2 Sisters 2 Cities

Image Map
  • About 2 Sisters 2 Cities
  • Recipe Index
  • Project Index
  • Contact Us
  • Like us on Facebook
  • Follow m on twitter
  • Follow k on twitter
  • Follow 2S2C on Pinterest
  • Follow 2S2C on G+
  • rss
  • e-mail 2S2C

Gingerbread Biscotti

Posted by Meaghan Barry on December 29, 2014

Gingerbread Biscotti

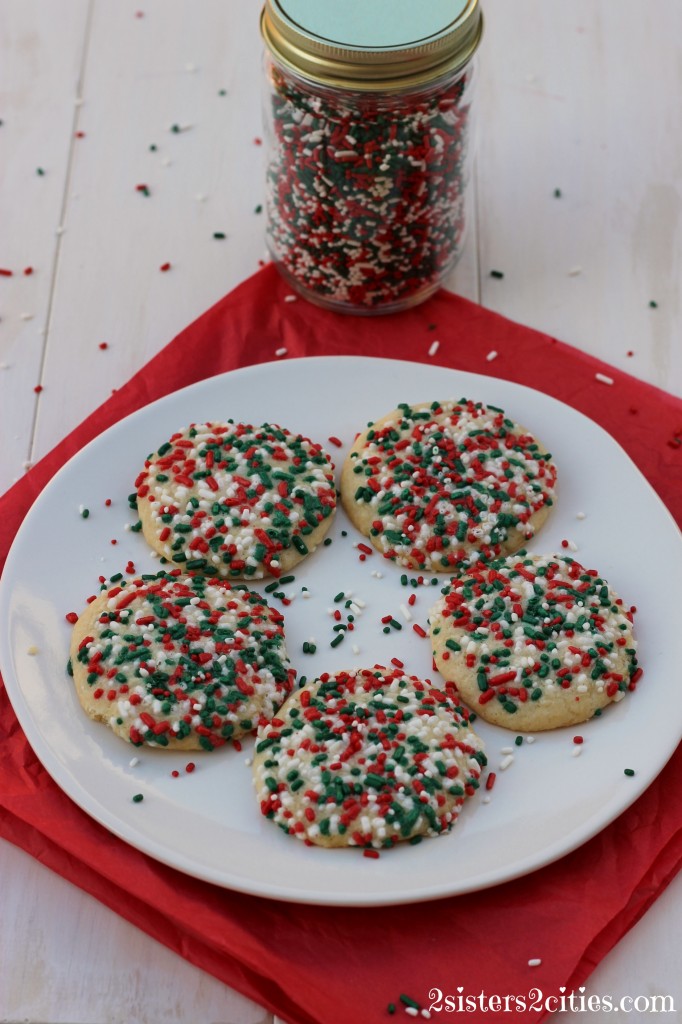
Happy holidays!  I hope everyone is having a relaxing holiday and getting some quality cooking and baking time in.  K and I had a strategic blog meeting earlier this month and we opted not to do our annual 12 Days of Christmas Cookies this year.  December is always such a busy month and we decided we would be able to enjoy our Christmas prep without all the self-imposed deadlines.  If you are still looking for some holiday baking inspiration, we have our archive of cookie recipes saved under the Christmas Cookies tag.

Gingerbread Latte

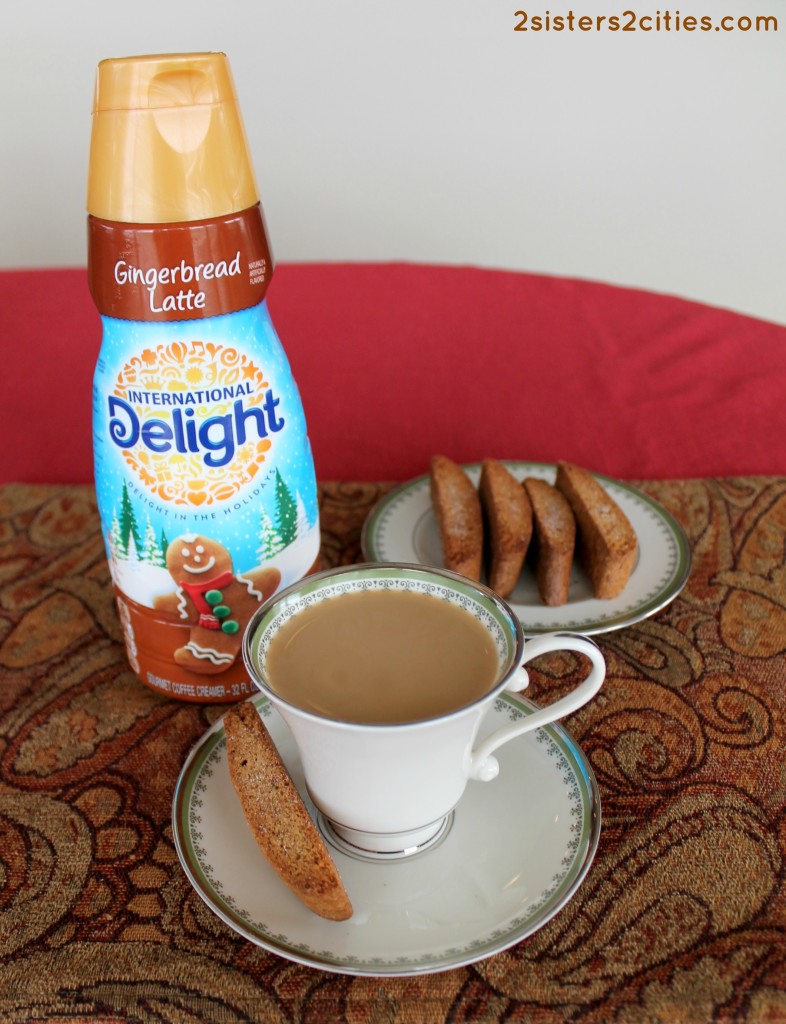
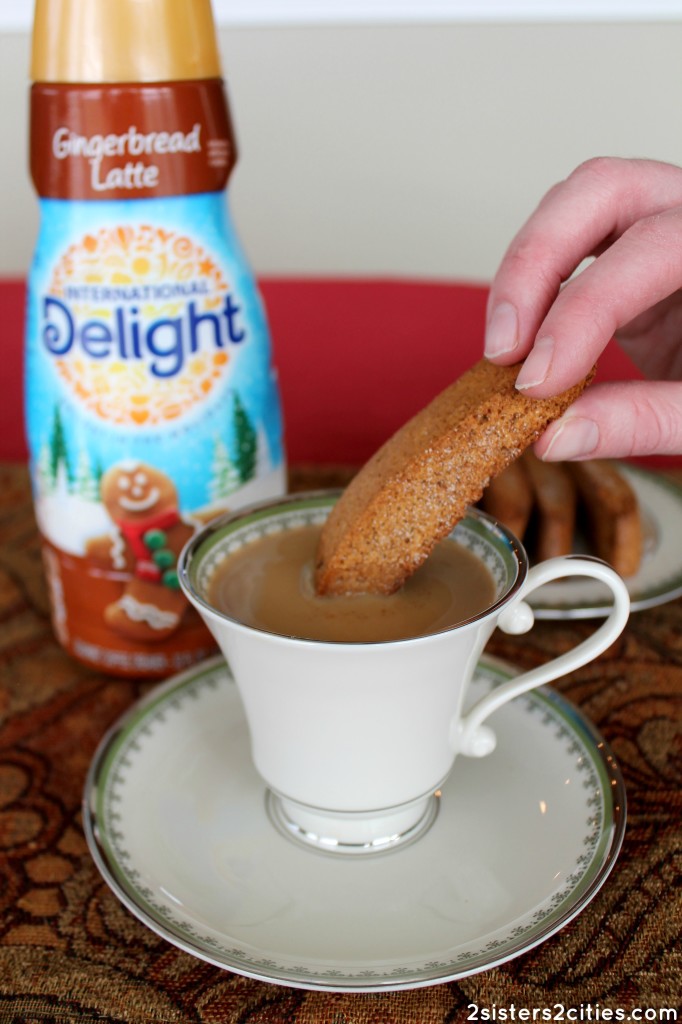
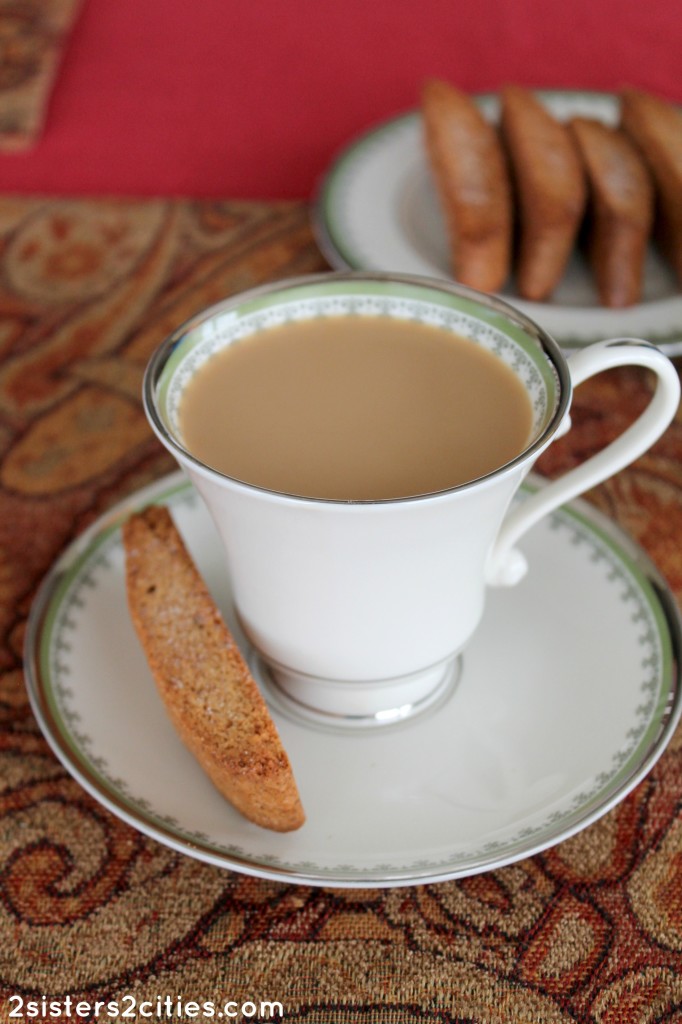
While we were together this year for Christmas at my parent’s home, K and I decided to make some Gingerbread Biscotti.  We knew it would be perfect holiday treat to go with our morning coffee.  We even used International Delight Gingerbread Latte creamer with our coffee to help meet our official holiday gingerbread quota! (Be sure to check out the the International Delight Member Delights’ program for coupons and giveaways.)

Our mom had found us this recipe for Gingerbread Biscotti and we had a lot of fun one afternoon baking together during T & N’s nap time one day.  We don’t often get an opportunity to make stuff together since we live on opposite sides of the country.  It’s also always a fun time writing up a blog post together- I do most of the writing and K focuses on the food styling and photography.

gingerbread biscotti 1

Print
Gingerbread Biscotti
Author: 2 Sisters 2 Cities
Cook time:  1 hour 30 mins
Total time:  1 hour 30 mins
Serves: 20-30 pieces
 
Ingredients
  • 2 cups, plus 2 tablespoons all-purpose flour, plus extra for flouring hands
  • 2 teaspoons baking powder
  • 2 teaspoons ground cinnamon
  • 2 teaspoons ground ginger
  • ⅛ teaspoon ground cloves
  • A few grates of nutmeg (or a pinch of ground nutmeg)
  • A pinch of black pepper
  • ½ teaspoon coarse sea salt
  • ½ cup dark brown sugar
  • ½ cup granulated sugar
  • 7 tablespoons unsalted butter, melted and cooled
  • 2 large eggs
  • 2 teaspoons vanilla extract
  • 1 large egg white
  • ⅓ cup granulated sugar
  • 1 tablespoon ground cinnamon
Instructions
  1. Preheat oven to 350°F. Line one large baking sheet with parchment paper or a silicone baking mat. In a large bowl, whisk together the flour, baking powder, spices, pepper and salt. In a separate medium bowl, whisk together the dark brown sugar, the granulated sugar, butter, eggs, and vanilla. Add the sugar and butter ingredients to the flour and spice mixture and stir to combine.
  2. Separate dough into two balls. Transfer first ball to the prepared baking sheet and form it into a slightly flattened log (approximately 11 inches by 2½ inches.) Repeat with second half of dough on the other side of the baking sheet. Meanwhile, whisk egg white in a small bowl until foamy. Brush the egg white over each log.
  3. Bake biscotti for 25 minutes or until it turns golden brown. Remove from oven and let cool on the baking sheet. Once the biscotti has cooled down, move each log to a cutting board. Use a serrated knife to cut the log on the diagonal into approximately ½" slices.
  4. Arrange slices (keeping a cut side down) on baking sheet. Bake for another 10 to 12 minutes. Turn each biscotti over and bake for another 6 to 8 minutes, until lightly golden all over. Transfer biscotti to a cooling rack.
3.2.2708

 Source: Slightly adapted from Smitten Kitchen

Enjoy your last few days of 2014 and happy new year 2015!

sister m signature


This is a sponsored conversation written by me on behalf of International Delight. The opinions and text are all mine.


Filed Under: M's Desserts, M's recipes Tagged With: 12 cookies of Christmas, biscotti, Christmas Cookies, coffee, cookie, gingerbread biscotti, gingerbread latte, holiday cookies, international delight, new year's, New Year's Eve, sponsored post

1 Roly-Poly Santa Cookies

Posted by Keelin Hollenbeck on December 24, 2013

Roly-Poly Santas

Here we are, our last cookie of the 2013 2 Sisters 2 Cities’ Cookie Countdown!   The last cookie is always the hardest to pick.  Since we photograph the number of cookies that correlate with the day of the countdown (if you haven’t noticed yet), having one cookie in a photo can be boring!   I knew that the last cookie had to be something special so when I saw these Roly-Poly Santa Cookies on Better Homes and Gardens’ website I was sold.  The funny thing is that  M and I both had these cookies on our 2013 cookie brainstorming list.

Roly-Poly Santa

Although these cookies are so cute, they are a little bit more labor-intensive than your average cookie.  I think this would be a great recipe to gift to kids.  I wanted to save one for my nephew T, but I knew they would never last in my luggage on the way home.

Roly-Poly Santas are made up with 11 red and white dough balls, then embellished with mini chocolate chips, red hots, and frosting.   I was worried that my red dye wouldn’t make a true red color.  I always get a bright pink when I try to make red frosting, but I’ve heard this happens to a lot of people.  From my research, I discovered that Americolor’s Super Red soft gel paste does the trick.  I was happy with the red color that my Santa cookies came out in and I did not taste any dye in them.

Print
Roly-Poly Santas
Author: 2 Sisters 2 Cities
Recipe type: cookies
 
Ingredients
For Cookies
  • 1 cup of butter, softened
  • ½ cup of sugar
  • 1 tablespoon of milk
  • 1 teaspoon of vanilla
  • 2¼ cups of all-purpose flour
  • Red paste food coloring
  • Miniature semisweet chocolate pieces
  • 1 recipe of Snow Frosting
  • Red cinnamon candies
White Frosting
  • ¼ cup of shortening
  • ¼ tsp. of vanilla
  • 1 cup plus 2 tbsp. of confectioners' sugar
  • 1½ tsp. of milk
Instructions
For Cookies:
  1. Preheat oven to 325 degrees F.
  2. In the bowl of your mixer, beat butter on medium speed for about 30 seconds. Add sugar to butter and continue to beat until combined.
  3. Beat in milk and vanilla, scraping down sides until all is combined.
  4. Next mix in as much of the flour as you can with the mixer. Stir in any remaining flour by hand. Remove 1 cup of the dough and place in a separate bowl . With the remaining dough, tint red with food coloring gel in mixer.
  5. For each Santa (this should make 10-12 cookies), shape red dough into twelve- 1-inch ball and sixty -1/2-inch balls(one 1-inch red dough ball, and five ½-inch red dough balls per Santa cookie.)
  6. Shape plain dough into twelve- ¾-inch ball and forty-eight- ¼-inch balls (one ¾-inch plain dough ball, and four-1/4 inch plain dough balls)
  7. Line 2 baking sheets with baking mat or parchment paper.
  8. Place the red 1-inch ball on a baking sheet, flattening the dough ball until about ½ inch thick. Attach the plain ¾-inch ball for head, flattening until ½ inch thick.
  9. Next, attach four of the red ½-inch balls for arms and legs and then attach the plain ¼-inch balls for hands and feet. Pinch the remaining ½-inch red ball into a Santa hat and attach to head.
  10. Repeat steps to create the rest of the Santas. Add the mini-chocolate chips as eyes and buttons.
  11. Bake Santa cookies for 12 to 15 minutes until edges are lightly browned.
  12. Let the cookies cool on baking sheet. Be careful because the are extremely fragile. Once cooled, gently move to a wire cooling rack.
  13. To create beard, put frosting in a piping bag with a small star tip (recipe below). Attach the red hot for the nose. Let sit until frosting sets.
For Frosting-
  1. In the bowl of you mixer, beat together shortening and vanilla for around 30 seconds. Gradually mix in around ½ cups of the confectioners' sugar until smooth. Next beat in 1½ tsp. milk. Continue to mix in remaining confectioners' sugar until the consistency for piping.
3.2.2199

Source- Slightly Adapted from BHG.com

sisterk (2)


Filed Under: K's Desserts, K's Recipes Tagged With: 12 cookies of Christmas, Christmas Cookies, cookie recipe, cookies, holiday baking, santa

2 Pecan Sandies

Posted by Keelin Hollenbeck on December 22, 2013

I know M and I have been saying this the whole time, but I cannot believe we are only three days away from Christmas.  All the cookies are made and we are so excited to share the the last two with you.  Today’s cookies are the Pecan Sandies, a delicious butter cookie with a hint of sweetness and a whole lot of pecans!  I actually picked out this recipe last February when I got the Bouchon Bakery cookbook.  When you know you have to make 12 new types of cookies in December, you definitely  need to plan ahead!

Pecan Sandies

This recipe closely resembles my family’s recipes for Mexican Wedding Cakes, the only difference is that these are made with pecans instead of walnuts, and the cookies are pressed down instead of just cooked in ball shape. I wouldn’t refuse either with a cup of tea or coffee…mmmmmmm.

2 Pecan Sandies

Print
2 Pecan Sandies
Author: 2 Sisters 2 Cities
Serves: 24-30
 
Ingredients
  • 1¾ cups plus 2 tsp. all purpose flour
  • ¾ cup coarsely chopped pecans
  • ¾ cup unsalted butter (1½ sticks)
  • ¾ cup plus 2 tbsp. confectioners' sugar, additional for sprinkling finished cookies
Instructions
  1. Preheat oven to 350 degrees F.
  2. In the bowl of your mixer, beat butter for 1-2 minutes until smooth. Add confectioners' sugar and mix together until light and fluffy.
  3. In a separate bowl combine pecans and flour.
  4. Mix dry ingredients into butter until combined, scraping down the side of the bowl to make sure all ingredients are incorporated.
  5. Roll dough into 1 to 1½ inch balls. Place dough balls at least 2 inches away from on a baking sheet lined with a silicone baking mat or parchment paper. Lightly flour the backside of a measuring cup, press dough ball into ½ inch thick disk.I
  6. Bake for 15-20 minutes until cookies are lightly golden on edges, rotating the baking sheet halfway through baking. Let cool on a wire rack and lightly sprinkle with additional confectioners' sugar.
3.2.2199

Source- Slightly adapted from Bouchon Bakery cookbook

sisterk (2)


Filed Under: K's Desserts, K's Recipes Tagged With: 12 days of christmas cookies, Christmas Cookies, cookies, holiday baking, holiday cookies, pecan sandies

3 Peanut Butter Reindeer Cookies

Posted by Meaghan Barry on December 19, 2013

Peanut Butter Reindeer Cookies {from 2 Sisters 2 Cities}

Today’s 12 Cookies of Christmas countdown post is brought to you by Kraft.

A Little Help For The Holidays From Kraft

Christmas is less than a week away and it’s time to get serious about Christmas preparations!  When I saw this Peanut Butter Reindeer Cookie idea on Pinterest, I knew I had to make these little guys.  These reindeer are so stinking cute and peanut butter cookies are a family favorite in our household.  They also reminded me of K’s Black Cat Cookies and I had fun making those for T this past Halloween.  Whether you are baking for kids or grown-ups, these reindeer cookies will be sure to bring a smile to their faces.

Peanut Butter Reindeer Cookies {from 2 Sisters 2 Cities}

I was able to save a little bit of money this holiday season by picking up some Planters Peanut Butter at Target.  Kraft is currently offering a number of coupons for exclusive use at Target to make your holiday entertaining a bit easier. ( Save up to $20 on participating Kraft products, only at Target.)  These Peanut Butter Reindeer Cookies will be the hit of your Christmas party!

Peanut Butter Reindeer Cookies {from 2 Sisters 2 Cities}

Save Print
Peanut Butter Reindeer Cookies
Author: 2 Sisters 2 Cities
Recipe type: cookie
Prep time:  50 mins
Cook time:  9 mins
Total time:  59 mins
Serves: 36
Ingredients
  • 1 stick unsalted butter, softened
  • ½ cup light brown sugar
  • ¼ cup sugar
  • 1 egg
  • ¾ cup Creamy Planters Peanut Butter
  • 1 teaspoon vanilla extract
  • ½ teaspoon baking soda
  • 1 and ¼ cup all-purpose flour.
  • ¼ teaspoon salt
  • chocolate-covered pretzels, cut in half (for the antlers)
  • mini brown M&Ms (for the eyes)
  • regular-sized red M&Ms (for the nose...you could also use brown M&Ms if you prefer non-Rudolph cookies!)
Instructions
  1. In the bowl of an electric mixer, cream together butter and sugar using the paddle attachment. Next, add in the peanut butter, egg, and vanilla and mix together until combined. In a separate mixing bowl, whisk together the baking soda, flour, and salt. Gradually add the flour mixture to the electric mixing bowl and mix until fully incorporated. Once all the flour mixture has been added, chill the dough in the refrigerator for about 30 minutes.
  2. Meanwhile, preheat the oven to 350 degrees Fahrenheit and prepare baking sheets with parchment paper. Once dough has chilled, use a mini ice cream scooper to scoop out small balls of dough. Place the ball of dough on the cookie sheet and gently flatten it with your hand. Bake for 8-9 minutes or until edges turn slightly golden.
  3. Remove cookies from oven and immediately add the chocolate-covered pretzels as antlers, two mini brown M&Ms for eyes, and red M&M for the mouth. Carefully transfer cookies to a wire rack to cool completely.
3.2.2199

Source: Reindeer Cookie idea from Bakergirl and Peanut Butter Cookie recipe slightly adapted from Sally’s Baking Addiction

Here’s the rest of our 2013 Cookie Countdown in case you have missed any!

4 Oatmeal Chocolate Mint Cookies
5 Sprinkle Cookies
6 Chocolate-Dipped Shortbread Cutouts
7 Chocolate Hazelnut Coins
8 Italian Lemon Drops
9 Chocolate Toffee Crackers
10 Cranberry Pistachio Shortbread Cookies
11 Christmas Snickerdoodles
12 Chocolate Raspberry Thumbprints

sister m signature


From shopping for gifts to planning family dinners, it’s hard to keep up with all your holiday to-do’s. This year, Kraft is helping out with great weeknight meals and entertaining ideas to make the season a little bit easier. Plus, Kraft is offering up to $20 in coupons, redeemable exclusively at Target, to make food shopping easier and to help you have a happy holiday season.

This is a sponsored conversation written by me on behalf of Kraft. The opinions and text are all mine.


Filed Under: M's Desserts, M's recipes Tagged With: 12 days of christmas cookies, chocolate chip cookie recipe, christmas, Christmas Cookies, cookie recipe, holiday baking, peanut butter cookies, planters peanut butter, reindeer cookies, sponsored post

5 Sprinkle Cookies

Posted by Keelin Hollenbeck on December 17, 2013

Sprinkle Cookies

Today we bring you 5 sprinkle cookies! Can you tell that I am in a sprinkle mood after cookie number 6?   I ended up buying two huge containers of sprinkles at the store when I ran out last weekend for the chocolate-dipped shortbread cookies.  During the week I had a very productive night: getting home, working out, and making dinner all before 8.  I decided to get ahead and make another batch of cookies for our cookie countdown.

I found a recipe for Italian Sprinkle cookies and since these happened to be my most favorite of the Italian variety, I knew I had to make them.  Better yet, this recipe was so easy to make!  The recipe has lemon zest in it which may seem weird to you.  My boyfriend was very skeptical about this addition but it adds a really great flavor to the cookies.  We ate so many of these cookies that I was lucky to have five cookies left to take a picture!

5 Sprinkle Cookies

Print
5 Sprinkle Cookies
 
Ingredients
  • 1½ cup all-purpose flour
  • 1½ tsp. baking powder
  • ½ tsp. kosher salt
  • 1½ sticks of unsalted butter (12 tbsp.), at room temperature
  • ¾ cup of granulated sugar
  • 2 tsp. vanilla extract
  • Zest of ½ of a lemon
  • 1 egg
  • 1 cup of sprinkles
  • 1 egg white, light beaten
Instructions
  1. In the bowl of your mixer, combine butter and sugar for about 2 minutes, until light and fluffy.
  2. Sir in vanilla, lemon zest, and egg into the butter mixture until smooth.
  3. In a separate medium-sized bowl whisk together flour, baking powder, and salt.
  4. Add dry ingredients to the butter, and mix until just combined.
  5. Line a baking sheet with silicone baking mat or parchment paper.
  6. Roll dough into 1" balls and place on baking sheet at least 2 inches away from each other.
  7. With the back side of clean measuring cup, dust lightly with flour and press down each cookie ball in disk. Continue to flour the bottom of the measuring cup as needed to prevent the dough from sticking
  8. Refrigerate the cookie disk for 30 minutes.
  9. Preheat the oven to 375 degree F.
  10. Place sprinkles in one bowl and egg white in another bowl.
  11. With a pastry brush, brush each cookie with egg white and then dip into sprinkles, pressing lightly to get sprinkles to adhere. Place each cookie back on baking sheet.
  12. Bake for about 10 minutes until each cookie is set.
  13. Let cool and serve! Keep in a airtight container for 3 days or freeze for up to 3 months,
3.2.2199

Source- Adapted from Saveur.com

Looking for more cookie recipes?  Check out our countdown so far:

6 Chocolate-Dipped Shortbread
7 Chocolate Hazelnut Coins
8 Italian Lemon Drops
9 Chocolate Toffee Crackers
10 Cranberry Pistachio Shortbread
11 Christmas Snickerdoodles
12 Chocolate Raspberry Thumbprints

sisterk (2)


Filed Under: K's Desserts, K's Recipes Tagged With: 12 days of christmas cookies, Christmas Cookies, cookie recipes, holiday baking, Italian cookies, sprinkles

7 Chocolate Hazelnut Coins

Posted by Keelin Hollenbeck on December 13, 2013

Chocolate Hazelnut Coins (from 2 Sisters 2 Cities)

Oh my gosh…I have been having the worst time following recipes lately!  I was making a cookie recipe earlier in the week and I could not figure out why the dough was so dry.  I re-read through the recipe and realized I forgot to add three eggs and two sticks of butter…think that could have been it?  Fortunately, the dough was still salvageable as I was still able to mix them in.

I had another mishap yesterday as I was trying to make these Chocolate Hazelnut Coins.  The cookies were all baked and I was drizzling the chocolate on.  I went to read the directions to figure out what point to garnish them with hazelnut and then I realized the hazelnuts were supposed to be baked into the cookie…oops!  I also burnt the the dark chocolate while I was melting it on the stovetop.  I used the microwave for my second attempt and it turned out much better.

I was going to scrap these and make them again today with the hazelnuts added to the dough this time, but everyone who has tried them so far really likes them with hazelnuts as the garnish.  You could also use walnuts in a pinch.

This recipe is a refrigerator cookie- you refrigerate the dough for an hour or so, slice them, and bake them.  If you are looking to get some cookies prepared ahead of time before Christmas, you could easily whip up this cookie dough and store it in the fridge until the 25th gets closer.  Or, you can bake them the same day and just freeze the finished cookies.  Or you could just eat them right away.

So, here is my recipe for Chocolate Hazelnut Coins in which hazelnuts serve as a lovely garnish.  If you are looking for a recipe where hazelnuts are incorporated into the cookie dough, check out the lovely source link below!

Chocolate Hazelnut Coins (from 2 Sisters 2 Cities)

Print
Chocolate Hazelnut Coins
Prep time:  1 hour 10 mins
Cook time:  6 mins
Total time:  1 hour 16 mins
 
Ingredients
  • 1 cup butter, softened
  • ½ cup sugar
  • ¼ teaspoon salt
  • 1 egg
  • 3 tablespoons unsweetened cocoa powder
  • 1 and ¾ cups all-purpose flour
  • ¼ cups finely chopped hazelnuts, lightly toasted
  • 6 ounces dark chocolate, chopped or dark chocolate chips (1-2 cups)
  • ½ teaspoon shortening
Instructions
  1. Add the butter to a bowl of an electric mixer. Using the paddle attachment, mix butter on medium speed for 30 seconds. Add sugar and salt and mix until thoroughly combined. Then, add in egg and cocoa powder. Use a spatula to clean off sides of bowl and continue to mix all ingredients until once again combined. Add in the flour in ½ cup increments and mix until incorporated.
  2. Lay out 2 large sheet of plastic wrap. Divide dough in half and place on top of each sheet of plastic wrap. Wrap the plastic wrap around dough and roll into an 11-inch log. Repeat for other half of dough. Refrigerate the two dough logs for 1 to 2 hours.
  3. Preheat the oven to 375 degrees Fahrenheit and prepare baking sheets with parchment paper. Cut the dough into thin slices (about ¼".) I was able to get about 25 cookies from each log, so there will be ~50 cookies in total. Bake for 6-8 minutes or until cookie tops are firm. Remove from oven and let cookies cool on a wire rack.
  4. Meanwhile, melt the chocolate and shortening together in the microwave in 30-second increments (I used a Pyrex glass.) Stir after each increment until melted. Place cooled cookies on wax paper and use a spoon to drizzle melted chocolate on top. Before chocolate hardens, sprinkle on chopped hazelnuts. Allow chocolate to set and then serve, store in an airtight container, or freeze.
3.2.2199

Source: Adapted from BHG.com

I’ve also shared my cornbread baking mishap…what holiday baking blunders have you ever made?

sister m signature


Filed Under: M's Desserts, M's recipes Tagged With: 12 days of christmas cookies, chocolate, chocolate cookies, Christmas Cookies, cookie recipes, hazelnut, holiday baking, recipe mishaps, refrigerator cookies

9 Chocolate Toffee Crackers

Posted by Meaghan Barry on December 10, 2013

Chocolate Toffee Crackers (from 2 Sisters 2 Cities)

I have seen this recipe for Chocolate Toffee Crackers so many times on Pinterest and I have been wanting to make it for such a long time.  It goes by a lot of different names- Christmas Crack, Chocolate Saltine Toffee, Sweet & Saltines, Saltine Toffee Candy, etc.  I knew I could not refer to this recipe as Christmas Crack as my son picks up on everything we say lately.  I really do not want a note from his nursery school asking why T made “crack” with his mother over the weekend.

{Side story: we made a joke about having raccoon and coyote steak this past summer while we were having a regular (cow) steak dinner.  T still requests raccoon and coyote steak to this day…it makes me snicker out loud when I think about him telling his teachers that his favorite meal consists of raccoon and coyote meat.}

Anywhoo…it’s a super easy recipe to make.  I once again attempted a cookie recipe while T & N were both awake.  I even made this one during the “witching hour”…basically anytime between 4:30-7:30pm in our house.  I let T add the nonpareil sprinkles to the top of the chocolate toffee crackers as they were cooling.  He was grabbing them by the fistful and throwing them on top.  We had a fun time making this recipe, but I tell you, my kitchen may never be the same after I brought out those nonpareil sprinkles.  I’m trying very hard this holiday season to let go of my need for everything to be clean all the time and to just have fun making memories with the kids!

Chocolate Toffee Crackers (from 2 Sisters 2 Cities)

Print
9 Chocolate Toffee Crackers
Prep time:  10 mins
Cook time:  4 mins
Total time:  14 mins
 
Ingredients
  • cooking spray
  • 40 saltine crackers
  • 1 cup unsalted butter
  • 1 cup light brown sugar
  • ½ teaspoon vanilla
  • 2 cups chocolate chips
  • nonpareil sprinkles or any other type of decorative candy (optional)
Instructions
  1. Preheat oven to 400 degrees Fahrenheit. Line a jelly roll pan with foil and spray it with cooking spray. Lay down a single layer of 40 saltines on the foil surface.
  2. Meanwhile, melt together the butter and brown sugar in a medium-sized sauce pan. Allow it to reach a boil, then lower the temperature and allow it to simmer for about 5 minutes. Stir the butter & sugar mixture occasionally and remove from the heat once it has thickened.
  3. Stir in the vanilla to the saucepan and pour the mixture over the crackers on the jelly pan. Use a spatula to spread the mixture over any crackers that are dry. Put in the oven and bake for 3-4 minutes, or until it gets bubbly. Remove pan from oven.
  4. Sprinkle chocolate chips over crackers evenly. Allow the chocolate chips to melt for a few minutes and use a spatula to smooth it out over the crackers. Then, sprinkle on nonpareil sprinkles or any other decorative candy (this step is optional). Place the pan in the fridge for 30-45 minutes or until chocolate is hard. Break up into pieces and serve. Store at room temperature in an airtight container.
3.2.2124

Source: Adapted from Trisha Yearwood and Averie Cooks

sister m signature


Filed Under: M's Desserts, M's recipes Tagged With: 12 days of christmas cookies, chocolate, chocolate chips, Christmas Cookies, cookie recipes, cookies, crackers, holiday baking, saltines, toffee

10 Cranberry Pistachio Shortbread Cookies

Posted by Keelin Hollenbeck on December 9, 2013

Cranberry Pistachio Shortbread

Today’s cookie is number ten on our cookie countdown: Cranberry Pistachio Shortbread cookies.  I was inspired to make these cookies by looking through my pantry to see what I had available to make for Christmas cookies this year. As you know, I love to bake so I already had many options before having to go out to buy ingredients. I had a bag of pistachios and dried cranberries sitting next to each other and the thought came to me of trying to find a recipe that contained both ingredients since they are natural Christmas colors. I then found a shortbread recipe that incorporated both ingredients and the results were just what I wanted.

These shortbread cookies were perfect, a light buttery cookies with punches of sweet cranberries and salty pistachios.  I brought the leftover cookies to work so I wouldn’t eat them all, and they were gone within an hour of putting them out.   Enjoy!

10 Cranberry Pistachio Shortbread

Print
10 Cranberry Pistachio Shortbread Cookies
 
Ingredients
  • 2⅓ cups all-purpose flour
  • ½ tsp. kosher salt
  • 1 cup unsalted butter (2 sticks), at room temperature
  • ⅔ cup granulated sugar
  • 1 tsp. vanilla extract
  • 1 cup unsalted pistachios, coarsely chopped
  • 1 cup dried cranberries, coarsely chopped
Instructions
  1. In the bowl of your mixer, beat the butter until smooth, about 1-2 minutes. Add sugar and continues to mix until smooth, about 3 minutes. Next beat in the vanilla extract.
  2. In a separate bowl whisk together flour and salt. Add flour mixture to butter until just incorporated. With a spatula, fold in the chopped pistachios and dried cranberries until evenly combined.
  3. Divide the dough in half and roll each dough half into 14 inch logs, so that the width is the same throughout . Wrap in parchment paper and twist the ends. Place in the refrigerator and chill for at least 2 hours but up to three days.
  4. Preheat oven to 325 degrees F. Line 2 baking sheets with parchment paper or silicone baking sheets.
  5. Using a sharp knife slice the logs into ¼ thick slices. Place cookies on baking sheet space at least 1½ inches away. Bake for 15-20 minutes until cookies just start to brown on edges. Let cool on wire rack. Store in an airtight container up to three days. Freeze cookies to keep them longer (up to 3 months.)
3.2.2124

Source- Adapted from The Grand Central Baking Book via JoyofBaking.com

sisterk (2)


Filed Under: K's Desserts, K's Recipes Tagged With: 12 days of christmas cookies, Christmas Cookies, cookies, cranberries, holiday baking, pistachios, shortbread

11 Christmas Snickerdoodles

Posted by Meaghan Barry on December 6, 2013

Christmas Snickerdoodles (from 2 Sisters 2 Cities)

For my first Christmas cookie recipe of the season, I decided to turn a traditional year-round cookie into a Christmas version of itself.  I used red and green sugar crystals in the recipe to turn these Snickerdoodles into Christmas Snickerdoodles!

This recipe was super simple and it was the perfect cookie recipe to make with a 3-year old and 5-month old.  After I formed a ball of cookie dough, I handed it to T and he would roll it in either the red or green sugar & cinnamon mixture, then place it on the pan.  We got a good laugh as Baby N sat in his Bumbo chair and kept trying to grab for the red cookies…you can have cookies soon baby!  I hope you have as much fun as I did making these Christmas Snickerdoodles this holiday season. (Just keep in mind that the dough needs to be refrigerated for one hour before baking- the perfect amount of time to grab a quick afternoon nap or watch a Christmas movie by the fire!)

Christmas Snickerdoodles (from 2 Sisters 2 Cities)

Print
11 Christmas Snickerdoodles
Prep time:  1 hour 30 mins
Cook time:  10 mins
Total time:  1 hour 40 mins
 
Turn this classic cookie recipe into a Christmas one by using green and red-colored sugars.
Ingredients
  • 1 cup butter, softened
  • 1 and ½ cups sugar
  • 1 teaspoon baking soda
  • 1 teaspoon cream of tartar
  • ¼ teaspoon salt
  • 2 eggs
  • 1 teaspoon vanilla
  • 3 cups all-purpose flour
  • 2 tablespoons red sanding sugar or sugar crystals
  • 2 tablespoons green sanding sugar or sugar crystals
  • 2 teaspoons ground cinnamon
Instructions
  1. Add the softened butter to a mixing bowl and use an electric mixer to beat butter on high for 30 seconds. Add the 1 and ½ cups sugar, baking soda, cream of tartar, and salt and mix until combined. Use a spatula to scrape the side of the mixing bowl if necessary. Turn off mixer and add in eggs and vanilla- mix for 30 more seconds until combined. Turn off mixer and add 1 cup of flour at a time, beating after each addition until flour is incorporated. Cover bowl with plastic wrap and chill for 1 hour or more.
  2. Preheat oven to 375 degrees F and prepare cookie sheets with parchment paper. Add the red sugar into a small bowl and the green sugar into a second small bowl. Add 1 teaspoon cinnamon into each bowl and mix. Shape dough into ~1 balls (you can make the balls smaller or larger based on how what size cookie you prefer. I ended up making 36 cookies from this batch of dough.)
  3. Roll balls in either the red or green sugar mixture until dough is coated. Place 2 inches apart on the parchment paper.
  4. Bake for 12-13 minutes or until bottoms are light brown. Transfer to wire racks and allow to cool.
3.2.2124

Source: BHG.com

sister m signature


Filed Under: M's Desserts, M's recipes Tagged With: 12 days of christmas cookies, baking, christmas, Christmas Cookies, cinnamon, cookie recipe, cookies, holiday baking, holiday cookies, snickerdoodles

12 Chocolate Raspberry Thumbprints

Posted by Keelin Hollenbeck on December 4, 2013

Chocolate Raspberry Thumbprints Cookies

Well, here we are again!  It’s the most wonderful time of year- the 2 Sisters 2 Cities 12 Days of  Christmas Cookie Countdown!  We are going to start this party with a delicious classic holiday cookie with a new twist:  a chocolate thumbprint cookies with raspberry jam and drizzled with bittersweet chocolate!

12 Chocolate Raspberry Thumbprints

This year with my holiday cookies, I am going for more classic types of holiday cookies. When I think of Christmas cookies I think of small special cookies embellished with icing, chocolate, powdered sugar, frosting, glaze, jam, nuts, peppermints, or sprinkles. The great part about Christmas cookies is that you can grab a bunch of different kinds and and you get to try all the amazing flavors. Obviously you know what my favorite time of the year is!

My boyfriend loves thumbprint cookies, but he is not a big chocolate cookie fan.  I was hesitant to make this recipe because I thought he wouldn’t like them.  Boy was I wrong, he loved them! The deep chocolate flavors are perfect with the sweet tart raspberry jam.  Add them to your Christmas cookie to-do list today!

Chocolate Raspberry Thumbprints

Print
12 Chocolate Raspberry Thumbprints
Author: 2 Sisters 2 Cities
 
Ingredients
  • 1 cup plus 2 tablespoons butter (2 sticks + 2 tbsp),at room temperature
  • ¾ cup granulated sugar
  • ⅓ cup cocoa powder
  • 2 cups all purpose flour
  • ½ tsp. salt
  • ½ tsp. baking soda
  • 1 tsp. baking powder
  • Raspberry jam
  • 2-3 tbsp. bittersweet chocolate chips
Instructions
  1. Preheat the oven to 350 degrees.
  2. In the bowl of a mixer add butter and sugar, mixing until smooth.
  3. Add in cocoa powder until combined
  4. In a separate bowl, whisk together flour, salt, baking soda, and baking powder.
  5. Gradually add the flour mixture to the butter mixture until all is combined
  6. Line a baking sheet with a silicone baking mat or parchment paper.
  7. Roll dough into 1-inch balls. Place on baking mat at least 2 inches away from each other.
  8. With the tip of your thumb, press down in the middle of the cookie ball to make a well (don't press down all the way.)
  9. Fill each thumbprint with around ½ tsp of jam
  10. Bake for 9-10 minutes
  11. Cookies will spread out a little so if you need more jam in the center add some more before they cool.
  12. For Drizzle- In a small heat proof bowl, add chocolate chips. Microwave in 20 second intervals, stirring in between until melted. To drizzle, take a spoon of melted chocolate, tip the spoon to get a small stream of chocolate going and move back and forth over the cookies so you get zig zags over the cookies.
3.2.2124

Source–  Base cookie recipe adapted from Pinch of Yum, addition of raspberry jam and chocolate drizzle is a 2S2C original

sisterk (2)

Related Posts Plugin for WordPress, Blogger...


Filed Under: K's Desserts, K's Recipes Tagged With: 12 days of christmas cookies, baking, chocolate, chocolate and raspberries, christmas, Christmas Cookies, cookie recipe, holiday baking, raspberries

  • 1
  • 2
  • 3
  • 4
  • Next Page »

Recent Posts

  • Easy Holiday Office Party Tips
  • 5 Steps to an Easy Football Party
  • Gingerbread Biscotti
  • Holiday Coffee Bar and Thanksgiving Recipes
  • Soft Sugar Pumpkin Cookies
  • Cinnamon Sugar Apple Cake
  • Hello Pumpkin Season!
  • Make Your Own Milkshake Party!
  • Mama’s Pickles
  • S’more Cookies

Categories

  • About 2 Sisters 2 Cities (7)
  • Books (8)
  • Crafting & DIY (22)
  • Design & Decorating (15)
  • Gardening (5)
  • Giveaway (14)
  • Guest Bloggers (8)
  • K's post (46)
  • K's Recipes (191)
    • K's Desserts (75)
    • K's Entrees (23)
    • K's Sides (24)
  • M's post (72)
  • M's recipes (167)
    • M's Entrees (21)
    • M's Sides (14)
    • M's Desserts (30)
  • Organizing (7)
  • Party Ideas (49)
  • Uncategorized (1)
  • Vacation (12)
Stitch Fix

Archives

Blogroll

  • Annie's Eats
  • Bake at 350
  • Baked Bree
  • Boston Harbor Beacon
  • Confections of a Foodie Bride
  • Cook Like a Champion
  • Erin’s Food Files
  • Forever and a Recipe
  • Framed Cooks
  • Oh Happy Day
  • On Common Ground
  • Pennies on a Platter
  • Pink Parsley
  • Recipe Girl
  • Sally's Baking Addiction
  • Simply Scratch
  • The Curvy Carrot
  • The Pioneer Woman
  • Tidy Mom
  • Two Peas & Their Pod
  • What’s Gaby Cooking
  • Young House Love
Increase your website traffic with Attracta.com

grab a 2 sisters button!


Copyright © 2014 ~ 2 Sisters 2 Cities | Blog Design by Minx Design