2 Sisters 2 Cities

Image Map
  • About 2 Sisters 2 Cities
  • Recipe Index
  • Project Index
  • Contact Us
  • Like us on Facebook
  • Follow m on twitter
  • Follow k on twitter
  • Follow 2S2C on Pinterest
  • Follow 2S2C on G+
  • rss
  • e-mail 2S2C

Homemade Candy

Posted by Keelin Hollenbeck on December 16, 2013

Slow Cooker Candy

Today we are taking a break from the cookie countdown, but we are still focusing on Christmas treats!  This year for my co-workers’ holiday gifts, I am giving mason jars filled with two kinds of homemade candy inside.   I have given my co-workers Christmas cookies in the past, but I decided to change it up this year.  I have been bringing the cookies into work right after I make them to give us a little break from being surrounded by Christmas cookies 24/7.  I love the idea of mason jars and how they can be used for some many things.  Leftovers, soups, vases, glasses, and gift packaging!  I purchased my jars at Target for around $8 for 12, but they also sell them on Amazon for $9.99 with Prime shipping if you can’t find them around where you live.

Slow Cooker Candies

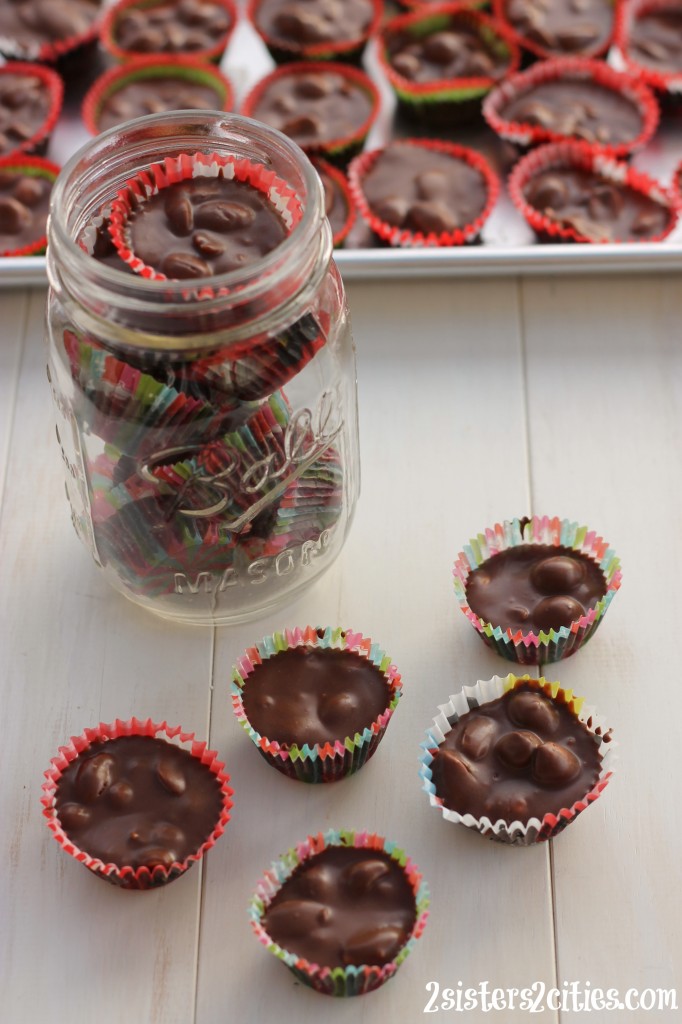
The first candy I made was one that I have been seeing all over Pinterest called “Crockpot Candy.”  This candy is made with a slow cooker.  It is really easy to make and is super addictive!  They are like a chocolate-covered nut cluster with a softer more tastier chocolate mixture.  I used mini cupcake liners to put the chocolate candies in instead of the regular sized liners called for in the original recipe.  I found Christmas cupcake liners at both Target and my grocery store.  The original recipe also asks for white almond bark, which they do not sell anywhere around here.   After googling some resolutions, I found out that you can use Candiquik vanilla melting chocolate in replacement of white almond bark.  I had seen this product at Target when I was looking for the bark.  If you can’t find either, just use white chocolate.

For a quicker hardening stage- stick your trays outside (if it’s cold out).  It has been record breaking cold over hear in the Bay Area, which would be regular cold everywhere else, but its considered cold here.  I know what M is thinking now- we grew up with Syracuse winters… toughen up K!  Right M?

Print
Slow Cooker Candies
Author: 2 Sisters 2 Cities
Recipe type: Candy
Prep time:  20 mins
Cook time:  2 hours 30 mins
Total time:  2 hours 50 mins
Serves: 50-60 candies
 
Ingredients
  • 1 pound dry-roasted salted peanuts
  • 2 oz. German Chocolate, broken into squares
  • 1 cup Semi-sweet chocolate
  • 1¼ pounds Candiquik vanilla melting chocolate, broken into squares
Instructions
  1. In your slow cooker add peanuts followed by German sweet chocolate, semi-sweet chocolate chips and then topped with the candiquik vanilla melting chocolate.
  2. Cover slow cooker and turn on low. Cook untouched for 2½ hours.
  3. While the chocolate is heating, line a baking sheet with mini cupcake liners. You will need about 50-60 liners.
  4. After 2½ hour cooking time, stir the chocolate until all combined. Keep the heat on low while dividing.
  5. Using a teaspoon or a small cookie scoop, scoop candy mixture into each liner. Half way through filling. Tap tray against counter to force the chocolate to settle into the liners. Repeat when finished filling the remainder of liners.
  6. Let candies cool complete before eating. Keep in an air tight container.
3.2.2199

Source- Adapted from Home Cooking with Trisha Yearwood via foodnetwork.com

Peanut Brittle

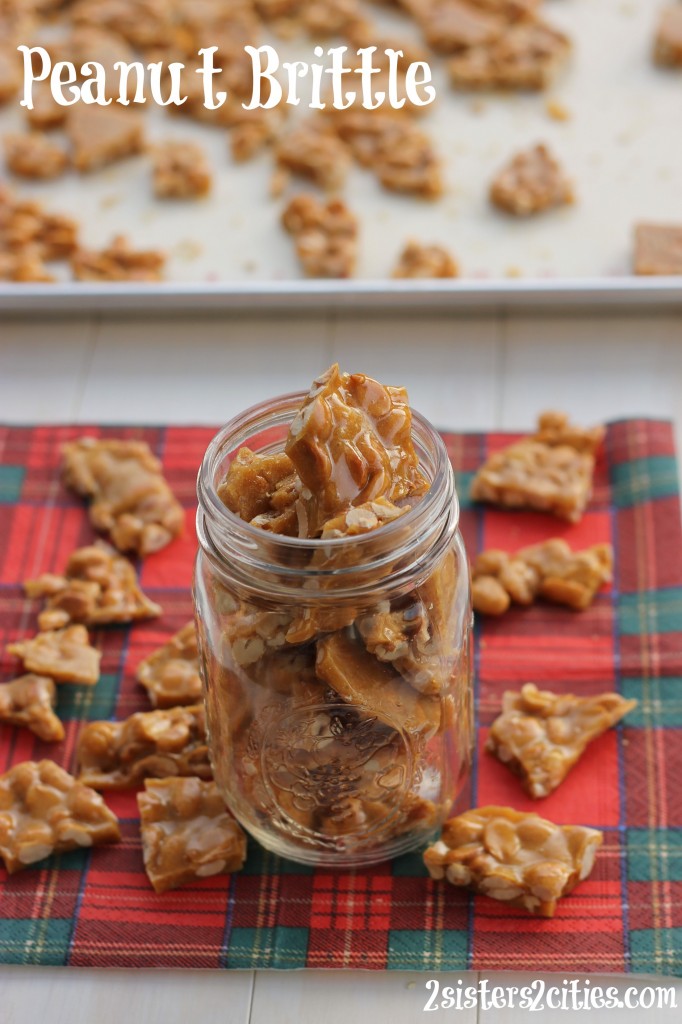
The second type of candy I am packaging this year is my all time favorite holiday candy, Peanut Brittle.  My mom made this recipe growing up and I am such a huge fan.  I had posted this recipe when we first started this blog, but I didn’t have any photos of it and it is pretty buried in our history.  The key to this recipe is finding raw, blanched peanuts.  This, my friends, is not an easy task.  I have been searching for raw blanched peanuts for the last four years!  Wegmans used to carry then and Whole Foods has them occasionally,  but I haven’t seen them in either for awhile.  You can buy these on-line for sure, I just never got to ordering them ahead of time.  This year while  getting my produce at a store called Sprouts, I found the peanuts in the bulk nut section!   I couldn’t believe it!  I quickly filled a bag with the peanuts and knew I had to make my favorite peanut brittle again.

Print
Peanut Brittle
Author: 2 Sisters 2 Cities
 
Ingredients
  • 1 cup sugar
  • 1 cup light corn syrup
  • 2 cups raw blanched peanuts
  • 1 tsp. Baking Soda
  • 1 tsp. vanilla extract
Instructions
  1. Prepare a cookie sheet by spraying with cooking spray and set aside. Also spray a heat resistant rubber spatula or regular spatula with spray; it will come in handy when spreading the sticky mixture.
  2. In a sauce pan over medium-high heat, stir together sugar and light corn syrup.
  3. Once melted together, add in raw peanuts. Stir constantly for 12-15 minutes, until peanuts start to turn brown (often the signal that it’s ready is a puff of smoke, but I am yet to see this puff.)
  4. Stir in vanilla extract and baking soda quickly before the candy starts to harden.
  5. Once all the ingredients are completely stirred together, pour mixture onto greased baking sheet, using greased spatula to spread it out. Spread candy out as far as you can without making holes so that there is a single layer of peanuts.
  6. After this is spread, leave for about 1 or 2 hours until completely hardened then break into small pieces. Store in an airtight container.
3.2.2199

Source- A 2s2c original
sisterk (2)


P.S. Looking for more holiday edible gift ideas besides homemade candy?  Try our homemade hot chocolate mix!

Homemade Hot Chocolate Mix


Filed Under: K's Desserts, K's Recipes Tagged With: candy, christmas gift ideas, crockpot candies, diy christmas project, DIY gifts, edible stocking stuffers, homemade candy, Peanut Brittle, stocking stuffers

6 Chocolate-Dipped Shortbread Cutouts

Posted by Keelin Hollenbeck on December 14, 2013

Chocolate Dipped Shortbread Cutouts

On the sixth day of Christmas cookies my true love gave to me… 6 chocolate-dipped shortbread cutouts!   Aww, thanks!  I love love this recipe for shortbread.  It is one of my favorite cookies.  I feel like I say that a lot, but what can I say, I love me some cookies.  My boyfriend and I make them year-round in different shapes based on the season.  He will make the dough and put it in the refrigerator, and do the dishes, and then I will roll it out, cut them out, bake them and dip them in chocolate.   When I am feeling festive, I add sprinkles!  I love the longer “jimmie” sprinkles rather than the nonpareil sprinkles.

Chocolate Dipped Shortbread Cutouts

I happened to only have the later when I was making these cookies so I ran out the grocery store to get some  more.  I later discovered that I also had no confectioners’ sugar left to make my next cookie!  Don’t you hate when that happens!  I had every type of sugar – granulated, light brown, dark brown, and even superfine!  I had to change my next cookie recipe up because I was not about to go back to the store.  Sprinkles and chocolate are optional and if this recipe looks familiar to you, it’s just a variation of the recipe I use for linzer cookies.

Chocolate Dipped Shortbread Cookies

These cookies are great to come home to after a long day of last-minute shopping.  Not to toot my own horn, but I don’t have any last minute shopping to do because I bought everything on-line last week…Toot TOOT!  I do have some serious baking to do this weekend though!
Chocolate Dipped Shortbread Cutouts
Print
6 Chocolate Dipped Shortbread Cutouts
 
Ingredients
  • 1½ cups of Butter (3 sticks), at room temperature
  • 1 cup granulated sugar
  • 1 teaspoon vanilla extract
  • 3½ cups AP flour
  • ¼ teaspoon salt
  • 2 cups bittersweet or semi-sweet chocolate chips
  • 1 cup sprinkles (optional)
Instructions
  1. In the bowl of a mixer, add in butter and sugar and mix until combined (using the paddle attachment.) Mix in vanilla extract.
  2. In a separate bowl whisk together flour and salt.
  3. With mixer on low, add the dry ingredients into the butter and mix until combined.
  4. Take dough out on to a floured surface and form into a disk. Wrap in plastic wrap and place in the refrigerator for 30 minutes.
  5. Preheat oven to 350 degrees F.
  6. On a floured surface, roll out dough with a rolling pin to ¼-1/2 inch thickness.
  7. Using a 3 inch cookie cutter, cut out shapes and place them on a silicone baking mat or parchment paper lined baking sheet. Space cookies at least 2 inches away from one another.
  8. Bake for 15-20 minutes until cookies start to brown on edges.
  9. To melt chocolate-- In a microwave safe bowl place chocolate chips. On a 50% power setting on the microwave heat the chocolate for 1-1½ minutes. Stir chocolate then continue to heat until melted in 20 seconds intervals until completely smooth or melted.
  10. Dip cookies in melted chocolate, using a off-set spatula to scrape the chocolate off the bottom of the cookie. Lie on parchment paper. Add sprinkles immediately before chocolate starts to dried. Repeat for all cookies. Let dry before repacking cookies. Eat within three days or freeze.
  11. *I would recommend higher quality chocolate chips for this process because although I am a huge fan of Nestle chips and Costco chips in cookies, they have added more wax in their chips in the last few years and they do not melt as smoothly. I used Ghiradelli Bittersweet Chocolate chips and they melted perfectly. For smoother chocolate you can even used baking bars of chocolate which have even less wax in them resulting in smoother chocolate.
3.2.2199
sisterk (2)


Filed Under: K's Desserts, K's Recipes Tagged With: 12 days of christmas cookies, chocolate, chocolate dipped cookies, christmas cookie, cookie recipe, cookies, holiday baking, shortbread, sprinkles

7 Chocolate Hazelnut Coins

Posted by Keelin Hollenbeck on December 13, 2013

Chocolate Hazelnut Coins (from 2 Sisters 2 Cities)

Oh my gosh…I have been having the worst time following recipes lately!  I was making a cookie recipe earlier in the week and I could not figure out why the dough was so dry.  I re-read through the recipe and realized I forgot to add three eggs and two sticks of butter…think that could have been it?  Fortunately, the dough was still salvageable as I was still able to mix them in.

I had another mishap yesterday as I was trying to make these Chocolate Hazelnut Coins.  The cookies were all baked and I was drizzling the chocolate on.  I went to read the directions to figure out what point to garnish them with hazelnut and then I realized the hazelnuts were supposed to be baked into the cookie…oops!  I also burnt the the dark chocolate while I was melting it on the stovetop.  I used the microwave for my second attempt and it turned out much better.

I was going to scrap these and make them again today with the hazelnuts added to the dough this time, but everyone who has tried them so far really likes them with hazelnuts as the garnish.  You could also use walnuts in a pinch.

This recipe is a refrigerator cookie- you refrigerate the dough for an hour or so, slice them, and bake them.  If you are looking to get some cookies prepared ahead of time before Christmas, you could easily whip up this cookie dough and store it in the fridge until the 25th gets closer.  Or, you can bake them the same day and just freeze the finished cookies.  Or you could just eat them right away.

So, here is my recipe for Chocolate Hazelnut Coins in which hazelnuts serve as a lovely garnish.  If you are looking for a recipe where hazelnuts are incorporated into the cookie dough, check out the lovely source link below!

Chocolate Hazelnut Coins (from 2 Sisters 2 Cities)

Print
Chocolate Hazelnut Coins
Prep time:  1 hour 10 mins
Cook time:  6 mins
Total time:  1 hour 16 mins
 
Ingredients
  • 1 cup butter, softened
  • ½ cup sugar
  • ¼ teaspoon salt
  • 1 egg
  • 3 tablespoons unsweetened cocoa powder
  • 1 and ¾ cups all-purpose flour
  • ¼ cups finely chopped hazelnuts, lightly toasted
  • 6 ounces dark chocolate, chopped or dark chocolate chips (1-2 cups)
  • ½ teaspoon shortening
Instructions
  1. Add the butter to a bowl of an electric mixer. Using the paddle attachment, mix butter on medium speed for 30 seconds. Add sugar and salt and mix until thoroughly combined. Then, add in egg and cocoa powder. Use a spatula to clean off sides of bowl and continue to mix all ingredients until once again combined. Add in the flour in ½ cup increments and mix until incorporated.
  2. Lay out 2 large sheet of plastic wrap. Divide dough in half and place on top of each sheet of plastic wrap. Wrap the plastic wrap around dough and roll into an 11-inch log. Repeat for other half of dough. Refrigerate the two dough logs for 1 to 2 hours.
  3. Preheat the oven to 375 degrees Fahrenheit and prepare baking sheets with parchment paper. Cut the dough into thin slices (about ¼".) I was able to get about 25 cookies from each log, so there will be ~50 cookies in total. Bake for 6-8 minutes or until cookie tops are firm. Remove from oven and let cookies cool on a wire rack.
  4. Meanwhile, melt the chocolate and shortening together in the microwave in 30-second increments (I used a Pyrex glass.) Stir after each increment until melted. Place cooled cookies on wax paper and use a spoon to drizzle melted chocolate on top. Before chocolate hardens, sprinkle on chopped hazelnuts. Allow chocolate to set and then serve, store in an airtight container, or freeze.
3.2.2199

Source: Adapted from BHG.com

I’ve also shared my cornbread baking mishap…what holiday baking blunders have you ever made?

sister m signature


Filed Under: M's Desserts, M's recipes Tagged With: 12 days of christmas cookies, chocolate, chocolate cookies, Christmas Cookies, cookie recipes, hazelnut, holiday baking, recipe mishaps, refrigerator cookies

8 Italian Lemon Drops

Posted by Keelin Hollenbeck on December 11, 2013

Italian Lemon Drops

As I have told you all before, I have a crazy food memory in which I can practically remember everything I have eaten at most events in my life.   Can I remember a phone number or where my keys are…uhhh nope!  It’s funny how selective memories can be, but I guess it shows my love for all things food.

Where were we?  Oh right, when I think of Christmas as a child, all the cookies my mom made around the holiday time come to mind.  I can remember the peanut brittle, the chocolate crinkles, the peanut butter cup blossoms, the Mexican wedding cakes, the cut-out cookies, the buckeyes and endless more.  As I grew up and learned how to bake, I started taking on more baking around the holidays and emulated the same tradition my mom had in my own place.  The whole Christmas cookie process of planning, sharing, giving and of course, eating has become quiet an obsession of mine and really how our 12 Days of Christmas Cookies started here at 2s2c.

Italian Lemon Drops

I have shared most of the above recipes that I remember growing up with, but there was one cookie missing that I couldn’t put my finger on.  I kept remembering a round puffy lemon cookie with lemon glaze.   It was driving me crazy that I couldn’t find the recipe in any of my family cookbooks.  When I asked my mom, she remembered where it was from: a school fundraiser cookbook she had bought over 30 years ago.  Alas, here is how we came to cookie number eight on this year’s countdown- the Italian Lemon Drop cookie (i.e. the Lemon Anginetti.)  I have updated some of the ingredients to more modern ones since the original recipe included melted Crisco and 3 tablespoons of lemon extract!

Print
Italian Lemon Drops
Author: 2 Sisters 2 Cities
 
Ingredients
Cookie-
  • ½ cup unsalted butter, melted
  • Zest from one lemon
  • ¾ cup sugar
  • 2 eggs
  • pinch of salt
  • 3½ cups all-purpose flour
  • 7 tsp baking powder
  • ⅔ cup whole milk
  • 2 tsp. lemon extract
  • ½ tsp. vanilla extract
Glaze-
  • 1 lemon, juiced
  • 1-1 ½ cups confectioners’ sugar
Instructions
  1. Preheat oven to 350 degrees F.
  2. In the bowl of your mixer add sugar and lemon zest. Mix for 1-2 minutes to infuse the sugar with the lemon flavor.
  3. Add melted butter to lemon sugar and combine. Mix in eggs and salt.
  4. In a separate bowl sift together flour and baking powder.
  5. In measuring cup mix together milk, lemon extract and vanilla extract.
  6. Mix in ⅓ of flour mixture to butter followed by ⅓ of milk mixture. Repeat process ending with milk and stirring until all ingredients are combined.
  7. Line baking sheets with non-stick baking mats or parchment paper. Roll dough in balls the size of walnuts. The dough may be sticky so make sure your hands are well floured. Leave about 2 inches between each cookie.
  8. Bake for 10-12 minutes until cookies are firm to touch. Let cool on wire rack.
  9. To make glaze- whisk together 1 cup of confectioners’ sugar and 1-2 tablespoons of lemon juice. Continue to whisk until smooth, adding more lemon juice as needed. If glaze gets too thin add additional confectioners’ sugar. Dip each cookie top in glaze and let excess drip back into bowl. Place on parchment paper and let dry completely before putting away. Can be store in air tight container for up to three days or frozen up to 3 months.
3.2.2199

sisterk (2)


Filed Under: K's Desserts, K's Recipes Tagged With: 12 days of christmas cookies, cookie recipe, cookies, holiday baking, lemon, lemon cookies

10 Cranberry Pistachio Shortbread Cookies

Posted by Keelin Hollenbeck on December 9, 2013

Cranberry Pistachio Shortbread

Today’s cookie is number ten on our cookie countdown: Cranberry Pistachio Shortbread cookies.  I was inspired to make these cookies by looking through my pantry to see what I had available to make for Christmas cookies this year. As you know, I love to bake so I already had many options before having to go out to buy ingredients. I had a bag of pistachios and dried cranberries sitting next to each other and the thought came to me of trying to find a recipe that contained both ingredients since they are natural Christmas colors. I then found a shortbread recipe that incorporated both ingredients and the results were just what I wanted.

These shortbread cookies were perfect, a light buttery cookies with punches of sweet cranberries and salty pistachios.  I brought the leftover cookies to work so I wouldn’t eat them all, and they were gone within an hour of putting them out.   Enjoy!

10 Cranberry Pistachio Shortbread

Print
10 Cranberry Pistachio Shortbread Cookies
 
Ingredients
  • 2⅓ cups all-purpose flour
  • ½ tsp. kosher salt
  • 1 cup unsalted butter (2 sticks), at room temperature
  • ⅔ cup granulated sugar
  • 1 tsp. vanilla extract
  • 1 cup unsalted pistachios, coarsely chopped
  • 1 cup dried cranberries, coarsely chopped
Instructions
  1. In the bowl of your mixer, beat the butter until smooth, about 1-2 minutes. Add sugar and continues to mix until smooth, about 3 minutes. Next beat in the vanilla extract.
  2. In a separate bowl whisk together flour and salt. Add flour mixture to butter until just incorporated. With a spatula, fold in the chopped pistachios and dried cranberries until evenly combined.
  3. Divide the dough in half and roll each dough half into 14 inch logs, so that the width is the same throughout . Wrap in parchment paper and twist the ends. Place in the refrigerator and chill for at least 2 hours but up to three days.
  4. Preheat oven to 325 degrees F. Line 2 baking sheets with parchment paper or silicone baking sheets.
  5. Using a sharp knife slice the logs into ¼ thick slices. Place cookies on baking sheet space at least 1½ inches away. Bake for 15-20 minutes until cookies just start to brown on edges. Let cool on wire rack. Store in an airtight container up to three days. Freeze cookies to keep them longer (up to 3 months.)
3.2.2124

Source- Adapted from The Grand Central Baking Book via JoyofBaking.com

sisterk (2)


Filed Under: K's Desserts, K's Recipes Tagged With: 12 days of christmas cookies, Christmas Cookies, cookies, cranberries, holiday baking, pistachios, shortbread

12 Chocolate Raspberry Thumbprints

Posted by Keelin Hollenbeck on December 4, 2013

Chocolate Raspberry Thumbprints Cookies

Well, here we are again!  It’s the most wonderful time of year- the 2 Sisters 2 Cities 12 Days of  Christmas Cookie Countdown!  We are going to start this party with a delicious classic holiday cookie with a new twist:  a chocolate thumbprint cookies with raspberry jam and drizzled with bittersweet chocolate!

12 Chocolate Raspberry Thumbprints

This year with my holiday cookies, I am going for more classic types of holiday cookies. When I think of Christmas cookies I think of small special cookies embellished with icing, chocolate, powdered sugar, frosting, glaze, jam, nuts, peppermints, or sprinkles. The great part about Christmas cookies is that you can grab a bunch of different kinds and and you get to try all the amazing flavors. Obviously you know what my favorite time of the year is!

My boyfriend loves thumbprint cookies, but he is not a big chocolate cookie fan.  I was hesitant to make this recipe because I thought he wouldn’t like them.  Boy was I wrong, he loved them! The deep chocolate flavors are perfect with the sweet tart raspberry jam.  Add them to your Christmas cookie to-do list today!

Chocolate Raspberry Thumbprints

Print
12 Chocolate Raspberry Thumbprints
Author: 2 Sisters 2 Cities
 
Ingredients
  • 1 cup plus 2 tablespoons butter (2 sticks + 2 tbsp),at room temperature
  • ¾ cup granulated sugar
  • ⅓ cup cocoa powder
  • 2 cups all purpose flour
  • ½ tsp. salt
  • ½ tsp. baking soda
  • 1 tsp. baking powder
  • Raspberry jam
  • 2-3 tbsp. bittersweet chocolate chips
Instructions
  1. Preheat the oven to 350 degrees.
  2. In the bowl of a mixer add butter and sugar, mixing until smooth.
  3. Add in cocoa powder until combined
  4. In a separate bowl, whisk together flour, salt, baking soda, and baking powder.
  5. Gradually add the flour mixture to the butter mixture until all is combined
  6. Line a baking sheet with a silicone baking mat or parchment paper.
  7. Roll dough into 1-inch balls. Place on baking mat at least 2 inches away from each other.
  8. With the tip of your thumb, press down in the middle of the cookie ball to make a well (don't press down all the way.)
  9. Fill each thumbprint with around ½ tsp of jam
  10. Bake for 9-10 minutes
  11. Cookies will spread out a little so if you need more jam in the center add some more before they cool.
  12. For Drizzle- In a small heat proof bowl, add chocolate chips. Microwave in 20 second intervals, stirring in between until melted. To drizzle, take a spoon of melted chocolate, tip the spoon to get a small stream of chocolate going and move back and forth over the cookies so you get zig zags over the cookies.
3.2.2124

Source–  Base cookie recipe adapted from Pinch of Yum, addition of raspberry jam and chocolate drizzle is a 2S2C original

sisterk (2)


Filed Under: K's Desserts, K's Recipes Tagged With: 12 days of christmas cookies, baking, chocolate, chocolate and raspberries, christmas, Christmas Cookies, cookie recipe, holiday baking, raspberries

Sweet Potato Casserole

Posted by Keelin Hollenbeck on November 27, 2013

Sweet PotatoYam Casserole

Speaking of classic Thanksgiving recipes, this is the classic baked sweet potatoes or yam casserole recipe.  I know there are a lot of new moderns versions of this side, but I love this original marshmallow-covered one too much to give it up.  When we were younger my mom made the mistake of trying to update the sweet potato recipe to a more modern version which was topped with candied walnuts or pecans.  I am sure it would have been delicious, but my sisters and I threw such a fuss that she ended up having to put marshmallows on half.

What can I say?  To me it wouldn’t be Thanksgiving without marshmallow-covered candied yams/ sweet potatoes or canned jelled cranberry sauce (sliced at the can ring lines…. Not mashed up!) I call this sweet potatoes, but really I use yams because they are cheaper.  Preparing this dish is so easy, you will never use yams out of a can again!

Yams!

Print
Sweet Potato Casserole
Author: 2 Sisters 2 Cities
 
Ingredients
  • 2-3 pounds of yams or sweet potatoes
  • ¼ cup brown sugar
  • ¼ cup butter, melted
  • 2 tbsp. maple syrup
  • 2-3 cups marshmallows
Instructions
  1. Peel and cut sweet potatoes up into 1-1/2 inch pieces. Place in a large pot and cover with water. Bring to a boil and cook for about 10-12 minutes until sweets potatoes are tender.
  2. Drain sweet potatoes
  3. In a large bowl add cooked sweet potatoes, butter, maple syrup, and brown sugar. Mix together until combined and smooth.
  4. Spread out sweet potatoes in casserole dish. Bake for 20-25 minutes at 375 degrees until sides are bubbling. Add marshmallows on the top during the last 5 minutes. To get the toasted marshmallow effect, turn broiler on for the last 2 minutes. Be careful because they can burn easily!
  5. These yams can be made ahead, up until the baking step and then refrigerated or frozen. You will need to add extra time to the baking to make sure they heat thoroughly.
3.2.2124

Baked Yams with Marshmallows
sisterk (2)


Filed Under: K's Sides, K's Recipes Tagged With: candied yams, holiday, side dish, sides, sweet, sweet potato, Thanksgiving, thanksgiving menu, thanksgiving recipe, yams

Grandma’s Sweet Refrigerator Rolls

Posted by Keelin Hollenbeck on November 25, 2013

Sweet Refrigerator Rolls

What is Thanksgiving without homemade rolls?  This recipe is from our family cookbook that my aunt put together for everyone many, many years ago.  We are actually on our second edition and I use both cookbooks in my kitchen all of the time.  It’s great to have all my favorite family recipes in one place.  This recipe for sweet rolls is really special to me and M, it is our Grandma’s recipe for rolls that she made for Thanksgiving each year. We lost our grandma a few years ago, but we still have her recipes and family tradition that lives on.

These rolls not only have a place in our heart, but they are really tasty!  Their sweet taste goes perfectly with a small amount of butter and of course a thanksgiving dinner.   Make these rolls for your holiday meal this year!

These rolls can be frozen or the dough can be made the day before and then rolled and baked an hour before dinner (if you have extra oven space.)  I made these rolls over the weekend and froze them for my work Thanksgiving lunch Friday.  We are all about making things ahead here around here!  In the past when I was only cooking for four people, I cut the recipe in half and it turned out great.

Homemade Rolls Rising

The rolls rising for 30 minutes before baking (plus my mixer in the background, isn’t she so pretty?)

Sweet Rolls

Mmmm rolls…..

Print
Grandma's Sweet Refrigerator Rolls
Author: 2 Sisters 2 Cities
Serves: 30-36 rolls
 
Ingredients
  • ¾ cup butter
  • 1 cup boiling water
  • ⅓ cup sugar
  • 4½ tsp. active dry yeast
  • 1 cup luke warm water
  • 2 eggs
  • ⅓ cup sugar
  • 6 cups flour
  • 2 tsp. salt
Instructions
  1. Combine butter and 1 cup of boiling water. Stir until butter is melted.
  2. In the bowl of your mixer with paddle attachment add ⅓ cup of sugar, yeast, and 1 cup luke warm water. Combine on low.
  3. Once the butter reaches room temperature, add into yeast mixture and mix until combined.
  4. Add in eggs and another ⅓ cup of sugar, mix well.
  5. Next add in flour and salt. Combine completely.
  6. Cover bowl with plastic wrap and place in the refrigerator for at least 4 hours or overnight. If leaving overnight, punch the dough down before you go to bed so it doesn’t overflow in your fridge.
  7. One hour before dinner, turn dough out on a floured surface. The dough will be sticky so make sure your hands and surface are well floured.
  8. Preheat the oven to 400 degrees F. Form dough 30-36 rolls evenly sized. Place rolls 1-inch apart on a silicone mat lined baking sheet, you may need 2 baking sheets.
  9. Allow to rise for 30 minutes, then bake for 10-12 minutes. For best results cook each baking sheets one at a time.
  10. Serve immediately or store in an airtight container once cooled. Rolls can be frozen for up to 2 months.
3.2.2124

Source-  Adapted from Grandma H’s original recipe
sisterk (2)


Filed Under: K's Sides, K's post Tagged With: Bread, family recipe, grandma's sweet rolls, rolls, Sweet Refrigerator rolls, Sweet rolls, Thanksgiving, thanksgiving sides

Homemade Apple Sauce

Posted by Keelin Hollenbeck on November 21, 2013

Homemade Apple Sauce
Oh dear, where have I been for the last few months?  This is a great question!  I have been busy moving… again!  I didn’t move across the country again, just across the bay.  I moved from the South Bay of San Francisco to the East Bay which equals a shorter commute for me and a larger kitchen! A win-win in my book.  I have over 1-2 hours back in my life each day,  which is beyond amazing.  People who don’t commute in major cities probably wouldn’t understand the excitement of moving from a 2-hour commute each way to a little bit less than an hour each way, but it is life altering!

I can’t believe next week is Thanksgiving, but I also can’t believe it’s almost December!  No fear the 2 sisters in 2 cities are here to help you with you last minute holiday meal planning.

One of my favorite sides for a holiday meal is homemade apple sauce.  It is so easy to make and 1000 times better than store-bought apple sauce.  Homemade apple sauce is like eating the inside of an apple pie- so delicious!  You don’t have to use the most expensive apples to make apple sauce.  You can use a variety of apples and they don’t need to be perfect.

What do you need?
Apples for Apple Sauce
A bunch of apples is a must!  Get those apples that have been chilling in your fruit drawer for weeks.
Peeled Apples for Apple Sauce
Peel those apples… bruises are okay!
Slice Apples for Apple Sauce
Slice the apples evenly (and meticulously stack your apples cores.)
Cooking Apple Sauce
Cook those apple slices with water until softened.
Mash Apples for Apple Sauce
Mash the apples once softened.
Apple Sauce
Tada!

Print
Apple Sauce
Author: 2 Sisters 2 Cities
 
Ingredients
  • 8-10 apples
  • ½ cup water
  • ¼ –1/2 cup granulated sugar (to taste)
  • ¼ tsp. cinnamon
Instructions
  1. Peel all the apples. Cut apples into evenly sized slices. Throw your peels and cores in your compost pile.
  2. Place sliced apples into a large pot. Add in water to pot and cook over medium heat. Put on cover and cook for 10-20 minutes until apples soften. Turn heat down if the apples start to boil.
  3. Apples should be easily mashed with a fork or potato masher when cooked. Mash apples to preferred thickness.
  4. Add in sugar, to taste, and cinnamon. Stir and cook for a few more minutes. Serve warm or cold and store in an air tight container in the refrigerator.
3.2.2124

sisterk (2)


Filed Under: K's Sides, K's Recipes Tagged With: apple sauce, apples, autumn, autumn recipes, easy sides, fall, fruit, holiday sides, homemade sides, sides, Thanksgiving, thanksgiving recipe

Baked Pumpkin Doughnuts

Posted by Keelin Hollenbeck on September 25, 2013

Fall for Pumpkin Doughnuts

I warned you that pumpkin recipes were coming!   And of course I am finding more use for my doughnut pan!

These baked pumpkin doughnuts were phenomenal with their buttery cinnamon sugar outside and their delicious pumpkin spice inside. The day after making them, I was so excited to get out of bed to eat another doughnut with my coffee.  There’s nothing like a cool fall morning with a yummy pumpkin goodness.  Bring on the pumpkin baked goods!  I know, I know- pumpkin is totally overdone, but it’s one of the reasons why I love fall.   I even have a pumpkin Pinterest board- check it out here!

Pumpkin Doughnuts

Print
Baked Pumpkin Doughnuts
Author: 2 Sisters 2 Cities
Serves: 12
 
Ingredients
For Doughnuts
  • ½ cup vegetable oil
  • 3 large eggs
  • 1½ cups granulated sugar
  • 1½ cups canned pumpkin puree
  • 1 tsp. ground cinnamon
  • ¼ tsp. ground ginger
  • 1½ tsp. salt
  • 1½ tsp. baking powder
  • 1¾ cup All-Purpose flour
For Topping
  • ½ cup unsalted butter, 1 stick
  • 1 cup granulated sugar
  • 1 tsp. ground cinnamon
Instructions
  1. Preheat oven to 350 degrees.
  2. In the bowl of your mixer add all doughnut ingredients except flour and mix together until smooth. Add in flour and mix until just combined.
  3. Spray a doughnut pan with non-stick spray. Fill each doughnut mold with batter and fill ¾ths the way.
  4. Place in oven and bake for 15 to 18 minutes until a toothpick inserted in middle comes out clean.
  5. Let doughnuts cool in pan 5-10 minutes before taking out of doughnut pan. You can loosen the edges with a butter knife. Place doughnuts on wire rack.
  6. Repeat for additional batch (if using a 6 doughnut pan)
  7. In a heatproof bowl, melt butter in the microwave. Watch carefully so the butter doesn’t boil over.
  8. In a medium bowl stir together sugar and cinnamon.
  9. Dip doughnut in butter, shake slightly to stop dipping and then dip doughnut in cinnamon sugar, covering both side. Let dry at room temperature on a wire rack over a baking sheet. Store in an airtight container for 1-2 days.
3.2.1753


Stack of Pumpkin Doughnuts

Source- Adapted from the King Arthur’s Flour Blog

sisterk (2)

Related Posts Plugin for WordPress, Blogger...


Filed Under: K's Recipes Tagged With: autumn recipes, baked doughnuts, doughnuts, fall, fall recipe, pumpkin, pumpkin recipes

  • « Previous Page
  • 1
  • 2
  • 3
  • 4
  • 5
  • …
  • 12
  • Next Page »

Recent Posts

  • Easy Holiday Office Party Tips
  • 5 Steps to an Easy Football Party
  • Gingerbread Biscotti
  • Holiday Coffee Bar and Thanksgiving Recipes
  • Soft Sugar Pumpkin Cookies
  • Cinnamon Sugar Apple Cake
  • Hello Pumpkin Season!
  • Make Your Own Milkshake Party!
  • Mama’s Pickles
  • S’more Cookies

Categories

  • About 2 Sisters 2 Cities (7)
  • Books (8)
  • Crafting & DIY (22)
  • Design & Decorating (15)
  • Gardening (5)
  • Giveaway (14)
  • Guest Bloggers (8)
  • K's post (46)
  • K's Recipes (191)
    • K's Desserts (75)
    • K's Entrees (23)
    • K's Sides (24)
  • M's post (72)
  • M's recipes (167)
    • M's Entrees (21)
    • M's Sides (14)
    • M's Desserts (30)
  • Organizing (7)
  • Party Ideas (49)
  • Uncategorized (1)
  • Vacation (12)
Stitch Fix

Archives

Blogroll

  • Annie's Eats
  • Bake at 350
  • Baked Bree
  • Boston Harbor Beacon
  • Confections of a Foodie Bride
  • Cook Like a Champion
  • Erin’s Food Files
  • Forever and a Recipe
  • Framed Cooks
  • Oh Happy Day
  • On Common Ground
  • Pennies on a Platter
  • Pink Parsley
  • Recipe Girl
  • Sally's Baking Addiction
  • Simply Scratch
  • The Curvy Carrot
  • The Pioneer Woman
  • Tidy Mom
  • Two Peas & Their Pod
  • What’s Gaby Cooking
  • Young House Love
Increase your website traffic with Attracta.com

grab a 2 sisters button!


Copyright © 2014 ~ 2 Sisters 2 Cities | Blog Design by Minx Design