2 Sisters 2 Cities

Image Map
  • About 2 Sisters 2 Cities
  • Recipe Index
  • Project Index
  • Contact Us
  • Like us on Facebook
  • Follow m on twitter
  • Follow k on twitter
  • Follow 2S2C on Pinterest
  • Follow 2S2C on G+
  • rss
  • e-mail 2S2C

Chicken Fajitas

Posted by 2 Sisters 2 Cities on January 21, 2013

Chicken Fajitas

These Chicken Fajitas are one of my main go-to meals that I have been making since I started cooking for myself in college.  The recipe has come along over time and matured (just like me!)  I no longer need my George Forman to cook a piece of chicken like I did in college.  I have moved on to making chicken in my Le Creuset cast iron skillet and it comes out so juicy and tender.

Sliced-Peppers-and-Onions_thumb.jpg

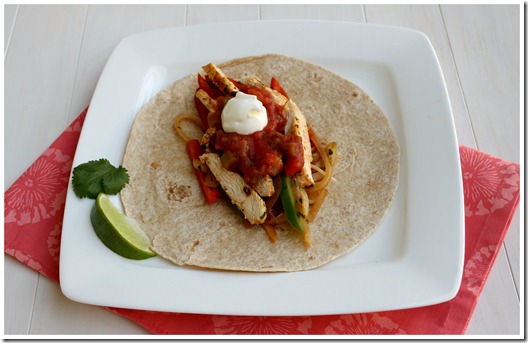
They key to not overcooking with the cast iron skillet is to cut the chicken breast (which can be so huge!) into thin pieces that are around the same thickness. I use my instant read thermometer to know when the chicken is done so there is no overcooking.  I then prepare some fresh sliced bell peppers and onion in a large frying pan with  a small amount of oil until they onions are cooked and then stir in some fresh cilantro, lime juice, and cayenne pepper.  I serve the sliced chicken and veggies in a warm whole wheat tortilla topped with salsa and light sour cream.   Since my boyfriend and I are trying to eat healthier, the fajitas have been making it into our menu line-up most weeks.
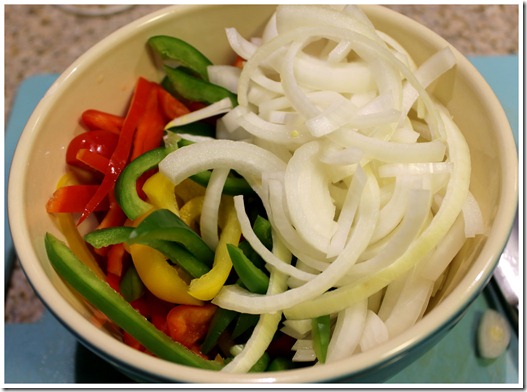
Chicken-Fajitas-with-Toppings_thumb.jpg

Print
 
Ingredients
  • 1 red pepper
  • 1 green pepper
  • 1 yellow pepper
  • 1 onion
  • Juice from 2 limes
  • 2-3 tablespoons Cilantro
  • 8 oz. of Chicken Breast, butterflied into two
  • ½ tsp. Cayenne Pepper
  • 2 tsp. Olive Oil
  • Salt and pepper, to taste
  • Light Sour Cream
  • Salsa
  • Whole Wheat Flour Tortillas
Instructions
  1. In a medium bowl, marinade the chicken with 2 tablespoons of lime, 1 tsp. olive oil, ¼ tsp. cayenne paper, salt and pepper. Allow chicken to marinade for 20-25 minutes while chopping vegetables.
  2. Cut the peppers and onion in thin slices.
  3. Heat a skillet on medium and cook the thin chicken breast until cooked, registering a 160 degrees on a meat thermometer.
  4. Heat the remaining olive oil in a large frying pan. Sauté vegetables until the onions are cooked. Once cooked, take off heat and stir remaining lime juice and cayenne pepper and all of the cilantro into veggies.
  5. Slice the cooked chicken.
  6. Warm tortillas in the microwave between two pieces of paper towel.
  7. In the middle of tortilla place a few slices of chicken, some peppers and onions and then top with salsa and light sour cream to your liking.
3.2.1337

What is your favorite recipe that you have been cooking for a long time and that you have improved over time?

sisterk (2)


Filed Under: K's Entrees, K's Recipes Tagged With: bell peppers, chicken, chicken fajitas, chicken recipes, easy to prepare meals, easy weeknight dinner, improved recipes, mexican, onions, weeknight dinner

Jalapeño Popper Stuffed Chicken

Posted by 2 Sisters 2 Cities on September 8, 2012

Jalapeno Popper Stuffed Chicken
Jalapeño poppers weren’t something I always desired.   I had thought they would be too spicy for me until a friend made me try hers in college.   After that, it was love at first bite and I couldn’t get enough.  I love jalapeño poppers so much I once telepathically communicated with my mom to tell her to make them for me.  Okay, okay, maybe it wasn’t exactly telepathic, but I did tell my little sister that I thought it would be amazing  to have jalapeño poppers when we got home.   Which we didn’t discuss again until we got home and my mom had made homemade jalapeño poppers.  She never had made them for us before either, so see, totally telepathic!   I have tried a few homemade jalapeño popper recipes on my own like the one here.  So when I found the recipe for jalapeño stuffed chicken I knew it would be a winner in my book.

I have been making this recipe a lot lately since my boyfriend basically asks for it every week.   This was my first stuffed chicken recipe I have made because I always assumed they were too much work or too fatty, but this recipe was easy to put together and actually somewhat low-fat.   To stuff the chicken I used all reduced-fat ingredients like reduced-fat cream cheese, reduced-fat shredded cheddar, and turkey bacon.   I then serve the chicken with a fiesta rice which I will give you the recipe for later this week.  So stay tuned for more yumminess Smile.

Jalapeno Popper Stuffed Chicken with Fiesta Rice

Print
Jalapeno Popper Stuffed Chicken
Author: 2 Sisters 2 Cities
Serves: 4
 
Ingredients
  • 2 slices of cooked turkey bacon, crumbled
  • 3 jalapeño, chopped with seeds and ribs removed*
  • 4 oz. reduced fat cream cheese, softened
  • 4 oz. reduced fat shredded cheddar cheese
  • 2 tbsp. chopped scallions
  • 4 3oz. chicken breast, rinsed, dried and pounded thin
  • ⅓ cup whole wheat Italian bread crumbs
  • 1½ limes, juiced
  • 1 tbsp. olive oil
  • salt and fresh pepper
  • olive oil non-stick spray
Instructions
  1. Preheat the oven to 450 degrees F.
  2. In a medium sized bowl mix together cream cheese, shredded cheese, scallions, chopped jalapeño, and crumbled turkey bacon.
  3. In a small bowl whisk together lime juice, olive oil, salt, and pepper then place bread crumbs on a large plate.
  4. Lay pounded out chicken onto a cutting board or working surface. Place 2-3 tbsp. of cream cheese mixture in the middle and then tightly roll chicken around the filling. Close the edges of the chicken with toothpicks so the filling doesn’t leak out (There will still be some small filling that leak out.)
  5. Take rolled chicken and dip in lime/oil mixture and roll around. Take chicken out roll in bread crumbs. Place seam side down in the baking dish. Repeat for the rest of the chicken. Once all chicken is stuffed and breaded spray with non-stick spray.
  6. Bake for 22-25 minutes, and serve.
3.1.09

*Please note-  Jalapeño’s seeds and ribs are extremely hot and can burn the skin so please wear gloves or plastic bags on hands when handling and wash knife an cutting board with hot soap water after.   If you do get a jalapeño burn, soak your burn in milk of magnesia, brand name Maalox (it worked for me!)

Recipe Source– Adapted from Skinnytaste


Filed Under: K's Entrees, K's Recipes Tagged With: chicken recipe, dinner recipe, jalapeno poppers

Garlicky Meatballs

Posted by 2 Sisters 2 Cities on June 17, 2012

This recipe was adapted from a recipe featured in Cooking Light in April.  I tried the recipe because I happen to have all the ingredients on hand and I am always looking for a new meatball recipe.   My boyfriend is quite the meatball lover so it is hard to impress him with just a normal meatball.  Needless to say he loved the Garlicky Meatballs so much that they have become a regular around here.  It is such an easy meal to pull together with my homemade sauce and whole grain pasta,  I usually schedule this dinner on a night I go to the gym after work.   I only serve us each three meatballs to keep the calories down.   We then take the leftovers for lunch the next day.  Even the leftovers of these meatballs are fantastic.

What is your go to recipe for an easy yet satisfying dinner?

IMG_1141

Print
Garlicky Meatballs
 
Ingredients
  • 1.2-1.3 pounds of ground beef (I use 95% Beef, 5% fat)
  • ¾ cup panko bread crumbs
  • ½ cup chopped fresh basil
  • 3-4 garlic cloves, minced
  • ½ teaspoon kosher salt
  • ¼ teaspoon crushed black pepper
  • 2 eggs
  • 2 teaspoons olive oil
Instructions
  1. In a large bowl, combine beef, panko, basil, garlic, salt, pepper, and eggs.
  2. With your hands mix all the ingredients together so that everything is mixed in.
  3. In a cast iron skillet, heat 1 teaspoon of olive oil.
  4. Form the meatball mix in 24 meatballs.
  5. Cook 12 at a time in skillet turning ever 2-3 minutes, cooking all sides.
  6. Once meatballs are cooked, place on a paper towel lined plate and cook then next batch.
  7. Serve with red sauce and pasta
  8. *I freeze half a batch of these after they cool and let them thaw in the fridge and heat them up in the sauce when I serve them again.
2.2.7

Source– adapted slightly from Cooking Light April 2012 Magazine

IMG_1140


Filed Under: K's Entrees, K's Recipes

Fiesta Chicken Tacos with Pineapple Salsa

Posted by 2 Sisters 2 Cities on June 3, 2012

I sort of invented this recipe one night because I didn’t feel like going to the grocery store.   I was reading through my Cooking Light 2010 Annual Recipe Cookbook and spotted a recipe for Chicken Tacos with a Jicama and Mango Slaw.  I then immediately thought about how good this would be with pineapple salsa instead of the slaw.  I  happen to have pineapple on hand and knew that the spicy chicken and the sweet and tart pineapple salsa would be a perfect combination.  In the end the mixture of the two were delicious and it was even fussy-boyfriend approved.   The whole recipe is easy to pull together and you can even eat the leftover pineapple salsa with some tortilla chips. That is, if there is leftovers.

Pineapple salsa

Print
Fiesta Chicken Tacos with Pineapple Salsa
Author: K
Recipe type: Entrée
 
A Spicy chicken with peppers and onion, topped with sweet and tart pineapple salsa, served on a warm corn tortilla.
Ingredients
  • For Pineapple Salsa:
  • 1 cup chopped fresh pineapple
  • ¼ cup chopped red onion
  • ¼ cup chopped red pepper
  • Handful of chopped cilantro (to your liking)
  • 1 juiced lime
  • For Chicken Filling:
  • 2 teaspoons olive oil
  • 1 pound of skinless, boneless chicken breast, cut into strips
  • 1 tablespoon lime juice
  • ½ teaspoon chili powder
  • ⅓ teaspoon cumin
  • ⅛ teaspoon ground red pepper
  • 1 cup red pepper, sliced into strips
  • 1 onion, sliced into strips
  • ¼ teaspoon salt
  • 8 corn tortillas
Instructions
  1. For Salsa: Mix all ingredients in a bowl, cover with plastic wrap and place in the refrigerator until tacos are ready
  2. For Taco Filling: Heat 1 teaspoons of olive oil in a skillet over medium high heat.
  3. In a bowl combine chicken strips, lime juice, chili powder, cumin, and ground red pepper.
  4. Add chicken mixture to pan and cook for 3 minutes. Remove chicken from pan.
  5. Heat remaining 1 teaspoon of oil in the same skillet and add in pepper and onion strips. Cook for 3 minutes.
  6. Add chicken back to pan and cook until chicken is done. Sprinkles with salt.
  7. To Serve: Heat corn tortillas in a warm frying pan sprayed with cooking spray. Heat both sides until warmed.
  8. Serve chicken/pepper mixture on warmed corn tortilla and top with pineapple salsa.
2.2.6

Source- Adapted from Cooking Light and Cook Yourself Thin
Have you ever made up a new recipe to use up ingredients you had on hand?   What did you end up making?


Filed Under: K's Entrees, K's Recipes Tagged With: easy weeknight dinner, fiesta chicken tacos, Pineapple Salsa, tacos

Chicken Spinach Artichoke Pizza

Posted by 2 Sisters 2 Cities on April 6, 2012

I was inspired to make this pizza after having the Chicken Artichoke Flatbread Pizza at Outback Steak House. Spinach artichoke dip is always one of my favorite appetizers to order at restaurants, so after trying the flat bread pizza I knew I would need to create my own pizza. I have made Spinach Artichoke Dip a few times for parties and have always been pretty satisfied with the results. I decided to create this pizza to be able to post it to M’s Produce Tuesday for artichokes (I used canned artichoke hearts, but you certainly could use fresh ones as well- here is a tutorial on how to trim and clean an artichoke heart).

Everything was going perfectly with the creation of this pizza until I went to remove the pizza from the oven. The pizza slipped off the pizza peel and landed topping down into the crack of the oven and the oven door.  What a mess!  I was so upset after I dropped it my boyfriend had to clean it up and try to save as much as he could of it. We still ate what he was able to save and it was still delicious, just not really pretty to photograph and show you guys. I was so proud of what the results were going to be so it broke my heart when I dropped it. Just goes to show you that kitchen accidents happen to everyone!  I will definitely be trying this pizza again.

Print
Chicken Spinach Artichoke Pizza
Recipe type: Entree
Prep time:  15 mins
Cook time:  10 mins
Total time:  25 mins
Serves: 4
 
Ingredients
  • 4 oz. light cream cheese
  • 3 tbsp. light mayonnaise
  • 3 tbsp. light sour cream
  • 3 tbsp. grated parmesan
  • 5oz. frozen chopped spinach, thawed, drained and moisture squeezed out
  • 5-6 canned artichokes hearts, quartered
  • 2 cloves of garlic, minces
  • salt
  • pepper
  • 3 oz grilled chicken breast cut into small pieces
  • ¼ cup shredded parmesan
  • ¾ cup mozzarella
  • Pizza dough- I use the recipe from Annie’s Eats
Instructions
  1. Preheat the oven to 500 degree with pizza stone in oven. Assemble the artichoke dip in a medium bowl mixing together the cream cheese, mayo, sour cream, 3 tbsp. parmesan, spinach, artichokes, garlic, and salt and pepper to taste. With a sheet of parchment paper cut to fit your pizza stone, sprinkle corn meal down on parchment paper and spread out pizza dough. Once the dough is spread out to the size you want, spread artichoke dip onto pizza leaving the edges open for crust. Place cut chicken slices on top of artichoke dip . Then, sprinkle parmesan and mozzarella cheese on top. Place pizza on preheated pizza stone in the oven and bake for 10 minutes. Carefully take out of the oven and by all means do not drop the pizza!!
2.2.6


Filed Under: K's Entrees, K's Recipes Tagged With: artichokes, chicken spinach artichoke pizza, outback steakhouse chicken artichoke flatbread pizza, pizza recipe, spinach artichoke dip pizza

Chili Mac and Cheese

Posted by 2 Sisters 2 Cities on March 22, 2012

Well hello, hello!  I feel like I have been MIA lately.  Do you want to know what is to blame this time?  The Hunger Games!  I got so wrapped up in these books during the last week that I feel like I got nothing done besides read those books.  You will be happy to know that I finished the series and I can now give you my full attention.  I am, however, going to see the movie this weekend which I am very excited about! Are any of you addicted to these books and plan on going to see the movie?  It seems like everyone I talked to was wrapped up in these books.

Well, besides my Hunger Games vacation, I also received my Cooking Light magazine over the weekend.  I am pretty excited because they have an entire section for 40 meals under 40 minutes.  I don’t know about you, but on the weeknight, I need a dinner that is easy and quick to pull together.

The first meal I picked from the magazine is a little unlike me because I am not a huge chili or mac and cheese person.  Don’t get me wrong about mac and cheese- I do love it, but I tend not to make it because it is not always healthy.  I picked a recipe for Chili Mac and Cheese and let me tell you… it was awesome!  My boyfriend also loved it- when I offered him one more scoop, he happily obliged which he hardly ever takes seconds of meals.  I loved this recipe because it was like a healthier homemade version of Hamburger Helper, which I use to love in college. Also this recipe is super easy and only uses two pots! Okay on with Chili Mac and Cheese.

IMG_0989

Chili Mac and Cheese
Ingredients

1 tsp. canola oil
1 lb. ground beef (95 % lean)
1 tsp. garlic powder
1 tsp. ground coriander
1 tsp. ground cumin
2 tsp. chili powder
2 cups fat-free, lower sodium beef broth
1 cup water
1  10 oz. can diced tomatoes and green chilies (I used hot but you can also use mild)
8 ounces uncooked elbow macaroni
1/2 cup fat-free milk
4 oz. of 1/3 less fat cream cheese
4 1/2 oz. of shredded reduced fat cheddar

Instructions
Heat a large Dutch oven or pot over medium-high heat . Add oil and allow to heat up.  Stir in ground beef and all 4 spices and cook for about 3-4 minutes. Next add broth, water, and tomatoes. Bring mixture to a boil and stir in elbows.  Cover with lid and let cook for 10 minutes or until the macaroni has been cooked and most of the liquid in the pot has been absorbed.

In a small sauce pan heat the milk and cream cheese over medium heat, stirring constantly until cream cheese has been melted and combined with milk.  Remove from heat and stir in cheddar cheese until melted.   Add cheese sauce to the macaroni and stir well. Serving size is about 1 cup.  Makes 6 servings.

Source– slightly adapted from Cooking Light,  April 2012


Filed Under: K's Entrees, K's Recipes Tagged With: chili, Cooking Light, cooking light recipes, easy weeknight dinner, hunger games, mac and cheese

French Onion Soup

Posted by 2 Sisters 2 Cities on February 29, 2012

It’s a SoupaPalooza at TidyMom and Dine and Dish sponsored by KitchenAid, Red Star Yeast and Le Creuset!  Come join the fun by linking up and adding a soup recipe.   Go to either of TidyMom or Dine and Dish site to read the rules.

My boyfriend and I love French Onion Soup.  We order it when we are out at restaurants all the time so we have experienced an array of flavors and different ways of having it served to us.   I have developed my recipe over time from a mixture of recipes to get what we consider the best French onion soup.   It’s so easy to make, I often whip it up at least once every two weeks for lunch on the weekend.  Also with the addition of reduced fat Swiss, we can make this recipe a little bit more healthy.

French Onion Soup
Ingredients
4-5 cups of halved then sliced onions
1 tablespoon butter
4 cups beef broth
1 tablespoon of sherry
1 tablespoon of worchestire sauce
4 slices of stale or toasted crusty bread ( French or Italian)
4 slices of Swiss cheese

Directions:
In a Dutch oven or large pot, melt butter over medium heat.  Add onions and stir to coat with butter.  Place cover on pot and allow onions to caramelize, stirring occasionally.  This process will take about 15-20 minutes.  Once the onions are caramelized and golden brown add in broth, sherry and worchestire sauce. Bring to a simmer and keep it there for about ten minutes.  While the soup simmers, take out 4 oven proof bowls and prepare bread and cheese.  Place bowls on a baking sheet and turn on your broiler on the oven.  Ladle soup into 4 bowls evenly.  Top each with a crusty piece of bread and a piece of Swiss.  Place baking sheet with bowls of soup into the oven and allow the cheese to melt and the bread to toast up.  Keep an eye on them because they melt/toast quickly.  When ready, serve ( with oven mitts and warn who you are serving it to that the bowls are hot!) Enjoy!

Weight Watchers PointsPlus- about 5 depending on the size of your bread and cheese

*K’s tip*-  I keep a loaf of sliced Italian bread in my freezer to serve a quick piece of garlic bread with pasta or to top my French onion soup.  This stops us from over-eating the bread and it last us a few months.  Wrap bread in plastic wrap and place in a freezer bag.  I take out the bread before I start cooking and it is thawed by the time I need it.

Come join SoupaPalooza at TidyMom and Dine and Dish sponsored by KitchenAid, Red Star Yeast and Le Creuset


Filed Under: K's Entrees, K's post Tagged With: french onion soup, soup, soupapalooza

Asparagus Risotto

Posted by 2 Sisters 2 Cities on February 19, 2012

This is one of my favorite recipes that I make.  Not necessarily my favorite to make, but it’s my favorite to eat after I prepare it.   For those of you that have made risotto before, you know that it is labor-intensive but the end result are something to feel proud about.  I have made this recipe a bunch of times but never during the daylight to be able to get a good photo of it.   My favorite main course to make with this particular risotto is Chicken Francese. I’ll give you my recipe in a future post.

Today I made the asparagus risotto for lunch for my boyfriend and me, which was the first time I have made it on it’s own.  It was delicious as ever and even filling as the main entree.   Risottos at restaurants can get really unhealthy with the abundance of creams and cheeses that are commonly in them.   You don’t need all that to make a good risotto.  This recipe is actually one of the healthiest recipes I have made of risotto and it tastes like it is loaded with cream and cheese.  The lemon juice and zest add a great lemony flavor to the risotto,  but is not overwhelming. 


Print
Asparagus Risotto
Author: 2 Sisters 2 Cities
Serves: 6- One Cup
 
Ingredients
  • 1 pound asparagus
  • 1 tbsp. butter
  • 1 small onion, minced
  • 1 cup uncooked Arborio rice
  • 2 tbsp. fresh lemon juice
  • 1 tbsp. white wine
  • zest from 1 lemon
  • 4 cups of fat free chicken broth
  • ⅓ cup grated Parmesan cheese
  • salt and pepper to taste
Instructions
  1. Start by rinsing the asparagus, breaking off the tough bottoms and cutting into ½ inch pieces. Bring a medium pot of salted water to a boil. Fill a large bowl with ice water and keep on the side. Blanch asparagus pieces in boiling water for 2 minutes. Immediately drain asparagus and then submerge into ice water; set aside.
  2. In a Dutch oven or medium sized pot melt 1 tablespoon of butter over medium heat. Add onions to butter and cook until translucent, about 5 to 7 minutes. Add in rice and stir to coat. Cook for 2 minutes. Add in lemon juice and wine, stir until evaporated. In a separate pot, bring 4 cups of chicken broth to a simmer, keep on low heat.
  3. Add ½ cup of broth at a time and continuously stir until absorbed. Repeat, a half cup at a time stirring constantly, until there is no more broth remaining. This should take about 20 minutes for all the broth to be absorbed. The rice will be creamy yet slightly chewy. Mix in Parmesan cheese until combined. Then stir in asparagus and lemon zest, and then salt and pepper to taste .
3.2.1682

Weight Watchers Points Plus-  5 PointsPlus per serving

Source-  Adapted from Weight Watchers Online and Better Homes and Garden New Cook Book
sisterk (2)


Filed Under: K's Entrees, K's Sides, K's Recipes Tagged With: 5 weights watchers pointsplus, asparagus risotto, lunch, lunch recipe, risotto, spring dinner, spring lunch, weight watchers

Herb-Rubbed Chicken with Creamy Orzo

Posted by 2 Sisters 2 Cities on January 22, 2012

The other night after work I made this recipe. The original recipe that I found was twice as large and had cream in it.  To make this recipe healthier I used half and half instead of cream, cut back on the olive oil, and halved the recipe (since there is only two of us.) It took about 30 minutes to put together and was really delicious.  The servings were pretty big and my boyfriend and I were so stuffed afterwards.  If you think 12 PointsPlus is too many to to have for dinner, you can add more broccoli to this recipe and divide the recipe into fourths for 6 PointsPlus a serving.

Herb-Rubbed Chicken with Creamy Orzo

Ingredients:
4 oz. orzo pasta, uncooked
2 – 3 oz. pieces of chicken
1/4 teaspoon dried basil
1/4 teaspoon dried oregano
1/4 teaspoon dried rosemary
1/4 teaspoon dried thyme
2 tsp. olive oil
1 small shallot, chopped
1 clove of garlic
1/2 of a 14.5 oz. can of diced tomatoes with juices
1 cup of broccoli florets
1/4 cup of half and half
3 tablespoons of grated Parmesan cheese

Directions:
Cook orzo according to the package directions.  Reserve 1/4 cup of pasta water and then drain orzo.

In a small bowl combine basil, oregano, rosemary, and thyme.   Take the two pieces of chicken and season both sides with salt and pepper.  Take the combined dried herbs and sprinkle on both sides of chicken evenly.  Heat olive oil in a 12-14 inch skillet over medium-high heat.   Place chicken in skillet and cook on both sides for about 3-4 minutes each until golden brown.   Once the chicken is cooked,  place on a plate and cover with aluminum foil.  Reduce the heat in the skillet to medium,  add the shallot to the pan and sauté 2-3 minutes.  Add garlic and stir until fragrant, about 1 minute.   Add diced tomatoes with juices and broccoli florets to the skillet.  Scrape the bottom of the pan to remove any of the brown bits.  Bring to a boil, then reduce heat to a simmer.  Cover the skillet and cook until for about 10 minutes, until broccoli is tender.   Next stir in parmesan cheese, half and half and cooked orzo.  Stir until combined, adding pasta water if sauce needs smoothing out.  Season with salt and pepper and divide evenly onto two plates.   Place each piece of cooked chicken on top of the beds or orzo.  Serve right away.  (Weight Watchers PointsPlus- 12 points)
Pin It

Source– Adapted from Annie’s Eats

Enjoy!

-K


Filed Under: K's Entrees, K's post, K's Recipes

Minestrone Soup

Posted by 2 Sisters 2 Cities on January 8, 2012

My mom had made this recipe of Minestrone soup for us over Christmas break.  It was really delicious and I usually don’t feel that way about minestrone soup.   This weekend wasn’t really what I would consider a winter soup weekend because it was pretty mild out.   After I went on my walk this afternoon,  it got a little chillier so I was in the mood for soup.   The soup makes a lot- my Dutch oven was almost filled to the brim.  After one bowl, my boyfriend and I were stuffed.  I will be having this soup for lunch all week, and giving some to my best friend and my boyfriend’s mom.   Yes, that’s how much soup I have, but it’s okay…it is delicious.

minestrone

Minestrone Soup
Printer-Friendly Recipe

Ingredients
2 tbsp. olive oil
1 large onion, diced
4 cloves garlic, minced
1 large carrot, peeled and diced
1 medium zucchini, diced
1 tsp. dried oregano
1 tsp. dried basil
1 tsp. salt
1/2 tsp. freshly ground black pepper
6 cups of low sodium chicken or vegetable broth
1 28oz can of diced tomatoes
1 45oz can crushed tomatoes
15 oz. can cannellini beans, drained and rinsed
4 oz. of dried whole wheat pasta (I used medium shells)
Parmesan cheese to sprinkle on top

Directions:
In a large pot heat olive oil over medium-high heat.  Add onions and cook for about 5 minutes, until translucent.  Add garlic, stir for 30 seconds.  Add carrots and cook for 5 minutes until carrots are soft. Next add zucchini, oregano, basil, salt, and pepper. Stir frequently for 2 minutes.   Add in broth and the tomatoes .  Bring to a boil,  and then reduce heat to medium low and simmer for 10 minutes.  Add beans and dried pasta.   Cook for an additional 10-15 minutes,  until pasta is ready.  Serve with Parmesan cheese sprinkled on the top. Makes 6 servings. (6-7 Weight Watchers PointsPlus – depending if you add cheese)

Source: Adapted from Better, Homes and Garden – January 2012

Enjoy!

-K
Pin It

Related Posts Plugin for WordPress, Blogger...


Filed Under: K's Entrees, K's Recipes Tagged With: Minestrone Soup, Soups, weight watchers 7 pointsplus

  • « Previous Page
  • 1
  • 2
  • 3
  • Next Page »

Recent Posts

  • Easy Holiday Office Party Tips
  • 5 Steps to an Easy Football Party
  • Gingerbread Biscotti
  • Holiday Coffee Bar and Thanksgiving Recipes
  • Soft Sugar Pumpkin Cookies
  • Cinnamon Sugar Apple Cake
  • Hello Pumpkin Season!
  • Make Your Own Milkshake Party!
  • Mama’s Pickles
  • S’more Cookies

Categories

  • About 2 Sisters 2 Cities (7)
  • Books (8)
  • Crafting & DIY (22)
  • Design & Decorating (15)
  • Gardening (5)
  • Giveaway (14)
  • Guest Bloggers (8)
  • K's post (46)
  • K's Recipes (191)
    • K's Desserts (75)
    • K's Entrees (23)
    • K's Sides (24)
  • M's post (72)
  • M's recipes (167)
    • M's Entrees (21)
    • M's Sides (14)
    • M's Desserts (30)
  • Organizing (7)
  • Party Ideas (49)
  • Uncategorized (1)
  • Vacation (12)
Stitch Fix

Archives

Blogroll

  • Annie's Eats
  • Bake at 350
  • Baked Bree
  • Boston Harbor Beacon
  • Confections of a Foodie Bride
  • Cook Like a Champion
  • Erin’s Food Files
  • Forever and a Recipe
  • Framed Cooks
  • Oh Happy Day
  • On Common Ground
  • Pennies on a Platter
  • Pink Parsley
  • Recipe Girl
  • Sally's Baking Addiction
  • Simply Scratch
  • The Curvy Carrot
  • The Pioneer Woman
  • Tidy Mom
  • Two Peas & Their Pod
  • What’s Gaby Cooking
  • Young House Love
Increase your website traffic with Attracta.com

grab a 2 sisters button!


Copyright © 2014 ~ 2 Sisters 2 Cities | Blog Design by Minx Design