2 Sisters 2 Cities

Image Map
  • About 2 Sisters 2 Cities
  • Recipe Index
  • Project Index
  • Contact Us
  • Like us on Facebook
  • Follow m on twitter
  • Follow k on twitter
  • Follow 2S2C on Pinterest
  • Follow 2S2C on G+
  • rss
  • e-mail 2S2C

Mini Pretzel Dogs

Posted by Keelin Hollenbeck on January 29, 2014

Pretzels Dogs

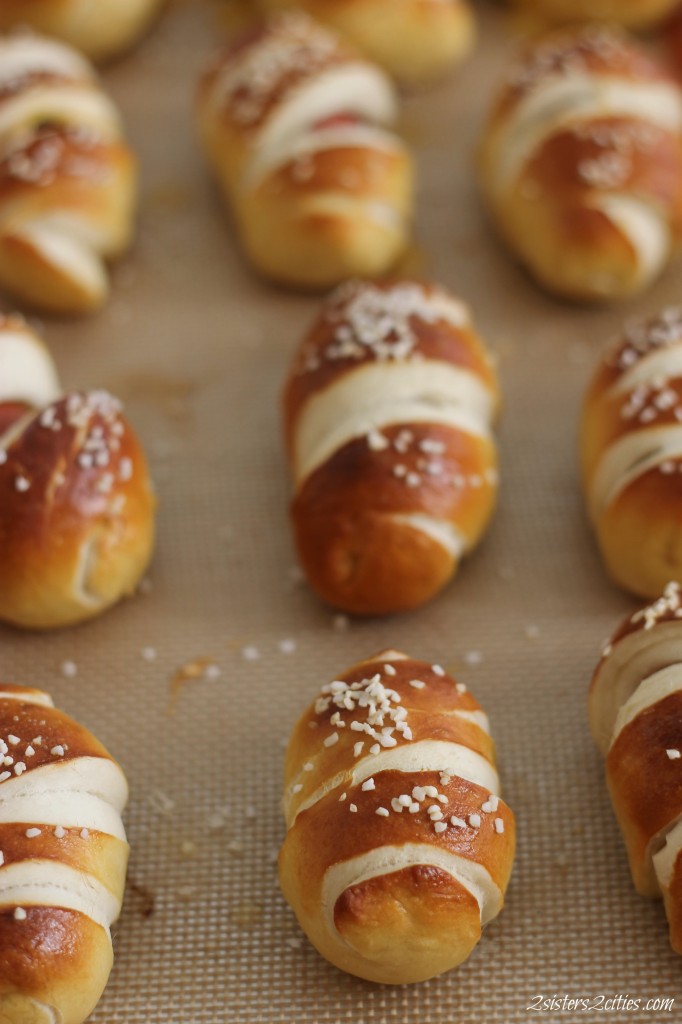
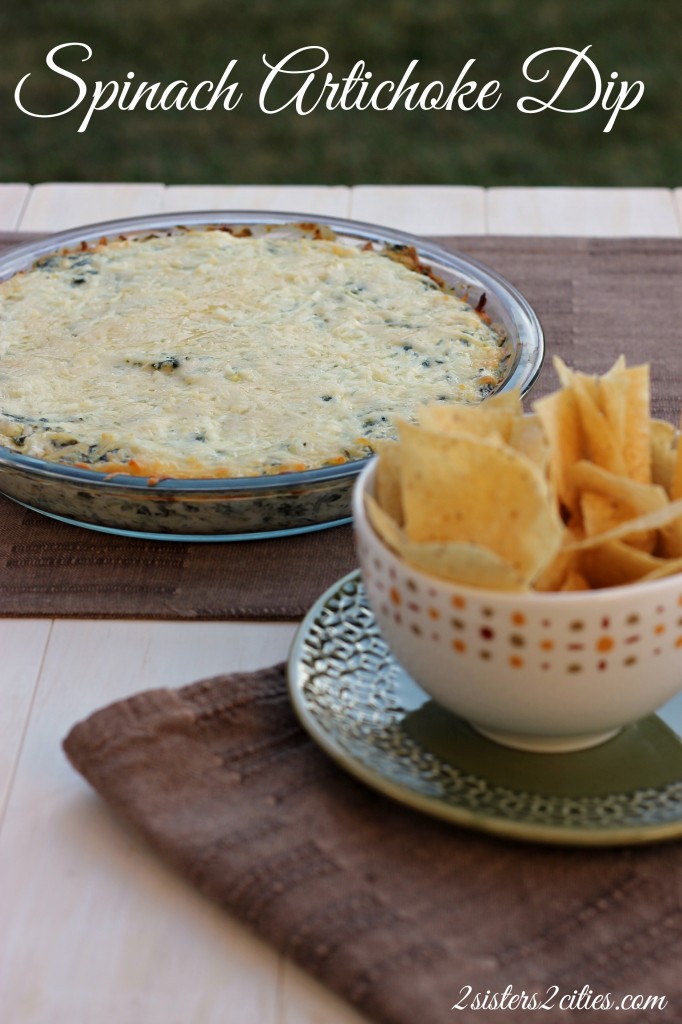
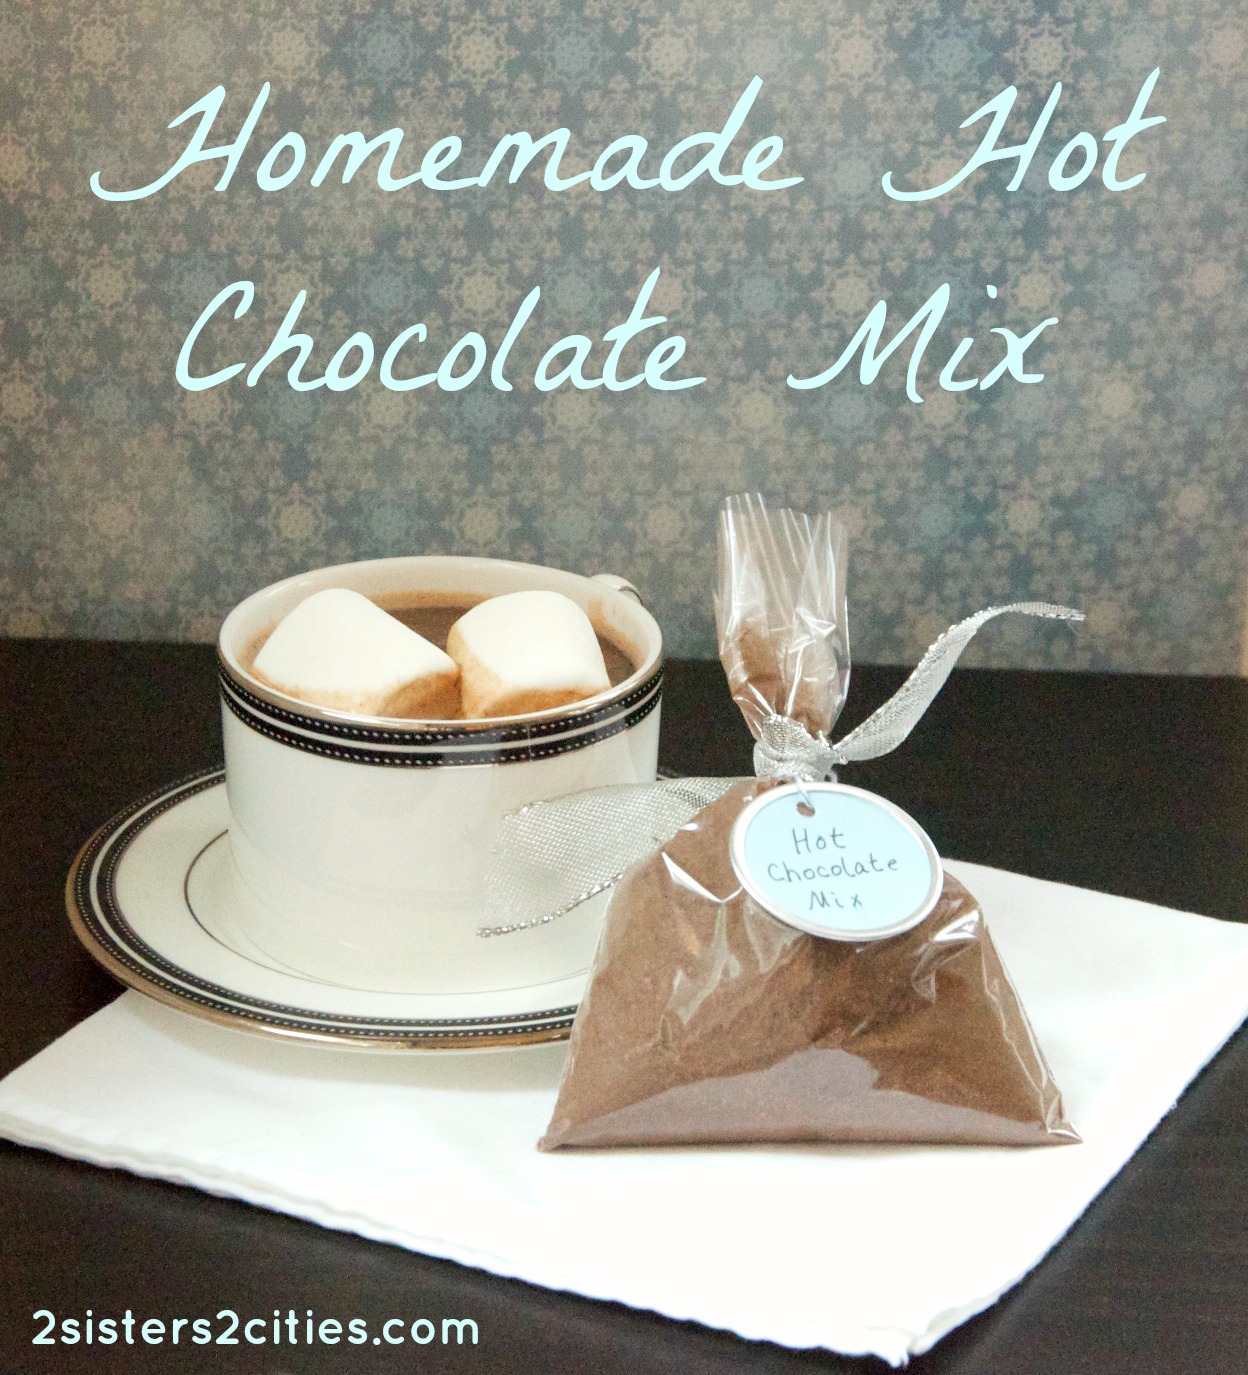
I am a huge fan of both hot dogs and homemade pretzels.  Although I have never ordered a pretzel dog from Auntie Anne’s, they have always intrigued me.  A football classic around this house is hot dogs cut into fourths and wrapped in crescent rolls, i.e. pigs in a blanket.  When I saw recipes for pretzels dogs on a few blogs, I knew trying out mini pretzel dogs was in order.

Wrap Dough around Hot Dog

These mini pretzel dogs are made with Nathan’s Skinless Beef Franks wrapped in a perfect homemade pretzel.  I prefer Nathan’s hot dogs because they taste great.  Plus, they are from New York so it always makes me happy to see them over here in California.  I added some cheese to the insides of half the pretzel dogs to test it out.  The results were amazing!  To do this, I made a lengthwise slit in the hot dog and folded some pieces of of deli American cheese in there.

Cheese Dogs

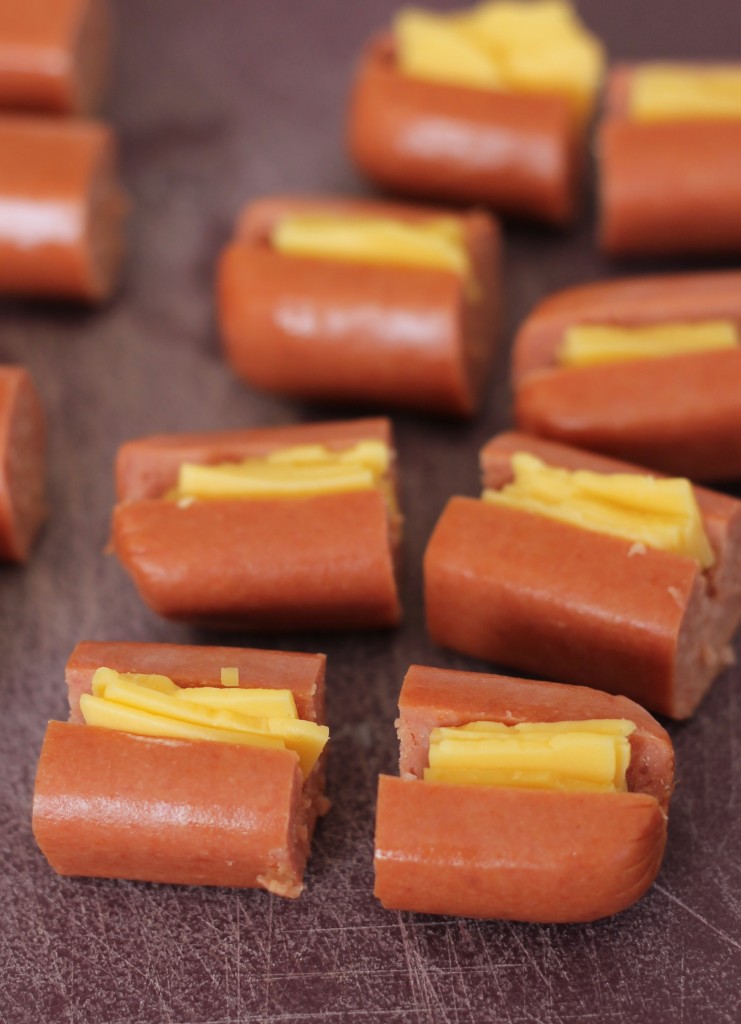
I had got the idea to add cheese from a dinner that we made on occasion growing up (and one that I still dream about!)  My mom made us homemade meals practically every night so she absolutely hates when we rave about the “Crescent Roll hot dog” dinners we used to have.  Her eyes are probably rolling right now as she reads this.  A Crescent Roll Hot Dog is when you take a full hot dog, make a lengthwise slit in the middle, stuff a folded half piece of American cheese, roll it in crescent roll dough and bake it together.  It’s very similar to how I make pigs in a blankets nowadays, except with a whole hot dog and the addition of cheese.  What can I say- it was the 80’s and early 90’s!

Cheesy Mini Pretzel Dogs

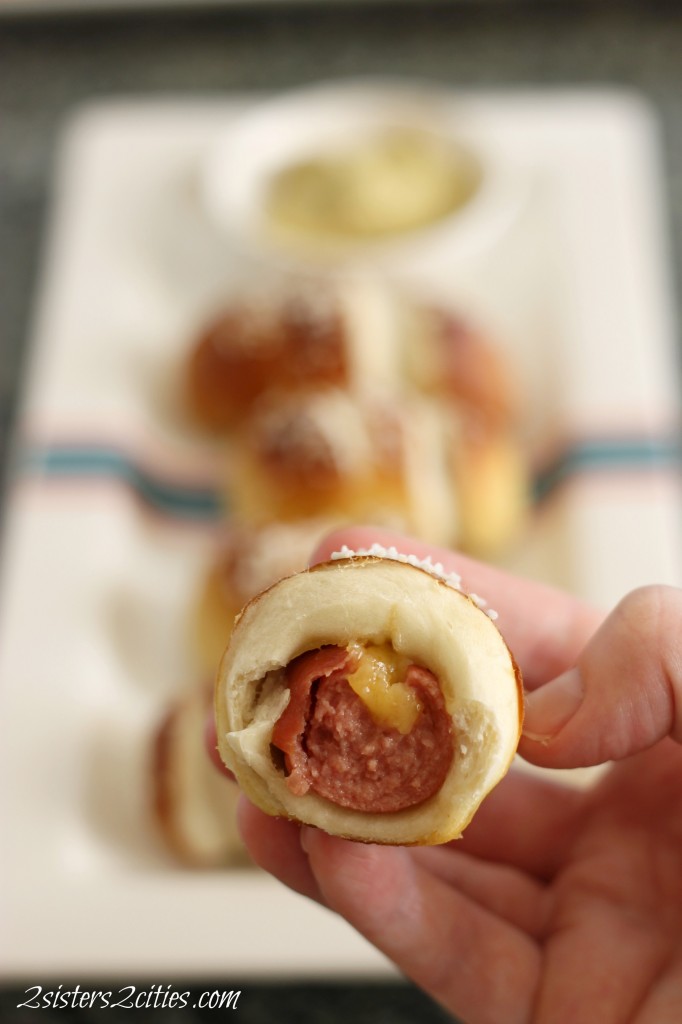
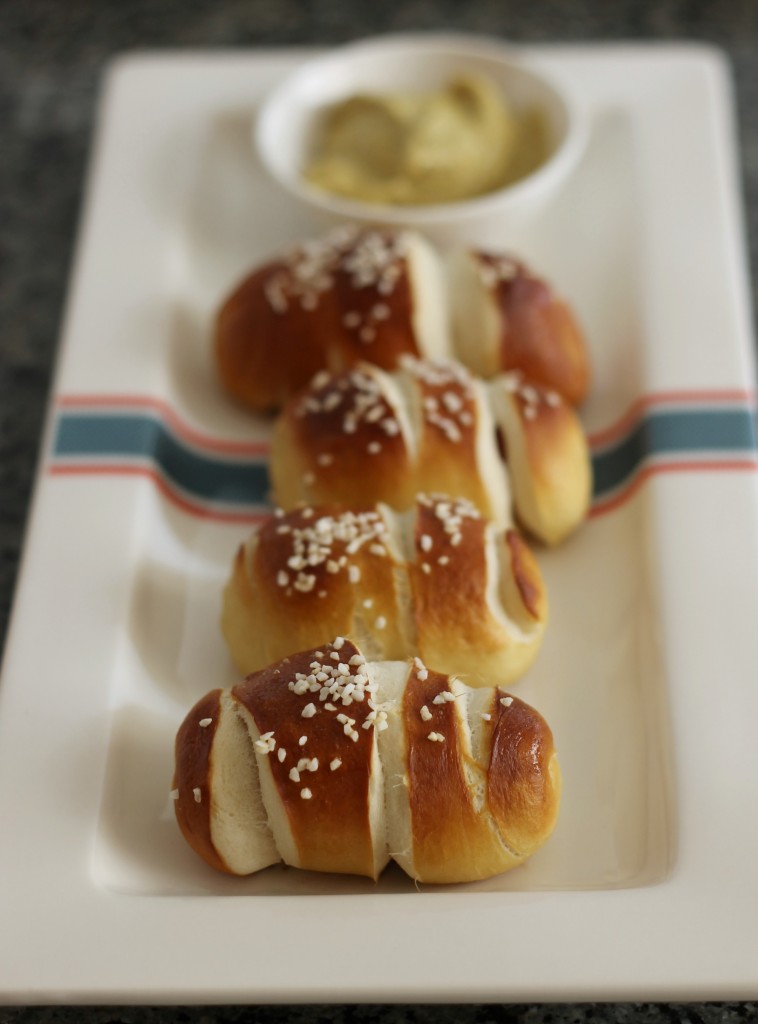
These pretzel dogs were so good!  I served them warm with deli mustard to dip.  Although these are best fresh from the oven, I froze the other half of them for Superbowl Sunday and I am going to reheat them at 350 degrees F for 10-12 minutes until they are heated up again.

Mini Pretzels Dogs and Mustard

Print
Mini Pretzel Dogs
 
Ingredients
For Pretzel Dough
  • 1½ cups warm water (110-115 degrees F)
  • 1 tbsp. granulated sugar
  • 2¼ tsp. active dry yeast (or one packet)
  • 22 oz. AP flour (about 4½ cups)
  • 2 tsp. salt
  • 2 tbsp. butter, melted and brought back to room temperature
For Boiling Mixture
  • 14 cups of water
  • 1 cup baking soda
For Assembly
  • 8 pack of hot dogs, cut into fourths for 32 hot dog pieces
  • 1 large egg beaten with 1 tsp. water
  • Pretzel salt or course salt
  • 4 slices of American Cheese (optional)
Instructions
  1. In the bowl of your mixer (with dough hook attachment) add warm water and sugar. Sprinkle the yeast on top of the the water and let sit for 5 minutes.
  2. Once the yeast is foamy, add in the flour,salt, and melted butter. Mix on low until the dough is combined. Take the speed up to around medium and mix the dough until it is smooth and easily pulls away from the sides of the mixer bowl. Knead for an additional 4 minutes at medium speed.
  3. Coat a separate large bowl with some canola oil. Take dough ball from mixer bowl, scraping dough off the sides of the bowl if needed and place in oiled bowl. Turn to coat. Cover bowl with plastic wrap and set bowl in a warm draft free place for 1 hour.
  4. Preheat oven to 425 degrees. Line two baking sheets with silicone baking mats or parchment paper. If using parchment paper spray with cooking spray to prevent sticking.
  5. Once the dough has risen, turn out on a lightly oiled surface. Divide dough evenly into 32 pieces. This is done easily if you divide dough in half and then divide each half into halves, continuing until there is 32 equal sized pieces.
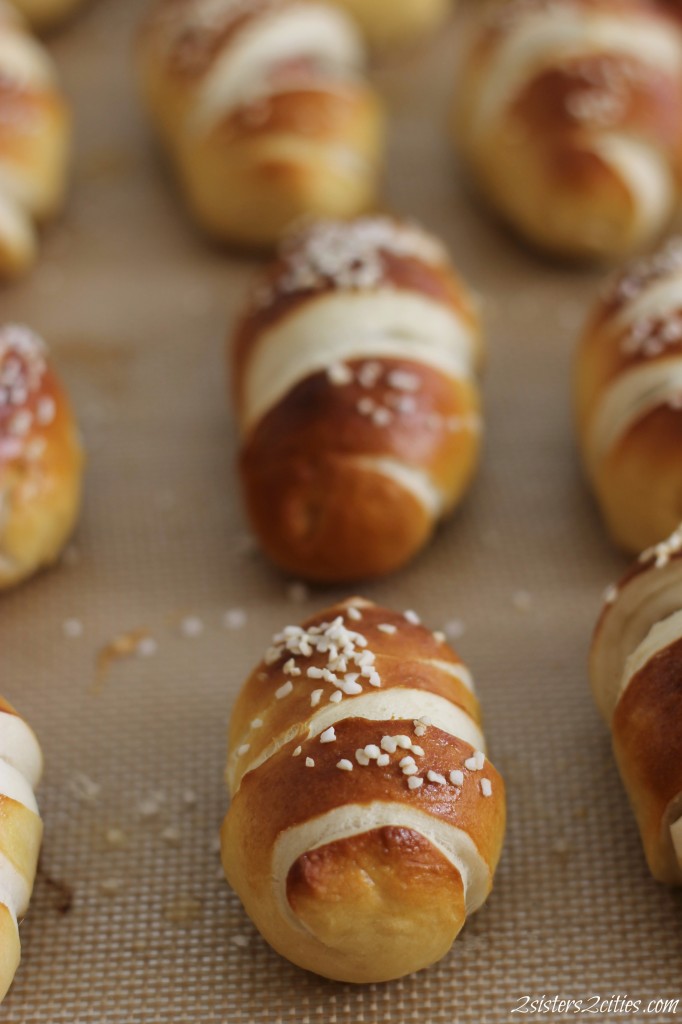
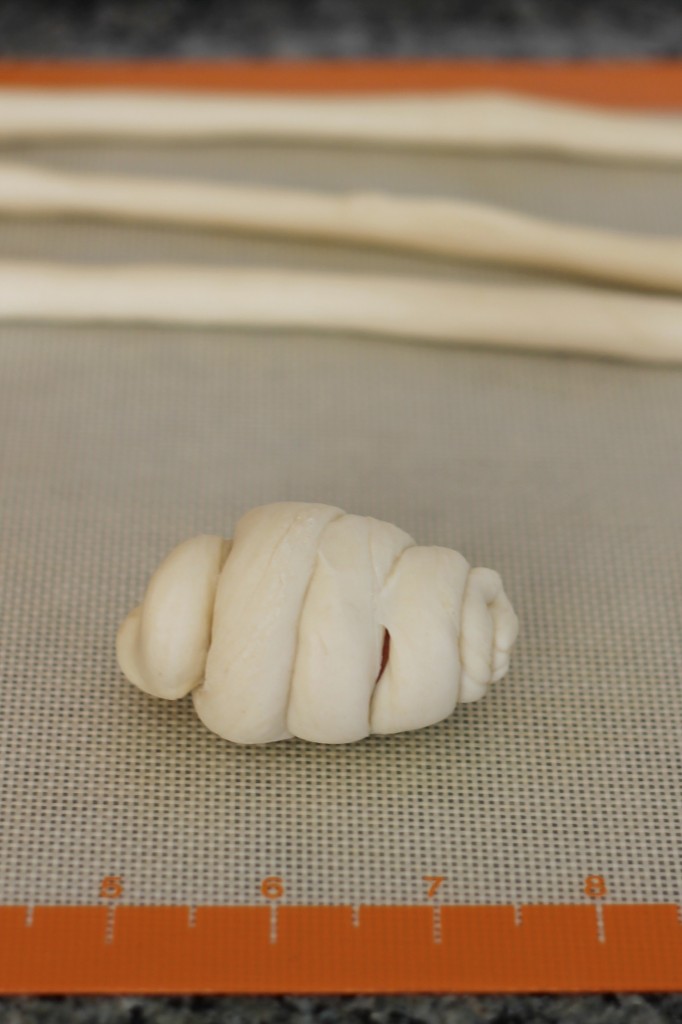
  6. Take one dough ball and roll out 12-18 inch piece rope. Take hot dog piece and starting at the end of the hot dog, wrap the dough around the hot dog so that it is completely covered in dough (like a cocoon or mummy). Make sure to seal ends and where ever the dough is touching so that it stays connected and completely sealed during baking. Unlike Pigs in a Blanket you are covering the entire hot dog with dough. Repeat for all dough and hot dog pieces.
  7. *to add cheese- take hot dog pieces before wrapping and make a slit lengthwise making sure to not cut through the hot dog all they way. Take a piece of American cheese and divide it up into 8 pieces. Take one of the pieces and gently fold it so it is around the same size as the slit made in the hot dog. Stuff the cheese into the slit and then wrap hot dog piece with dough like above directions.
  8. In a large pot add 14 cups of water and 1 cup of baking soda. Bring to a boil.
  9. Once the water comes to a boil, gently drop a few wrapped hot dogs into the pot and let cook for 30 seconds. Remove with a slotted spoon and line up on baking sheet, leaving about one inch in between each. Repeat for all wrapped hot dogs.
  10. Take the egg beaten with 1 tsp. of water and gently brush boiled pretzels with the egg mixture. Top with course salt.
  11. Bake each cookie sheet separately for about 12-14 minutes until golden brown. Let cool for a few minutes before serving.
3.2.2199

Source- slightly adapted from Joy The Baker 

Mini Pretzel Dogs

sisterk (2)


Filed Under: K's Recipes, Party Ideas Tagged With: Appetizer Recipes, appetizers, cheesy pretzel dogs, hot dogs, mini pretzel dogs, Nathan's Hot Dogs, pigs in a blanket, Pretzel Dogs, pretzels, Super Bowl, super bowl appetizers, superbowl sunday snacks

Mexican Pinwheels

Posted by Keelin Hollenbeck on January 23, 2014

Mexican Pinwheels Dipped in Salsa

With the Super Bowl in a couple of weeks and it being award season, it is most certainly appetizer time!  We had a chance for both the San Francisco and the New England football teams to play in the Super Bowl for another Sister City Super Bowl showdown, but that didn’t happen this year.

If you thought my spinach artichoke dip was easy, wait until you try this one.  My mom made these for us growing up a few times and when I moved off on my own, it was one of the recipes she typed up for me.  I have a college binder with all the original recipes I used when I first started cooking on my own.  Every time I would come home to visit my mom she would give me another collections of recipes that I loved growing up or that I needed to try.  Luckily now that we all follow blogs and have similar cookbooks, we share recipes all the time.  I still keep these recipes in the original binder even though I have switched over to fancier Martha Stewart binders for my other recipe collections.

Mexican Pinwheels

There are only five ingredients in this recipe: flour tortillas, cream cheese, a can of chopped black olives, a can of chopped green chiles, and chopped onion.  Also, the only thing you really need to do is chop an onion because you can buy the olives and green chiles pre-chopped!  Oh yeah, oh yeah!  The perfect dipping sauce for this?  Salsa!  I basically live off of Tostitos Salsa in medium heat.  I put it on everything from baked potatoes to scrambled egg whites.  These probably would also pair well with sour cream or guacamole!

Pinwheels

What do you need to do to make them?  Follow the easy recipe below!

Print
Mexican Pinwheels
 
Ingredients
  • 2 blocks of reduced-fat cream cheese, at room temperature
  • 1- 4 oz. can of chopped green chilies, drained
  • 1- 4 oz. can of chopped black olives, drained
  • ½ onion, finely chopped
  • 12-14 flour tortillas
Instructions
  1. In a medium sized bowl, mix together cream cheese, green chilies, black olives, and onion. Stir it all together so that it is all mixed together and evenly distributed.
  2. Take a pile of flour tortillas and place them between 2 paper towels. Microwave them for about 20 seconds, to soften them so they are easier to roll.
  3. Take a tortillas and spread about 3-4 tbsp. of the cream cheese mixture on the tortillas. Roll the tortillas up like a jelly roll, tight enough so there isn't any gaps but not too right that you are squeezing the cream cheese out.
  4. Once rolled set seam side down on some laid out plastic wrap. Continue for the rest of tortillas until you use up all of the filling. When done rolling the tortillas, tightly wrap up the rolls in the plastic wrap and place in the fridge for 2 hours or more.
  5. Once chilled, take tortilla rolls out and slice them in ½-3/4 inch slices, tossing out the ends (or eating.) Continue with remaining tortillas.
  6. Serve with salsa.
3.2.2199

Looking for more game day recipes?  Check out our 2013 Super Bowl Recipe Round-Up and the appetizer section of the 2S2C Recipe Index!  We’ll also be sharing a few more favorite game day appetizer recipes over the next week!

sisterk (2)


Filed Under: K's Recipes, Party Ideas, Uncategorized Tagged With: appetizers, Mexican Pinwheels, Mexican Roll-ups, pinwheels, roll-ups, Super Bowl, super bowl appetizers

Spinach Artichoke Dip

Posted by Keelin Hollenbeck on January 14, 2014

Spinach Artichoke Dip

It is football playoff season and you know what that means…appetizers!  I have several great recipes for appetizers to share with you this month leading up to Super Bowl weekend.  Matt and I have been toughing it out for you the last couple of weekends and have had a few meals of just appetizers so I could share these with you. It’s been real tough… you’re welcome!  We are going to start this Superbowl party off with one of my all-time favorite dips, the spinach artichoke dip.

Chips and Spinach Dip

There was a time period that this was one of those appetizers I would always order off a restaurant’s menu.  In college, two of our local bars had the most amazing spinach artichokes dips.  They both had a cream cheese base with big chunks of artichoke hearts and not too much spinach.  Served with either slices of toasted french bread or tortilla chips, I could not get enough of these dips!

I have played around with several recipes over the years trying to recreate the creaminess and thickness that the dip had from those bars.  I think I have come really close with this recipe.  I have brought this dip to several different parties and it is always gone within minutes.

Creamy Spinach Artichoke Dip

The best part about this dip (besides the dip itself!) is that it is so easy to put together and it can be done ahead of time. I am one of those people who goes frantic an hour before I am hosting a party so I have learned to serve things I can make ahead.  This helps me actually enjoy the party I am throwing.  It can be put together the day before and once it is constructed, you just cover the casserole dish with plastic wrap and store in the refrigerator until you are ready to bake it.

When I am making the dip for just Matt and myself,  I either make half the recipe or split the dip into two dishes and freeze one.  The leftover dip can be reheated and enjoyed again.  It is a very forgivable dish.  Serve it with tortilla chips, toasted French bread slices, crostini, pita chips, and or veggies.  Goooo football teams to be determined and even more so, bring on the appetizers!

Print
Spinach Artichoke Dip
 
Ingredients
  • ½ cup light sour cream
  • ½ cup light mayonnaise
  • 3 garlic cloves, minced
  • ¼ tsp. freshly ground black pepper
  • 1 -14 oz. can artichoke hearts, drained and chopped
  • 1- 10 oz. package of frozen chopped spinach, thawed, drained, and squeezed dry
  • 2 -8 oz. packages ⅓ less fat cream cheese, at room temperature
  • 2 cup part skim mozzarella cheese, shredded and divided
  • ½ cup shredded Parmesan cheese
Instructions
  1. Preheat oven to 350 degrees
  2. In a large bowl combine sour cream, mayonnaise, garlic, pepper, artichokes, spinach, and cream cheese.
  3. Add in 1½ cup of the shredded mozzarella and ¼ cup of the shredded Parmesan to the dip mixture.
  4. Take dip mixture and spread out into an oven-safe 1½-quart casserole pan or baking dish.
  5. Sprinkle with remained mozzarella and Parmesan cheese.
  6. Bake for 30 minutes or until bubbly.
  7. Serve with tortilla chips, toasted French bread slices, crostini, pita chips, and/or veggies.
3.2.2199

Source– Adapted from Cooking Light

sisterk (2)


Filed Under: K's Recipes, Party Ideas Tagged With: appetizers, dips, Spinach Artichoke Dip, super bowl appetizers, Super Bowl Recipe Ideas

Stovetop Oatmeal

Posted by Keelin Hollenbeck on January 6, 2014

Stovetop Oatmeal

Before Thanksgiving, my mom visited me for a few days while Matt was on a business trip.  I picked my mom up from the airport and surprised her by taking her to a cookbook signing for Giada’s new book Giada’s Feel Good Food.  The signing was at the Stanford Shopping Center in Palo Alto, which is beautiful, so that was a plus.  We waited in line for 2 hours and finally we got to meet Giada.

I have never been to something like this and of course, I was so starstruck I couldn’t think of anything to say when it was our turn. While I was smiling awkwardly, my mom kept talking to Giada about how much she loves her shows and books while Giada signed our books.  When we walked away, we had a really good laugh about how we reacted to seeing Giada!  We went to the restaurant next door and sat outside for a great dinner.  We even got to see Giada again when she left the book signing from our table at the restaurant.

Giada

When we got home that night, we decided to make one of the oatmeal recipes in her book that I happened to have all the ingredients for.  We reheated the oatmeal for the next two mornings for breakfast and it was so delicious and filling.   During the whole month of December I made this oatmeal on Sunday night to have for breakfast for the whole week .  I put each serving of oatmeal in a lidded container and stored then in the refrigerator.  When I got to work, I would reheat it for 1 -1 1/2 minutes in the microwave.   I really enjoyed the oatmeal and found myself look forward to it.   This breakfast gave me the energy during the holiday season and stopped me from feeling sluggish.

Now that it is January and things are back to normal around here, this oatmeal is definitely going to be a breakfast staple.   I am back to Weight Watchers after last month’s cookies so this breakfast fits perfectly into my plan.

Print
Stovetop Oatmeal
 
Ingredients
  • 3½ cup almond milk
  • ⅛ tsp. kosher salt
  • 1 tsp. vanilla extract
  • 2 cups old fashioned oats
  • 2 tbsp. dried cranberries
  • 1 tbsp. brown sugar
  • ¼ tsp ground cinnamon
  • 2 tsp. granulated sugar
Instructions
  1. Add almond milk, kosher salt, and vanilla extract to a sauce pan and bring to a boil over medium heat. Once the milk begins to boil, add in oats and cook for 6-7 minutes. Cook an additional 1-2 minutes if you prefer a thicker oatmeal.
  2. Stir in dried cranberries and brown sugar. In a small bowl combine the ground cinnamon and sugar. Separate the oatmeal into four bowls and sprinkle each bowl with ¼th the cinnamon sugar mix.
  3. To make ahead- Separate cooked oatmeal into 4 lidded containers and sprinkle with cinnamon sugar. Store in the refrigerator until needed. To reheat oatmeal remove lid and microwave for about 1-1½ minutes. Stir and enjoy!
3.2.2199

Source- Adapted from Giada’s Feel Good Food (disclosure: this is an Amazon affiliate link)

sisterk (2)


Filed Under: K's Recipes Tagged With: breakfast, breakfast recipe, Feel Good Food, Giada, Healthy Living, oatmeal

1 Roly-Poly Santa Cookies

Posted by Keelin Hollenbeck on December 24, 2013

Roly-Poly Santas

Here we are, our last cookie of the 2013 2 Sisters 2 Cities’ Cookie Countdown!   The last cookie is always the hardest to pick.  Since we photograph the number of cookies that correlate with the day of the countdown (if you haven’t noticed yet), having one cookie in a photo can be boring!   I knew that the last cookie had to be something special so when I saw these Roly-Poly Santa Cookies on Better Homes and Gardens’ website I was sold.  The funny thing is that  M and I both had these cookies on our 2013 cookie brainstorming list.

Roly-Poly Santa

Although these cookies are so cute, they are a little bit more labor-intensive than your average cookie.  I think this would be a great recipe to gift to kids.  I wanted to save one for my nephew T, but I knew they would never last in my luggage on the way home.

Roly-Poly Santas are made up with 11 red and white dough balls, then embellished with mini chocolate chips, red hots, and frosting.   I was worried that my red dye wouldn’t make a true red color.  I always get a bright pink when I try to make red frosting, but I’ve heard this happens to a lot of people.  From my research, I discovered that Americolor’s Super Red soft gel paste does the trick.  I was happy with the red color that my Santa cookies came out in and I did not taste any dye in them.

Print
Roly-Poly Santas
Author: 2 Sisters 2 Cities
Recipe type: cookies
 
Ingredients
For Cookies
  • 1 cup of butter, softened
  • ½ cup of sugar
  • 1 tablespoon of milk
  • 1 teaspoon of vanilla
  • 2¼ cups of all-purpose flour
  • Red paste food coloring
  • Miniature semisweet chocolate pieces
  • 1 recipe of Snow Frosting
  • Red cinnamon candies
White Frosting
  • ¼ cup of shortening
  • ¼ tsp. of vanilla
  • 1 cup plus 2 tbsp. of confectioners' sugar
  • 1½ tsp. of milk
Instructions
For Cookies:
  1. Preheat oven to 325 degrees F.
  2. In the bowl of your mixer, beat butter on medium speed for about 30 seconds. Add sugar to butter and continue to beat until combined.
  3. Beat in milk and vanilla, scraping down sides until all is combined.
  4. Next mix in as much of the flour as you can with the mixer. Stir in any remaining flour by hand. Remove 1 cup of the dough and place in a separate bowl . With the remaining dough, tint red with food coloring gel in mixer.
  5. For each Santa (this should make 10-12 cookies), shape red dough into twelve- 1-inch ball and sixty -1/2-inch balls(one 1-inch red dough ball, and five ½-inch red dough balls per Santa cookie.)
  6. Shape plain dough into twelve- ¾-inch ball and forty-eight- ¼-inch balls (one ¾-inch plain dough ball, and four-1/4 inch plain dough balls)
  7. Line 2 baking sheets with baking mat or parchment paper.
  8. Place the red 1-inch ball on a baking sheet, flattening the dough ball until about ½ inch thick. Attach the plain ¾-inch ball for head, flattening until ½ inch thick.
  9. Next, attach four of the red ½-inch balls for arms and legs and then attach the plain ¼-inch balls for hands and feet. Pinch the remaining ½-inch red ball into a Santa hat and attach to head.
  10. Repeat steps to create the rest of the Santas. Add the mini-chocolate chips as eyes and buttons.
  11. Bake Santa cookies for 12 to 15 minutes until edges are lightly browned.
  12. Let the cookies cool on baking sheet. Be careful because the are extremely fragile. Once cooled, gently move to a wire cooling rack.
  13. To create beard, put frosting in a piping bag with a small star tip (recipe below). Attach the red hot for the nose. Let sit until frosting sets.
For Frosting-
  1. In the bowl of you mixer, beat together shortening and vanilla for around 30 seconds. Gradually mix in around ½ cups of the confectioners' sugar until smooth. Next beat in 1½ tsp. milk. Continue to mix in remaining confectioners' sugar until the consistency for piping.
3.2.2199

Source- Slightly Adapted from BHG.com

sisterk (2)


Filed Under: K's Desserts, K's Recipes Tagged With: 12 cookies of Christmas, Christmas Cookies, cookie recipe, cookies, holiday baking, santa

2 Pecan Sandies

Posted by Keelin Hollenbeck on December 22, 2013

I know M and I have been saying this the whole time, but I cannot believe we are only three days away from Christmas.  All the cookies are made and we are so excited to share the the last two with you.  Today’s cookies are the Pecan Sandies, a delicious butter cookie with a hint of sweetness and a whole lot of pecans!  I actually picked out this recipe last February when I got the Bouchon Bakery cookbook.  When you know you have to make 12 new types of cookies in December, you definitely  need to plan ahead!

Pecan Sandies

This recipe closely resembles my family’s recipes for Mexican Wedding Cakes, the only difference is that these are made with pecans instead of walnuts, and the cookies are pressed down instead of just cooked in ball shape. I wouldn’t refuse either with a cup of tea or coffee…mmmmmmm.

2 Pecan Sandies

Print
2 Pecan Sandies
Author: 2 Sisters 2 Cities
Serves: 24-30
 
Ingredients
  • 1¾ cups plus 2 tsp. all purpose flour
  • ¾ cup coarsely chopped pecans
  • ¾ cup unsalted butter (1½ sticks)
  • ¾ cup plus 2 tbsp. confectioners' sugar, additional for sprinkling finished cookies
Instructions
  1. Preheat oven to 350 degrees F.
  2. In the bowl of your mixer, beat butter for 1-2 minutes until smooth. Add confectioners' sugar and mix together until light and fluffy.
  3. In a separate bowl combine pecans and flour.
  4. Mix dry ingredients into butter until combined, scraping down the side of the bowl to make sure all ingredients are incorporated.
  5. Roll dough into 1 to 1½ inch balls. Place dough balls at least 2 inches away from on a baking sheet lined with a silicone baking mat or parchment paper. Lightly flour the backside of a measuring cup, press dough ball into ½ inch thick disk.I
  6. Bake for 15-20 minutes until cookies are lightly golden on edges, rotating the baking sheet halfway through baking. Let cool on a wire rack and lightly sprinkle with additional confectioners' sugar.
3.2.2199

Source- Slightly adapted from Bouchon Bakery cookbook

sisterk (2)


Filed Under: K's Desserts, K's Recipes Tagged With: 12 days of christmas cookies, Christmas Cookies, cookies, holiday baking, holiday cookies, pecan sandies

Easy Pecan Sticky Buns

Posted by Keelin Hollenbeck on December 20, 2013

Easy Pecan Sticky Buns

Disclosure: This post is sponsored by the the National Frozen & Refrigerated Foods Association and The Mom It Forward Blogger Network.  All opinions are our own.

One of our favorite holiday traditions is enjoying warm sticky buns after opening presents on Christmas morning.  We are usually ravenous by the time we get to breakfast on that special day and these easy pecan sticky buns hit the spot every time.  This recipe is great because you can prepare it ahead of time and bake it right before serving.  This recipe calls for puff pastry (found in the freezer aisle) and unsalted butter (from the dairy aisle).  These easy pecan sticky buns just might become a Christmas tradition for your family too!

Quick Sticky Buns

While you are planning your holiday menu over the next week, don’t forget to shop the freezer and dairy aisle.  Both aisles offer such a great variety of foods that can be used for special holiday meals and treats. For more holiday recipe ideas, check out the Easy Home Meals Pinterest boards or the Easy Home Meals website, sponsored by the National Frozen & Refrigerated Foods Association.

Sticky Buns from Frozen Puff Pastry Dough

Save Print
Easy Pecan Sticky Buns
Prep time:  30 mins
Cook time:  30 mins
Total time:  1 hour
 
Ingredients
Sticky Buns
  • 12 tablespoons (1 and ½ sticks) unsalted butter, at room temperature
  • ⅓ cup light brown sugar, lightly packed
  • ¾ cup pecans
  • 1 package (17.3-ounces/ 2-sheets) frozen puff pastry, defrosted
Filling:
  • 2 tablespoons unsalted butter, melted and cooled
  • ⅔ cup light brown sugar, lightly packed
  • 3 teaspoons ground cinnamon
  • ½ cup raisins
Instructions
  1. Using the bowl of an electric mixer, cream together the 12 tablespoons butter and ⅓ cup brown sugar with the paddle attachment. Use a small ice cream scoop to place the mixture in each of the 12 muffin cups. Add the pecans evenly among the 12 muffin cups.
  2. Meanwhile, flour a surface and unfold 1 sheet of the puff pastry with the folds going left to right. Brush the entire sheet with the melted butter. Leaving a 1-inch border on the puff pastry, sprinkle each sheet with ⅓ cup of the brown sugar, 1 and ½ teaspoons of the cinnamon, and ¼ cup of the raisins. Starting with the end closest to you, roll the pastry up tightly around the filling, finishing the roll with the seam side down.
  3. Cut off ½-inch off the ends of the roll and discard. Slice the roll in 6 equal pieces. Place each cut bun (spiral side up) into a cup of a standard-sized muffin pan.
  4. Repeat with the second sheet of puff pastry to make 12 pecan sticky buns in total.
  5. Cover muffin pan with plastic wrap and refrigerate until serving day.
  6. On serving day: Preheat the oven to 400 degrees F. Place the muffin pan on a foil-lined baking sheet. Bake for 30 minutes, until the sticky buns are golden to dark brown on top and firm to the touch. Allow to cool for 5 minutes only and flip the buns onto the parchment paper (use a spoon to scoop out any remaining filling and pecans and pour onto the buns). Enjoy!
3.2.2199

Source: Adapted from The Barefoot Contessa

Holiday cheers!

k & m


Filed Under: K's Recipes, M's recipes Tagged With: breakfast recipe, christmas, christmas morning, holiday baking, holiday helper, pecan sticky buns, puff pastry, sponsored post

4 Oatmeal Chocolate Mint Cookies

Posted by Keelin Hollenbeck on December 18, 2013

Oatmeal Chocolate Mint Cookies

Was that a misprint?  An oatmeal cookie with mint?  No mistake here, these two flavors are a hidden treasure.  San Francisco is know for an ice cream sandwich from IT’s-IT Ice Cream which is vanilla, mint, chocolate, or cappuccino ice cream in between two old-fashioned oatmeal cookies and then dipped in dark chocolate.  We found them at the grocery store recently and have tried both the vanilla and mint sandwiches.  I have to say my favorite is the mint.  The classic oatmeal cookie with the cool refreshing taste of mint ice cream all pulled together with the bitter dark chocolate is something truly to write home about.

IT'S-IT Inspired Cookies

I was inspired to try to make a cookie version of this ice cream sandwich after eating some of Hershey’s Holiday Mint Truffle Kisses.  I searched through my cookbooks for a basic oatmeal cookie recipe and decided to tuck the kiss inside the cookie versus placing on top.  When the cookies came out of the oven, the flavor was almost perfect but missing something.  I had leftover melted chocolate from the chocolate-dipped shortbread cookie recipe so I drizzled some chocolate on top.  With the addition of the chocolate, the cookie instantly tasted just like the ice cream sandwich.

My boyfriend told me that they were best of all the holiday cookies I created, which is a huge feat after our favorite shortbread recipe.  I was a little worried about bringing them into work because of the weird combo, but my co-workers went nuts over them and they were gone quickly.   Take a chance this holiday season and make these cookies before those truffle kisses run out!

4 Oatmeal Chocolate Mint Cookies

Print
4 Oatmeal Chocolate Mint Cookies
Author: 2 Sisters 2 Cities
 
Ingredients
  • 1 cup of unsalted butter (2 sticks), at room temperature
  • 1 cup packed light brown sugar
  • 1 egg
  • 1 tsp. vanilla extract
  • 1 ¾ cup all purpose flour
  • 1 tsp. Cinnamon
  • ½ tsp. salt
  • 2 ½ cups old fashioned oats
  • 30-36 Hershey’s Mint Truffle Kisses, unwrapped
  • ¼ cup Bittersweet chocolate chips
Instructions
  1. In the bowl of you mixer, beat together butter and brown sugar until its fluffy and light yellow in color. Scrape down the sides of the bowl and add in egg and vanilla extract, mix for about 1 minute.
  2. In a separate bowl mix together flour, cinnamon, and salt. Add in oats.
  3. With mixer on low speed add dry ingredients to butter mixture. Mix for about 30 seconds and then finish the rest with a rubber spatula.
  4. Cover bowl with plastic wrap and place in the refrigerator for at least 1 hour or up to 12 hours.
  5. After at least an hour of chilling, preheat oven to 350 degrees
  6. Taking about 2 teaspoon of dough in your hand, flatten into a disk and place a mint kiss in the middle. Fold sides up around the kiss and top with an additional teaspoon of dough so that the kiss is completely sealed in the dough ball. Place on a baking sheet lined with a silicone baking mat or parchment paper, leaving at least 2 inches between each cookie.
  7. Bake for 14-16 minutes or until set. Let cool on baking sheet a couple of minutes before moving to a wire cooling rack.
  8. Once cookies have cooled top with chocolate drizzle.
  9. For Drizzle- In a small heat proof bowl, add chocolate chips. Microwave in 20 second intervals, stirring in between until melted. To drizzle, take a spoon of melted chocolate, tip the spoon to get a small stream of chocolate going and move back and forth over the cookies so you get zig zags over the cookies.
3.2.2199

Have you been following our entire 2013 Cookie Countdown?  Catch up below if you have missed any!

5 Sprinkle Cookies
6 Chocolate-Dipped Shortbread Cutouts
7 Chocolate Hazelnut Coins
8 Italian Lemon Drops
9 Chocolate Toffee Crackers
10 Cranberry Pistachio Shortbread Cookies
11 Christmas Snickerdoodles
12 Chocolate Raspberry Thumbprints

sisterk (2)


Filed Under: K's Desserts, K's Recipes Tagged With: 12 days of christmas cookies, baby shower brunch, chocolate, cookie recipe, cookies, holiday baking, it's it, mint, oatmeal, san francisco

5 Sprinkle Cookies

Posted by Keelin Hollenbeck on December 17, 2013

Sprinkle Cookies

Today we bring you 5 sprinkle cookies! Can you tell that I am in a sprinkle mood after cookie number 6?   I ended up buying two huge containers of sprinkles at the store when I ran out last weekend for the chocolate-dipped shortbread cookies.  During the week I had a very productive night: getting home, working out, and making dinner all before 8.  I decided to get ahead and make another batch of cookies for our cookie countdown.

I found a recipe for Italian Sprinkle cookies and since these happened to be my most favorite of the Italian variety, I knew I had to make them.  Better yet, this recipe was so easy to make!  The recipe has lemon zest in it which may seem weird to you.  My boyfriend was very skeptical about this addition but it adds a really great flavor to the cookies.  We ate so many of these cookies that I was lucky to have five cookies left to take a picture!

5 Sprinkle Cookies

Print
5 Sprinkle Cookies
 
Ingredients
  • 1½ cup all-purpose flour
  • 1½ tsp. baking powder
  • ½ tsp. kosher salt
  • 1½ sticks of unsalted butter (12 tbsp.), at room temperature
  • ¾ cup of granulated sugar
  • 2 tsp. vanilla extract
  • Zest of ½ of a lemon
  • 1 egg
  • 1 cup of sprinkles
  • 1 egg white, light beaten
Instructions
  1. In the bowl of your mixer, combine butter and sugar for about 2 minutes, until light and fluffy.
  2. Sir in vanilla, lemon zest, and egg into the butter mixture until smooth.
  3. In a separate medium-sized bowl whisk together flour, baking powder, and salt.
  4. Add dry ingredients to the butter, and mix until just combined.
  5. Line a baking sheet with silicone baking mat or parchment paper.
  6. Roll dough into 1" balls and place on baking sheet at least 2 inches away from each other.
  7. With the back side of clean measuring cup, dust lightly with flour and press down each cookie ball in disk. Continue to flour the bottom of the measuring cup as needed to prevent the dough from sticking
  8. Refrigerate the cookie disk for 30 minutes.
  9. Preheat the oven to 375 degree F.
  10. Place sprinkles in one bowl and egg white in another bowl.
  11. With a pastry brush, brush each cookie with egg white and then dip into sprinkles, pressing lightly to get sprinkles to adhere. Place each cookie back on baking sheet.
  12. Bake for about 10 minutes until each cookie is set.
  13. Let cool and serve! Keep in a airtight container for 3 days or freeze for up to 3 months,
3.2.2199

Source- Adapted from Saveur.com

Looking for more cookie recipes?  Check out our countdown so far:

6 Chocolate-Dipped Shortbread
7 Chocolate Hazelnut Coins
8 Italian Lemon Drops
9 Chocolate Toffee Crackers
10 Cranberry Pistachio Shortbread
11 Christmas Snickerdoodles
12 Chocolate Raspberry Thumbprints

sisterk (2)


Filed Under: K's Desserts, K's Recipes Tagged With: 12 days of christmas cookies, Christmas Cookies, cookie recipes, holiday baking, Italian cookies, sprinkles

Homemade Candy

Posted by Keelin Hollenbeck on December 16, 2013

Slow Cooker Candy

Today we are taking a break from the cookie countdown, but we are still focusing on Christmas treats!  This year for my co-workers’ holiday gifts, I am giving mason jars filled with two kinds of homemade candy inside.   I have given my co-workers Christmas cookies in the past, but I decided to change it up this year.  I have been bringing the cookies into work right after I make them to give us a little break from being surrounded by Christmas cookies 24/7.  I love the idea of mason jars and how they can be used for some many things.  Leftovers, soups, vases, glasses, and gift packaging!  I purchased my jars at Target for around $8 for 12, but they also sell them on Amazon for $9.99 with Prime shipping if you can’t find them around where you live.

Slow Cooker Candies

The first candy I made was one that I have been seeing all over Pinterest called “Crockpot Candy.”  This candy is made with a slow cooker.  It is really easy to make and is super addictive!  They are like a chocolate-covered nut cluster with a softer more tastier chocolate mixture.  I used mini cupcake liners to put the chocolate candies in instead of the regular sized liners called for in the original recipe.  I found Christmas cupcake liners at both Target and my grocery store.  The original recipe also asks for white almond bark, which they do not sell anywhere around here.   After googling some resolutions, I found out that you can use Candiquik vanilla melting chocolate in replacement of white almond bark.  I had seen this product at Target when I was looking for the bark.  If you can’t find either, just use white chocolate.

For a quicker hardening stage- stick your trays outside (if it’s cold out).  It has been record breaking cold over hear in the Bay Area, which would be regular cold everywhere else, but its considered cold here.  I know what M is thinking now- we grew up with Syracuse winters… toughen up K!  Right M?

Print
Slow Cooker Candies
Author: 2 Sisters 2 Cities
Recipe type: Candy
Prep time:  20 mins
Cook time:  2 hours 30 mins
Total time:  2 hours 50 mins
Serves: 50-60 candies
 
Ingredients
  • 1 pound dry-roasted salted peanuts
  • 2 oz. German Chocolate, broken into squares
  • 1 cup Semi-sweet chocolate
  • 1¼ pounds Candiquik vanilla melting chocolate, broken into squares
Instructions
  1. In your slow cooker add peanuts followed by German sweet chocolate, semi-sweet chocolate chips and then topped with the candiquik vanilla melting chocolate.
  2. Cover slow cooker and turn on low. Cook untouched for 2½ hours.
  3. While the chocolate is heating, line a baking sheet with mini cupcake liners. You will need about 50-60 liners.
  4. After 2½ hour cooking time, stir the chocolate until all combined. Keep the heat on low while dividing.
  5. Using a teaspoon or a small cookie scoop, scoop candy mixture into each liner. Half way through filling. Tap tray against counter to force the chocolate to settle into the liners. Repeat when finished filling the remainder of liners.
  6. Let candies cool complete before eating. Keep in an air tight container.
3.2.2199

Source- Adapted from Home Cooking with Trisha Yearwood via foodnetwork.com

Peanut Brittle

The second type of candy I am packaging this year is my all time favorite holiday candy, Peanut Brittle.  My mom made this recipe growing up and I am such a huge fan.  I had posted this recipe when we first started this blog, but I didn’t have any photos of it and it is pretty buried in our history.  The key to this recipe is finding raw, blanched peanuts.  This, my friends, is not an easy task.  I have been searching for raw blanched peanuts for the last four years!  Wegmans used to carry then and Whole Foods has them occasionally,  but I haven’t seen them in either for awhile.  You can buy these on-line for sure, I just never got to ordering them ahead of time.  This year while  getting my produce at a store called Sprouts, I found the peanuts in the bulk nut section!   I couldn’t believe it!  I quickly filled a bag with the peanuts and knew I had to make my favorite peanut brittle again.

Print
Peanut Brittle
Author: 2 Sisters 2 Cities
 
Ingredients
  • 1 cup sugar
  • 1 cup light corn syrup
  • 2 cups raw blanched peanuts
  • 1 tsp. Baking Soda
  • 1 tsp. vanilla extract
Instructions
  1. Prepare a cookie sheet by spraying with cooking spray and set aside. Also spray a heat resistant rubber spatula or regular spatula with spray; it will come in handy when spreading the sticky mixture.
  2. In a sauce pan over medium-high heat, stir together sugar and light corn syrup.
  3. Once melted together, add in raw peanuts. Stir constantly for 12-15 minutes, until peanuts start to turn brown (often the signal that it’s ready is a puff of smoke, but I am yet to see this puff.)
  4. Stir in vanilla extract and baking soda quickly before the candy starts to harden.
  5. Once all the ingredients are completely stirred together, pour mixture onto greased baking sheet, using greased spatula to spread it out. Spread candy out as far as you can without making holes so that there is a single layer of peanuts.
  6. After this is spread, leave for about 1 or 2 hours until completely hardened then break into small pieces. Store in an airtight container.
3.2.2199

Source- A 2s2c original
sisterk (2)


P.S. Looking for more holiday edible gift ideas besides homemade candy?  Try our homemade hot chocolate mix!

Homemade Hot Chocolate Mix

Related Posts Plugin for WordPress, Blogger...


Filed Under: K's Desserts, K's Recipes Tagged With: candy, christmas gift ideas, crockpot candies, diy christmas project, DIY gifts, edible stocking stuffers, homemade candy, Peanut Brittle, stocking stuffers

  • « Previous Page
  • 1
  • 2
  • 3
  • 4
  • …
  • 20
  • Next Page »

Recent Posts

  • Easy Holiday Office Party Tips
  • 5 Steps to an Easy Football Party
  • Gingerbread Biscotti
  • Holiday Coffee Bar and Thanksgiving Recipes
  • Soft Sugar Pumpkin Cookies
  • Cinnamon Sugar Apple Cake
  • Hello Pumpkin Season!
  • Make Your Own Milkshake Party!
  • Mama’s Pickles
  • S’more Cookies

Categories

  • About 2 Sisters 2 Cities (7)
  • Books (8)
  • Crafting & DIY (22)
  • Design & Decorating (15)
  • Gardening (5)
  • Giveaway (14)
  • Guest Bloggers (8)
  • K's post (46)
  • K's Recipes (191)
    • K's Desserts (75)
    • K's Entrees (23)
    • K's Sides (24)
  • M's post (72)
  • M's recipes (167)
    • M's Entrees (21)
    • M's Sides (14)
    • M's Desserts (30)
  • Organizing (7)
  • Party Ideas (49)
  • Uncategorized (1)
  • Vacation (12)
Stitch Fix

Archives

Blogroll

  • Annie's Eats
  • Bake at 350
  • Baked Bree
  • Boston Harbor Beacon
  • Confections of a Foodie Bride
  • Cook Like a Champion
  • Erin’s Food Files
  • Forever and a Recipe
  • Framed Cooks
  • Oh Happy Day
  • On Common Ground
  • Pennies on a Platter
  • Pink Parsley
  • Recipe Girl
  • Sally's Baking Addiction
  • Simply Scratch
  • The Curvy Carrot
  • The Pioneer Woman
  • Tidy Mom
  • Two Peas & Their Pod
  • What’s Gaby Cooking
  • Young House Love
Increase your website traffic with Attracta.com

grab a 2 sisters button!


Copyright © 2014 ~ 2 Sisters 2 Cities | Blog Design by Minx Design