2 Sisters 2 Cities

Image Map
  • About 2 Sisters 2 Cities
  • Recipe Index
  • Project Index
  • Contact Us
  • Like us on Facebook
  • Follow m on twitter
  • Follow k on twitter
  • Follow 2S2C on Pinterest
  • Follow 2S2C on G+
  • rss
  • e-mail 2S2C

6 Chocolate-Dipped Shortbread Cutouts

Posted by Keelin Hollenbeck on December 14, 2013

Chocolate Dipped Shortbread Cutouts

On the sixth day of Christmas cookies my true love gave to me… 6 chocolate-dipped shortbread cutouts!   Aww, thanks!  I love love this recipe for shortbread.  It is one of my favorite cookies.  I feel like I say that a lot, but what can I say, I love me some cookies.  My boyfriend and I make them year-round in different shapes based on the season.  He will make the dough and put it in the refrigerator, and do the dishes, and then I will roll it out, cut them out, bake them and dip them in chocolate.   When I am feeling festive, I add sprinkles!  I love the longer “jimmie” sprinkles rather than the nonpareil sprinkles.

Chocolate Dipped Shortbread Cutouts

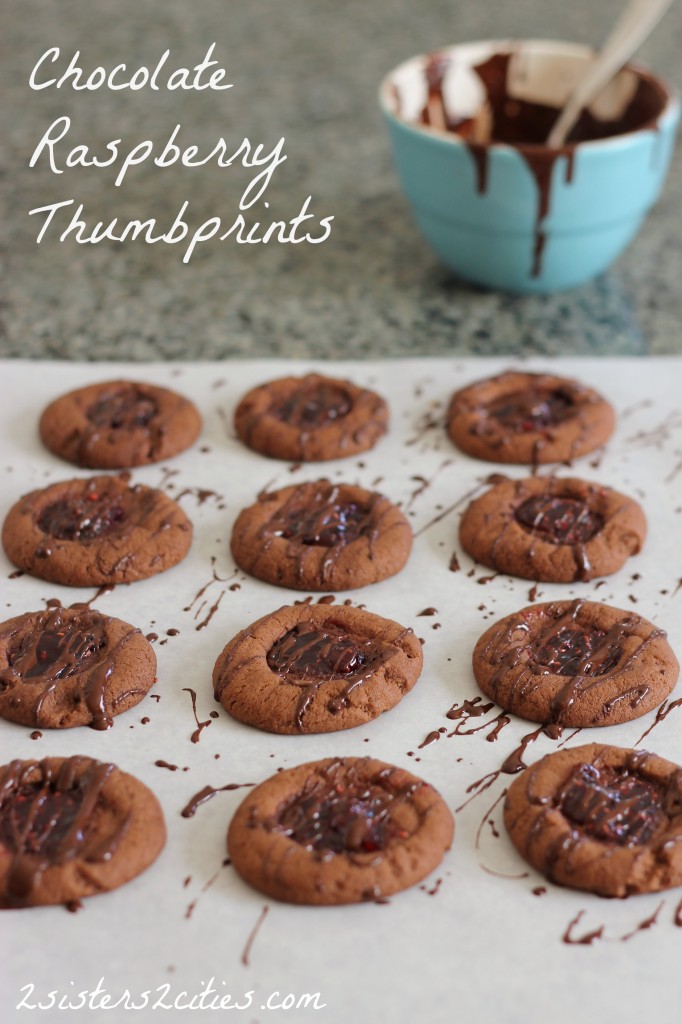
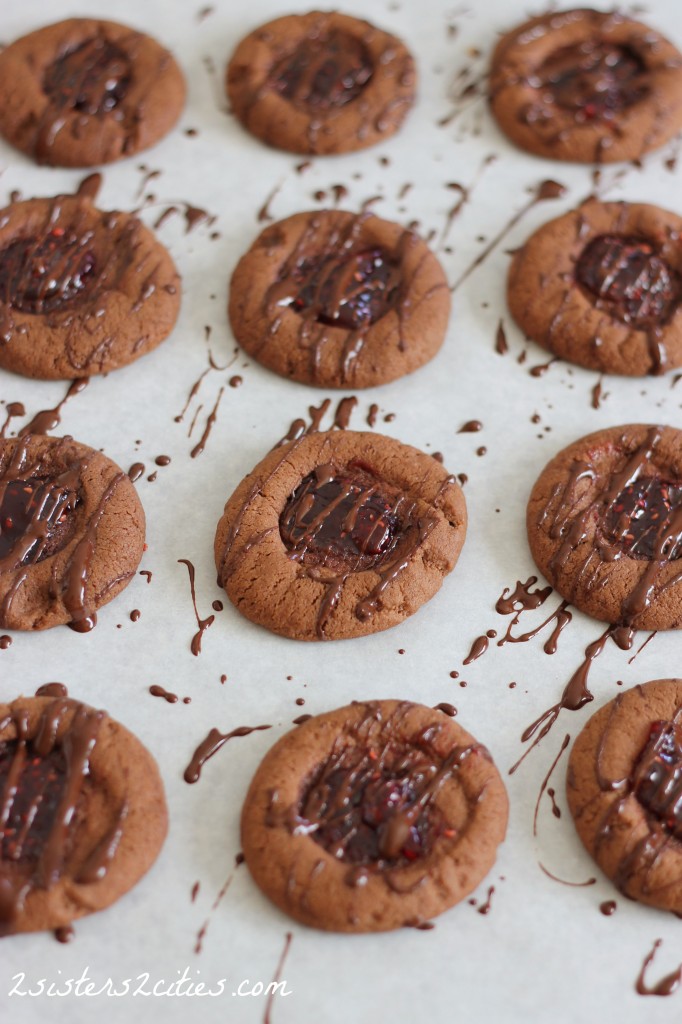
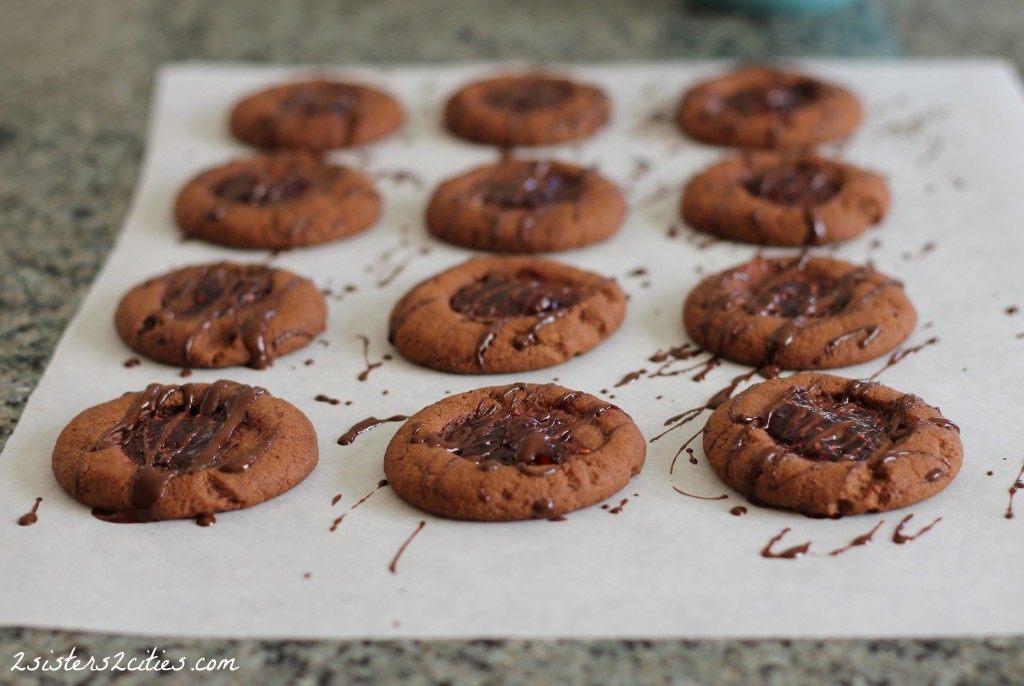
I happened to only have the later when I was making these cookies so I ran out the grocery store to get some  more.  I later discovered that I also had no confectioners’ sugar left to make my next cookie!  Don’t you hate when that happens!  I had every type of sugar – granulated, light brown, dark brown, and even superfine!  I had to change my next cookie recipe up because I was not about to go back to the store.  Sprinkles and chocolate are optional and if this recipe looks familiar to you, it’s just a variation of the recipe I use for linzer cookies.

Chocolate Dipped Shortbread Cookies

These cookies are great to come home to after a long day of last-minute shopping.  Not to toot my own horn, but I don’t have any last minute shopping to do because I bought everything on-line last week…Toot TOOT!  I do have some serious baking to do this weekend though!
Chocolate Dipped Shortbread Cutouts
Print
6 Chocolate Dipped Shortbread Cutouts
 
Ingredients
  • 1½ cups of Butter (3 sticks), at room temperature
  • 1 cup granulated sugar
  • 1 teaspoon vanilla extract
  • 3½ cups AP flour
  • ¼ teaspoon salt
  • 2 cups bittersweet or semi-sweet chocolate chips
  • 1 cup sprinkles (optional)
Instructions
  1. In the bowl of a mixer, add in butter and sugar and mix until combined (using the paddle attachment.) Mix in vanilla extract.
  2. In a separate bowl whisk together flour and salt.
  3. With mixer on low, add the dry ingredients into the butter and mix until combined.
  4. Take dough out on to a floured surface and form into a disk. Wrap in plastic wrap and place in the refrigerator for 30 minutes.
  5. Preheat oven to 350 degrees F.
  6. On a floured surface, roll out dough with a rolling pin to ¼-1/2 inch thickness.
  7. Using a 3 inch cookie cutter, cut out shapes and place them on a silicone baking mat or parchment paper lined baking sheet. Space cookies at least 2 inches away from one another.
  8. Bake for 15-20 minutes until cookies start to brown on edges.
  9. To melt chocolate-- In a microwave safe bowl place chocolate chips. On a 50% power setting on the microwave heat the chocolate for 1-1½ minutes. Stir chocolate then continue to heat until melted in 20 seconds intervals until completely smooth or melted.
  10. Dip cookies in melted chocolate, using a off-set spatula to scrape the chocolate off the bottom of the cookie. Lie on parchment paper. Add sprinkles immediately before chocolate starts to dried. Repeat for all cookies. Let dry before repacking cookies. Eat within three days or freeze.
  11. *I would recommend higher quality chocolate chips for this process because although I am a huge fan of Nestle chips and Costco chips in cookies, they have added more wax in their chips in the last few years and they do not melt as smoothly. I used Ghiradelli Bittersweet Chocolate chips and they melted perfectly. For smoother chocolate you can even used baking bars of chocolate which have even less wax in them resulting in smoother chocolate.
3.2.2199
sisterk (2)


Filed Under: K's Desserts, K's Recipes Tagged With: 12 days of christmas cookies, chocolate, chocolate dipped cookies, christmas cookie, cookie recipe, cookies, holiday baking, shortbread, sprinkles

8 Italian Lemon Drops

Posted by Keelin Hollenbeck on December 11, 2013

Italian Lemon Drops

As I have told you all before, I have a crazy food memory in which I can practically remember everything I have eaten at most events in my life.   Can I remember a phone number or where my keys are…uhhh nope!  It’s funny how selective memories can be, but I guess it shows my love for all things food.

Where were we?  Oh right, when I think of Christmas as a child, all the cookies my mom made around the holiday time come to mind.  I can remember the peanut brittle, the chocolate crinkles, the peanut butter cup blossoms, the Mexican wedding cakes, the cut-out cookies, the buckeyes and endless more.  As I grew up and learned how to bake, I started taking on more baking around the holidays and emulated the same tradition my mom had in my own place.  The whole Christmas cookie process of planning, sharing, giving and of course, eating has become quiet an obsession of mine and really how our 12 Days of Christmas Cookies started here at 2s2c.

Italian Lemon Drops

I have shared most of the above recipes that I remember growing up with, but there was one cookie missing that I couldn’t put my finger on.  I kept remembering a round puffy lemon cookie with lemon glaze.   It was driving me crazy that I couldn’t find the recipe in any of my family cookbooks.  When I asked my mom, she remembered where it was from: a school fundraiser cookbook she had bought over 30 years ago.  Alas, here is how we came to cookie number eight on this year’s countdown- the Italian Lemon Drop cookie (i.e. the Lemon Anginetti.)  I have updated some of the ingredients to more modern ones since the original recipe included melted Crisco and 3 tablespoons of lemon extract!

Print
Italian Lemon Drops
Author: 2 Sisters 2 Cities
 
Ingredients
Cookie-
  • ½ cup unsalted butter, melted
  • Zest from one lemon
  • ¾ cup sugar
  • 2 eggs
  • pinch of salt
  • 3½ cups all-purpose flour
  • 7 tsp baking powder
  • ⅔ cup whole milk
  • 2 tsp. lemon extract
  • ½ tsp. vanilla extract
Glaze-
  • 1 lemon, juiced
  • 1-1 ½ cups confectioners’ sugar
Instructions
  1. Preheat oven to 350 degrees F.
  2. In the bowl of your mixer add sugar and lemon zest. Mix for 1-2 minutes to infuse the sugar with the lemon flavor.
  3. Add melted butter to lemon sugar and combine. Mix in eggs and salt.
  4. In a separate bowl sift together flour and baking powder.
  5. In measuring cup mix together milk, lemon extract and vanilla extract.
  6. Mix in ⅓ of flour mixture to butter followed by ⅓ of milk mixture. Repeat process ending with milk and stirring until all ingredients are combined.
  7. Line baking sheets with non-stick baking mats or parchment paper. Roll dough in balls the size of walnuts. The dough may be sticky so make sure your hands are well floured. Leave about 2 inches between each cookie.
  8. Bake for 10-12 minutes until cookies are firm to touch. Let cool on wire rack.
  9. To make glaze- whisk together 1 cup of confectioners’ sugar and 1-2 tablespoons of lemon juice. Continue to whisk until smooth, adding more lemon juice as needed. If glaze gets too thin add additional confectioners’ sugar. Dip each cookie top in glaze and let excess drip back into bowl. Place on parchment paper and let dry completely before putting away. Can be store in air tight container for up to three days or frozen up to 3 months.
3.2.2199

sisterk (2)


Filed Under: K's Desserts, K's Recipes Tagged With: 12 days of christmas cookies, cookie recipe, cookies, holiday baking, lemon, lemon cookies

10 Cranberry Pistachio Shortbread Cookies

Posted by Keelin Hollenbeck on December 9, 2013

Cranberry Pistachio Shortbread

Today’s cookie is number ten on our cookie countdown: Cranberry Pistachio Shortbread cookies.  I was inspired to make these cookies by looking through my pantry to see what I had available to make for Christmas cookies this year. As you know, I love to bake so I already had many options before having to go out to buy ingredients. I had a bag of pistachios and dried cranberries sitting next to each other and the thought came to me of trying to find a recipe that contained both ingredients since they are natural Christmas colors. I then found a shortbread recipe that incorporated both ingredients and the results were just what I wanted.

These shortbread cookies were perfect, a light buttery cookies with punches of sweet cranberries and salty pistachios.  I brought the leftover cookies to work so I wouldn’t eat them all, and they were gone within an hour of putting them out.   Enjoy!

10 Cranberry Pistachio Shortbread

Print
10 Cranberry Pistachio Shortbread Cookies
 
Ingredients
  • 2⅓ cups all-purpose flour
  • ½ tsp. kosher salt
  • 1 cup unsalted butter (2 sticks), at room temperature
  • ⅔ cup granulated sugar
  • 1 tsp. vanilla extract
  • 1 cup unsalted pistachios, coarsely chopped
  • 1 cup dried cranberries, coarsely chopped
Instructions
  1. In the bowl of your mixer, beat the butter until smooth, about 1-2 minutes. Add sugar and continues to mix until smooth, about 3 minutes. Next beat in the vanilla extract.
  2. In a separate bowl whisk together flour and salt. Add flour mixture to butter until just incorporated. With a spatula, fold in the chopped pistachios and dried cranberries until evenly combined.
  3. Divide the dough in half and roll each dough half into 14 inch logs, so that the width is the same throughout . Wrap in parchment paper and twist the ends. Place in the refrigerator and chill for at least 2 hours but up to three days.
  4. Preheat oven to 325 degrees F. Line 2 baking sheets with parchment paper or silicone baking sheets.
  5. Using a sharp knife slice the logs into ¼ thick slices. Place cookies on baking sheet space at least 1½ inches away. Bake for 15-20 minutes until cookies just start to brown on edges. Let cool on wire rack. Store in an airtight container up to three days. Freeze cookies to keep them longer (up to 3 months.)
3.2.2124

Source- Adapted from The Grand Central Baking Book via JoyofBaking.com

sisterk (2)


Filed Under: K's Desserts, K's Recipes Tagged With: 12 days of christmas cookies, Christmas Cookies, cookies, cranberries, holiday baking, pistachios, shortbread

12 Chocolate Raspberry Thumbprints

Posted by Keelin Hollenbeck on December 4, 2013

Chocolate Raspberry Thumbprints Cookies

Well, here we are again!  It’s the most wonderful time of year- the 2 Sisters 2 Cities 12 Days of  Christmas Cookie Countdown!  We are going to start this party with a delicious classic holiday cookie with a new twist:  a chocolate thumbprint cookies with raspberry jam and drizzled with bittersweet chocolate!

12 Chocolate Raspberry Thumbprints

This year with my holiday cookies, I am going for more classic types of holiday cookies. When I think of Christmas cookies I think of small special cookies embellished with icing, chocolate, powdered sugar, frosting, glaze, jam, nuts, peppermints, or sprinkles. The great part about Christmas cookies is that you can grab a bunch of different kinds and and you get to try all the amazing flavors. Obviously you know what my favorite time of the year is!

My boyfriend loves thumbprint cookies, but he is not a big chocolate cookie fan.  I was hesitant to make this recipe because I thought he wouldn’t like them.  Boy was I wrong, he loved them! The deep chocolate flavors are perfect with the sweet tart raspberry jam.  Add them to your Christmas cookie to-do list today!

Chocolate Raspberry Thumbprints

Print
12 Chocolate Raspberry Thumbprints
Author: 2 Sisters 2 Cities
 
Ingredients
  • 1 cup plus 2 tablespoons butter (2 sticks + 2 tbsp),at room temperature
  • ¾ cup granulated sugar
  • ⅓ cup cocoa powder
  • 2 cups all purpose flour
  • ½ tsp. salt
  • ½ tsp. baking soda
  • 1 tsp. baking powder
  • Raspberry jam
  • 2-3 tbsp. bittersweet chocolate chips
Instructions
  1. Preheat the oven to 350 degrees.
  2. In the bowl of a mixer add butter and sugar, mixing until smooth.
  3. Add in cocoa powder until combined
  4. In a separate bowl, whisk together flour, salt, baking soda, and baking powder.
  5. Gradually add the flour mixture to the butter mixture until all is combined
  6. Line a baking sheet with a silicone baking mat or parchment paper.
  7. Roll dough into 1-inch balls. Place on baking mat at least 2 inches away from each other.
  8. With the tip of your thumb, press down in the middle of the cookie ball to make a well (don't press down all the way.)
  9. Fill each thumbprint with around ½ tsp of jam
  10. Bake for 9-10 minutes
  11. Cookies will spread out a little so if you need more jam in the center add some more before they cool.
  12. For Drizzle- In a small heat proof bowl, add chocolate chips. Microwave in 20 second intervals, stirring in between until melted. To drizzle, take a spoon of melted chocolate, tip the spoon to get a small stream of chocolate going and move back and forth over the cookies so you get zig zags over the cookies.
3.2.2124

Source–  Base cookie recipe adapted from Pinch of Yum, addition of raspberry jam and chocolate drizzle is a 2S2C original

sisterk (2)


Filed Under: K's Desserts, K's Recipes Tagged With: 12 days of christmas cookies, baking, chocolate, chocolate and raspberries, christmas, Christmas Cookies, cookie recipe, holiday baking, raspberries

12 Days of Christmas Cookies (The Past)

Posted by 2 Sisters 2 Cities on December 1, 2013

Why hello there December 1st!  I could have sworn Thanksgiving was a mere three days ago.  Time to put those pumpkin pie pans away and get ready for some Christmas baking!  We are so excited to kick-off our 3rd year of our annual 12 Days of Christmas Cookies.  Before we start our series for 2013, I wanted to highlight our 24 Christmas cookies from the past two years.

12 Days of Christmas Cookies {from 2 Sisters 2 Cities}

12 DAYS OF CHRISTMAS COOKIES 2012

  • Twelve Oreo Truffles
  • Eleven Mini Pecan Pie Bites
  • Ten Crisp Toffee Chocolate Bars
  • Nine Raspberry Linzer Cookies
  • Eight Kolacky
  • Seven Italian Butter Spritz Cookies
  • Six Chocolate Velvet Butter Balls
  • Five Peppermint Bark Cookies
  • Four Nutella and Sea Salt Stuffed Sugar Cookies
  • Three Heath Bar Butter Cookies
  • Two Mini Gingerbread Men with Cream Cheese Icing
  • One Salted Chocolate Chip Caramel Cookie Bars


12 days of Christmas cookies- 2011 {from 2 Sisters 2 Cities}

12 DAYS OF CHRISTMAS COOKIES 2011

  • Twelve Salted Caramel Chocolate Shortbread Bars
  • Eleven Buckeyes
  • Ten Glazed Lemon Cookies
  • Nine Mexican Wedding Cakes
  • Eight White Chocolate Ginger Drops
  • Seven Peanut Butter Temptations
  • Six Chocolate Crinkly Cookies
  • Five Candy Cane Kiss Cookies
  • Four Pieces of Salted Peppermint Bark
  • Three Scandinavian Almond Bars
  • Two Coconut-Lime Bars
  • One Cut-out Sugar Cookie

Happy Baking!

sister m signature


Filed Under: K's Desserts, K's Recipes, M's Desserts, M's recipes Tagged With: 12 days of christmas cookies, 2011, 2012, christmas, Christmas Cookies, christmas past, cookie recipes, cookies, holiday, holiday baking

Sweet Potato Casserole

Posted by Keelin Hollenbeck on November 27, 2013

Sweet PotatoYam Casserole

Speaking of classic Thanksgiving recipes, this is the classic baked sweet potatoes or yam casserole recipe.  I know there are a lot of new moderns versions of this side, but I love this original marshmallow-covered one too much to give it up.  When we were younger my mom made the mistake of trying to update the sweet potato recipe to a more modern version which was topped with candied walnuts or pecans.  I am sure it would have been delicious, but my sisters and I threw such a fuss that she ended up having to put marshmallows on half.

What can I say?  To me it wouldn’t be Thanksgiving without marshmallow-covered candied yams/ sweet potatoes or canned jelled cranberry sauce (sliced at the can ring lines…. Not mashed up!) I call this sweet potatoes, but really I use yams because they are cheaper.  Preparing this dish is so easy, you will never use yams out of a can again!

Yams!

Print
Sweet Potato Casserole
Author: 2 Sisters 2 Cities
 
Ingredients
  • 2-3 pounds of yams or sweet potatoes
  • ¼ cup brown sugar
  • ¼ cup butter, melted
  • 2 tbsp. maple syrup
  • 2-3 cups marshmallows
Instructions
  1. Peel and cut sweet potatoes up into 1-1/2 inch pieces. Place in a large pot and cover with water. Bring to a boil and cook for about 10-12 minutes until sweets potatoes are tender.
  2. Drain sweet potatoes
  3. In a large bowl add cooked sweet potatoes, butter, maple syrup, and brown sugar. Mix together until combined and smooth.
  4. Spread out sweet potatoes in casserole dish. Bake for 20-25 minutes at 375 degrees until sides are bubbling. Add marshmallows on the top during the last 5 minutes. To get the toasted marshmallow effect, turn broiler on for the last 2 minutes. Be careful because they can burn easily!
  5. These yams can be made ahead, up until the baking step and then refrigerated or frozen. You will need to add extra time to the baking to make sure they heat thoroughly.
3.2.2124

Baked Yams with Marshmallows
sisterk (2)


Filed Under: K's Sides, K's Recipes Tagged With: candied yams, holiday, side dish, sides, sweet, sweet potato, Thanksgiving, thanksgiving menu, thanksgiving recipe, yams

Grandma’s Sweet Refrigerator Rolls

Posted by Keelin Hollenbeck on November 25, 2013

Sweet Refrigerator Rolls

What is Thanksgiving without homemade rolls?  This recipe is from our family cookbook that my aunt put together for everyone many, many years ago.  We are actually on our second edition and I use both cookbooks in my kitchen all of the time.  It’s great to have all my favorite family recipes in one place.  This recipe for sweet rolls is really special to me and M, it is our Grandma’s recipe for rolls that she made for Thanksgiving each year. We lost our grandma a few years ago, but we still have her recipes and family tradition that lives on.

These rolls not only have a place in our heart, but they are really tasty!  Their sweet taste goes perfectly with a small amount of butter and of course a thanksgiving dinner.   Make these rolls for your holiday meal this year!

These rolls can be frozen or the dough can be made the day before and then rolled and baked an hour before dinner (if you have extra oven space.)  I made these rolls over the weekend and froze them for my work Thanksgiving lunch Friday.  We are all about making things ahead here around here!  In the past when I was only cooking for four people, I cut the recipe in half and it turned out great.

Homemade Rolls Rising

The rolls rising for 30 minutes before baking (plus my mixer in the background, isn’t she so pretty?)

Sweet Rolls

Mmmm rolls…..

Print
Grandma's Sweet Refrigerator Rolls
Author: 2 Sisters 2 Cities
Serves: 30-36 rolls
 
Ingredients
  • ¾ cup butter
  • 1 cup boiling water
  • ⅓ cup sugar
  • 4½ tsp. active dry yeast
  • 1 cup luke warm water
  • 2 eggs
  • ⅓ cup sugar
  • 6 cups flour
  • 2 tsp. salt
Instructions
  1. Combine butter and 1 cup of boiling water. Stir until butter is melted.
  2. In the bowl of your mixer with paddle attachment add ⅓ cup of sugar, yeast, and 1 cup luke warm water. Combine on low.
  3. Once the butter reaches room temperature, add into yeast mixture and mix until combined.
  4. Add in eggs and another ⅓ cup of sugar, mix well.
  5. Next add in flour and salt. Combine completely.
  6. Cover bowl with plastic wrap and place in the refrigerator for at least 4 hours or overnight. If leaving overnight, punch the dough down before you go to bed so it doesn’t overflow in your fridge.
  7. One hour before dinner, turn dough out on a floured surface. The dough will be sticky so make sure your hands and surface are well floured.
  8. Preheat the oven to 400 degrees F. Form dough 30-36 rolls evenly sized. Place rolls 1-inch apart on a silicone mat lined baking sheet, you may need 2 baking sheets.
  9. Allow to rise for 30 minutes, then bake for 10-12 minutes. For best results cook each baking sheets one at a time.
  10. Serve immediately or store in an airtight container once cooled. Rolls can be frozen for up to 2 months.
3.2.2124

Source-  Adapted from Grandma H’s original recipe
sisterk (2)


Filed Under: K's Sides, K's post Tagged With: Bread, family recipe, grandma's sweet rolls, rolls, Sweet Refrigerator rolls, Sweet rolls, Thanksgiving, thanksgiving sides

Homemade Apple Sauce

Posted by Keelin Hollenbeck on November 21, 2013

Homemade Apple Sauce
Oh dear, where have I been for the last few months?  This is a great question!  I have been busy moving… again!  I didn’t move across the country again, just across the bay.  I moved from the South Bay of San Francisco to the East Bay which equals a shorter commute for me and a larger kitchen! A win-win in my book.  I have over 1-2 hours back in my life each day,  which is beyond amazing.  People who don’t commute in major cities probably wouldn’t understand the excitement of moving from a 2-hour commute each way to a little bit less than an hour each way, but it is life altering!

I can’t believe next week is Thanksgiving, but I also can’t believe it’s almost December!  No fear the 2 sisters in 2 cities are here to help you with you last minute holiday meal planning.

One of my favorite sides for a holiday meal is homemade apple sauce.  It is so easy to make and 1000 times better than store-bought apple sauce.  Homemade apple sauce is like eating the inside of an apple pie- so delicious!  You don’t have to use the most expensive apples to make apple sauce.  You can use a variety of apples and they don’t need to be perfect.

What do you need?
Apples for Apple Sauce
A bunch of apples is a must!  Get those apples that have been chilling in your fruit drawer for weeks.
Peeled Apples for Apple Sauce
Peel those apples… bruises are okay!
Slice Apples for Apple Sauce
Slice the apples evenly (and meticulously stack your apples cores.)
Cooking Apple Sauce
Cook those apple slices with water until softened.
Mash Apples for Apple Sauce
Mash the apples once softened.
Apple Sauce
Tada!

Print
Apple Sauce
Author: 2 Sisters 2 Cities
 
Ingredients
  • 8-10 apples
  • ½ cup water
  • ¼ –1/2 cup granulated sugar (to taste)
  • ¼ tsp. cinnamon
Instructions
  1. Peel all the apples. Cut apples into evenly sized slices. Throw your peels and cores in your compost pile.
  2. Place sliced apples into a large pot. Add in water to pot and cook over medium heat. Put on cover and cook for 10-20 minutes until apples soften. Turn heat down if the apples start to boil.
  3. Apples should be easily mashed with a fork or potato masher when cooked. Mash apples to preferred thickness.
  4. Add in sugar, to taste, and cinnamon. Stir and cook for a few more minutes. Serve warm or cold and store in an air tight container in the refrigerator.
3.2.2124

sisterk (2)


Filed Under: K's Sides, K's Recipes Tagged With: apple sauce, apples, autumn, autumn recipes, easy sides, fall, fruit, holiday sides, homemade sides, sides, Thanksgiving, thanksgiving recipe

Baked Pumpkin Doughnuts

Posted by Keelin Hollenbeck on September 25, 2013

Fall for Pumpkin Doughnuts

I warned you that pumpkin recipes were coming!   And of course I am finding more use for my doughnut pan!

These baked pumpkin doughnuts were phenomenal with their buttery cinnamon sugar outside and their delicious pumpkin spice inside. The day after making them, I was so excited to get out of bed to eat another doughnut with my coffee.  There’s nothing like a cool fall morning with a yummy pumpkin goodness.  Bring on the pumpkin baked goods!  I know, I know- pumpkin is totally overdone, but it’s one of the reasons why I love fall.   I even have a pumpkin Pinterest board- check it out here!

Pumpkin Doughnuts

Print
Baked Pumpkin Doughnuts
Author: 2 Sisters 2 Cities
Serves: 12
 
Ingredients
For Doughnuts
  • ½ cup vegetable oil
  • 3 large eggs
  • 1½ cups granulated sugar
  • 1½ cups canned pumpkin puree
  • 1 tsp. ground cinnamon
  • ¼ tsp. ground ginger
  • 1½ tsp. salt
  • 1½ tsp. baking powder
  • 1¾ cup All-Purpose flour
For Topping
  • ½ cup unsalted butter, 1 stick
  • 1 cup granulated sugar
  • 1 tsp. ground cinnamon
Instructions
  1. Preheat oven to 350 degrees.
  2. In the bowl of your mixer add all doughnut ingredients except flour and mix together until smooth. Add in flour and mix until just combined.
  3. Spray a doughnut pan with non-stick spray. Fill each doughnut mold with batter and fill ¾ths the way.
  4. Place in oven and bake for 15 to 18 minutes until a toothpick inserted in middle comes out clean.
  5. Let doughnuts cool in pan 5-10 minutes before taking out of doughnut pan. You can loosen the edges with a butter knife. Place doughnuts on wire rack.
  6. Repeat for additional batch (if using a 6 doughnut pan)
  7. In a heatproof bowl, melt butter in the microwave. Watch carefully so the butter doesn’t boil over.
  8. In a medium bowl stir together sugar and cinnamon.
  9. Dip doughnut in butter, shake slightly to stop dipping and then dip doughnut in cinnamon sugar, covering both side. Let dry at room temperature on a wire rack over a baking sheet. Store in an airtight container for 1-2 days.
3.2.1753


Stack of Pumpkin Doughnuts

Source- Adapted from the King Arthur’s Flour Blog

sisterk (2)


Filed Under: K's Recipes Tagged With: autumn recipes, baked doughnuts, doughnuts, fall, fall recipe, pumpkin, pumpkin recipes

Special Occasion Spaghetti and Meatballs

Posted by Keelin Hollenbeck on September 15, 2013

Special Occasion Spaghetti and Meatballs

My boyfriend loves spaghetti and meatballs.  If it were up to him, we would have this for dinner every night with the occasional meatball sub sprinkled in.   I use this basic recipe for meatballs with my favorite easy sauce every few weeks for our regular spaghetti and meatball weeknight recipe.  Since there is only two of us and we are usually watching our weight, I always freeze my leftover meatballs (before putting them in sauce.)   I love being able to make a really quick tomato sauce on weekdays and then just pop in the meatballs we need for dinner that night.

Spaghetti and Meatballs

However on the weekends when we are not busy, I like to try a new meal that take longer to pull together and that is really special.  We usually likes to do themed nights with the food and have drinks, an appetizer or bread, dinner, and a dessert all in the same “genre” if you will.  Italian night is a popular ones because there are so many options.  Since we have been on a Ina Garten kick lately, I decided to try her “Real Meatballs and Spaghetti”  with some minor changes to make it to our liking.

We paired it with a fresh loaf of Italian bread with some olive oil to dip it in, some prosciutto and sharp provolone rolled together, and or course, a bottle of wine.  For dessert, my boyfriend made us Italian Spritz cookies.  It was the perfect date night and so delicious!  I froze the extra meatballs and with the leftover meatballs that had been cooked in the sauce, I made the best meatball subs with the leftover Italian bread and a garlic spread to make it into garlic bread for lunch the next day.

Meatballs

I say that this recipe is a special occasion meal because buying ground veal, pork and beef can get expensive!   I don’t have a butcher and I often question the meats at my grocery store.  Recently, I have been getting my meats at Costco for steaks and chicken breast and then Whole Foods for ground meat and fish.   It’s a little more expensive, but I find that it’s worth if for the quality.  An extra plus is that at Whole Foods you can get the ground meat by weight so you can buy exactly what you need for these meatballs.  Do you have a recipe that you love to make for special occasions or date nights?

Print
Special Occasion Spaghetti and Meatballs
Author: 2 Sisters 2 Cities
 
Ingredients
For the meatballs:
  • ½ pound ground veal
  • ½ pound ground pork
  • 1 pound ground beef
  • 1 cup fresh white bread crumbs
  • ¼ cup seasoned dry bread crumbs
  • 2 tbsp. chopped flat-leaf parsley
  • ½ cup freshly grated Parmesan cheese
  • 2-3 cloves garlic, chopped
  • 2 tsp. kosher salt
  • ½ tsp. freshly ground pepper
  • 1 large egg
  • ¾ cup warm water
  • Canola oil
  • Olive oil
For the sauce:
  • 1 tbsp. olive oil
  • 1 cup chopped yellow onion
  • 1½ tsp. minced garlic
  • ½ cup dry red wine (I used the Cabernet I was drinking)
  • 1 28 oz. can crushed tomatoes
  • 1 tbsp. chopped fresh flat-leaf parsley
  • 1½ tsp. kosher salt
  • ½ tsp. freshly ground pepper
Instructions
  1. In a large bowl add in ground meats, both types of bread crumbs, parsley, Parmesan, garlic, salt, pepper, egg, and warm water. Combine with hands until just mixed then form 1½ inch balls.
  2. In a 12-inch skillet pour in equal amounts of canola and olive oil so that there is a ¼ inch of oil in the pan. Heat oil over medium-low heat. Line a platter with a few layers of paper towels. In several batches, carefully cook the meatballs in oil, browning them on each side. Don’t overcrowd and be very careful when turning the meatballs. Each batch should take about 10 minutes. Move cooked meatballs onto paper towels and repeat for next batch. Once done with cooking meatballs discard the oil but leave the pan for sauce steps.
  3. For the sauce, heat olive oil in the pan. Heat the pan to medium heat and sauté onions for 5-10 minutes until translucent. Add the garlic and cook until fragrant, about 1 minute. Add in wine to pan and turn heat up to high. As wine heats up scrape all the brown bits in the pan and cook until almost all the wine is evaporated. Stir in tomatoes, parsley, salt and pepper.
  4. Return meatballs to pan, cover, and simmer on low heat for about 20-30 minutes. Serve with cooked spaghetti, grated Parmesan, and fresh Italian bread.
  5. *If not using all the meatballs for the meal, freeze the meatballs after they cool and before you place them in the sauce. The next time you make sauce throw frozen meatballs into sauce and cook for 20-30 minutes.
3.2.1753

Source- Adapted from Ina Garten’s Barefoot Contessa Family Style

sisterk (2)

Related Posts Plugin for WordPress, Blogger...


Filed Under: K's Entrees, K's Recipes Tagged With: date night, Italian, italian recipes, meatballs, spaghetti and meatballs, special occasion dinner

  • « Previous Page
  • 1
  • 2
  • 3
  • 4
  • 5
  • …
  • 20
  • Next Page »

Recent Posts

  • Easy Holiday Office Party Tips
  • 5 Steps to an Easy Football Party
  • Gingerbread Biscotti
  • Holiday Coffee Bar and Thanksgiving Recipes
  • Soft Sugar Pumpkin Cookies
  • Cinnamon Sugar Apple Cake
  • Hello Pumpkin Season!
  • Make Your Own Milkshake Party!
  • Mama’s Pickles
  • S’more Cookies

Categories

  • About 2 Sisters 2 Cities (7)
  • Books (8)
  • Crafting & DIY (22)
  • Design & Decorating (15)
  • Gardening (5)
  • Giveaway (14)
  • Guest Bloggers (8)
  • K's post (46)
  • K's Recipes (191)
    • K's Desserts (75)
    • K's Entrees (23)
    • K's Sides (24)
  • M's post (72)
  • M's recipes (167)
    • M's Entrees (21)
    • M's Sides (14)
    • M's Desserts (30)
  • Organizing (7)
  • Party Ideas (49)
  • Uncategorized (1)
  • Vacation (12)
Stitch Fix

Archives

Blogroll

  • Annie's Eats
  • Bake at 350
  • Baked Bree
  • Boston Harbor Beacon
  • Confections of a Foodie Bride
  • Cook Like a Champion
  • Erin’s Food Files
  • Forever and a Recipe
  • Framed Cooks
  • Oh Happy Day
  • On Common Ground
  • Pennies on a Platter
  • Pink Parsley
  • Recipe Girl
  • Sally's Baking Addiction
  • Simply Scratch
  • The Curvy Carrot
  • The Pioneer Woman
  • Tidy Mom
  • Two Peas & Their Pod
  • What’s Gaby Cooking
  • Young House Love
Increase your website traffic with Attracta.com

grab a 2 sisters button!


Copyright © 2014 ~ 2 Sisters 2 Cities | Blog Design by Minx Design