2 Sisters 2 Cities

Image Map
  • About 2 Sisters 2 Cities
  • Recipe Index
  • Project Index
  • Contact Us
  • Like us on Facebook
  • Follow m on twitter
  • Follow k on twitter
  • Follow 2S2C on Pinterest
  • Follow 2S2C on G+
  • rss
  • e-mail 2S2C

Taco Dip

Posted by Meaghan Barry on February 1, 2014

Taco Dip

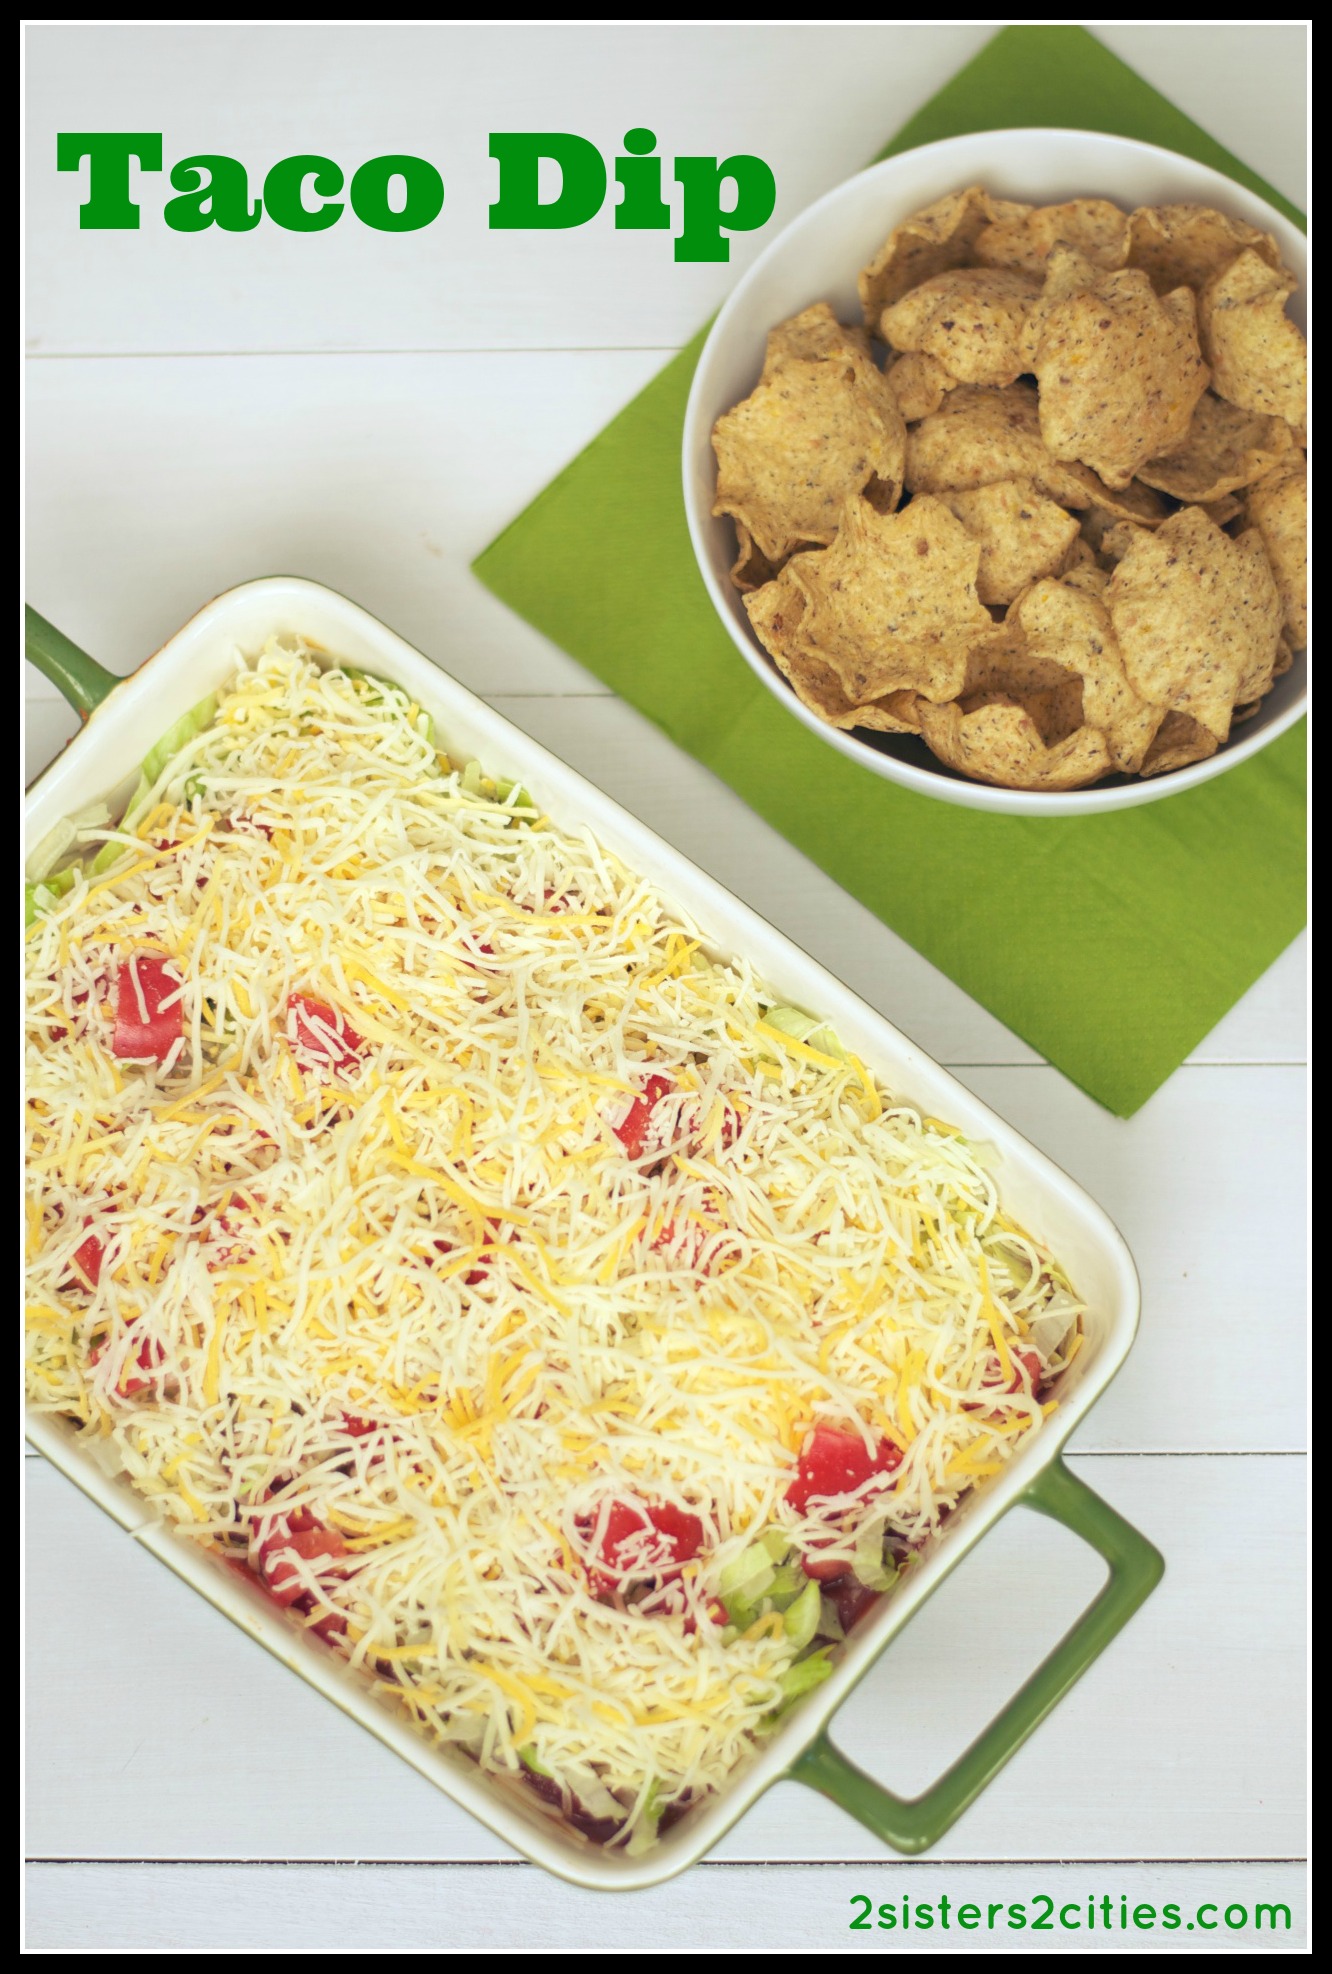
It’s been awhile since my last post and I decided to dive back into things with an easy recipe.  I’m far too often guilty of trying to come up with new and creative (and often complicated) recipes whenever we have guests visit.  However, with the birth of baby N, there are just not enough hours in the day to make every recipe that I would like to make.  I’ve come to the realization that it’s perfectly acceptable most of the time to just stick with easy, classic recipes.  This recipe for taco dip can be whipped up in no time at all!  If you are on the search for an easy recipe to add to your menu for this Super Bowl Sunday, this one has your name all over it (in cheese!)

taco dip

K actually posted this recipe for taco dip back in 2011, but we are trying to redo any of our old posts that did not have pictures or just have really bad pictures.  If you search through some of our archives, you can definitely see some of these photos for yourselves (I’m looking at you blurry iPhone photos of burnt lamb sliders…I’m not going to even link to it I’m so embarrassed.)  One of the many side benefits of working on our blog is that it has definitely honed our photography skills.  While I definitely still need to learn a lot more, blogging has definitely served as a catalyst to learn much more about photography.

taco dip

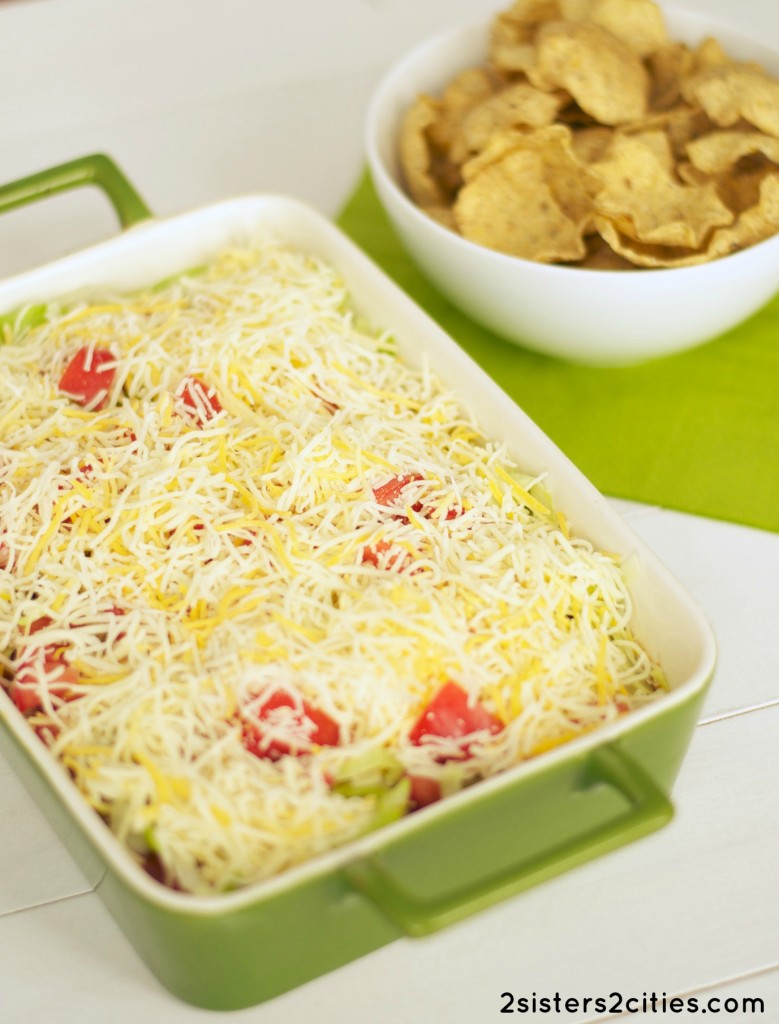
I accidentally bought the multi-grain version Tostitos scoops at the grocery store, however I was pleasantly surprised by how much I liked them.  Serve this dip with any type of tortilla chip you prefer.  You could also mix up this recipe a bit by adding more layers…diced green chills, sliced black olives, or black beans would all be interesting options to add.

Print
Taco Dip
Author: 2 Sisters 2 Cities
Prep time:  1 hour 10 mins
Total time:  1 hour 10 mins
 
Ingredients
  • 8 oz. block of light cream cheese
  • 16 oz. light sour cream
  • 1 packet of taco seasoning (or try 2 tablespoons homemade taco seasoning)
  • 1 jar of salsa
  • Shredded iceberg lettuce
  • 2 small or 1 large tomatoes chopped
  • Shredded Mexican cheese
  • Tortilla chips
Instructions
  1. Allow the cream cheese to come to room temperature. Once the cream cheese is softened, combine with sour cream and taco seasoning until smooth (you can mix it together by hand or mix with an electric stand mixer using the paddle attachment.) Spread the mixture out onto a 9×13-inch or an 8×10-inch pan evenly. Let it set by refrigerating it for an hour.
  2. After an hour or right before you are ready to serve it, use a spatula to spread the jar of salsa evenly over the top of the cream cheese/ sour cream mixture. Next, put the shredded iceberg lettuce on top (you can use as much as you want, I put on about 1½-2 cups), followed by the chopped tomatoes. Finally you sprinkle the shredded cheese on top of everything until it is well covered (about 1½ cups).
3.2.2199

sister m signature


Filed Under: M's recipes Tagged With: appetizers, cleaning, easy recipes, Super Bowl, taco dip

Shrimp Scampi with Garlic Toasts

Posted by Meaghan Barry on December 23, 2013

 Shrimp Scampi with Garlic Toasts

Another food tradition we enjoy in our family is serving lots of appetizers on Christmas Eve and New Year’s Eve.  It can be a bit hectic to prepare these apps with a full house so I am always looking for shortcuts to cut down on prep times.  Campbell’s asked us to share a holiday recipe using one of their skillet sauces or slow cooker sauces.  I decided to try out their Scampi Skillet Sauce to make an appetizer: Shrimp Scampi with Garlic Toasts.  This appetizer dish offers all the flavor of traditional shrimp scampi on a bite-size baguette…perfect for holiday entertaining!

shrimp scampi skillet sauce

I tested this recipe out with some guests that dropped by and it was approved by all (including the kids!)  The baguette slices can be toasted and rubbed with garlic ahead of time.  You could also clean and chop up the shrimp to have it all ready to be sautéed.  Whether you are planning your Christmas menu or looking ahead to New Year’s Eve, definitely consider adding this appetizer to your holiday!

Shrimp Scampi with Garlic Toasts

Print
Shrimp Scampi with Garlic Toasts
Prep time:  15 mins
Cook time:  15 mins
Total time:  30 mins
 
Ingredients
  • 1 french baguette
  • 2 garlic cloves, peeled and cut in half
  • 1 tablespoon extra virgin olive oil
  • 1 pound thawed shrimp, peeled, de-veined, and with tail removed
  • 1 package Campbell's Scampi Skillet Sauces
  • ¼ cup parsley, finely chopped
  • 1 lemon, sliced (optional, for garnish only)
Instructions
  1. Preheat over to 350 degrees (F). Cut baguette into thin slices and place on baking pan. Bake for five minutes on each side or until lightly golden
  2. Remove toasted baguette slices from oven and rub both sides with cut garlic, then set aside.
  3. Rinse shrimp and pat dry with paper towel.
  4. Pour olive oil into large skillet pan and heat to medium high.
  5. Meanwhile, chop shrimp into small pieces. Once oil is hot, add shrimp to pan, and cook until shrimp turns pink
  6. Once shrimp is cooked, turn heat to low and and add Campbell's Scampi Skillet Sauce. Cook until thoroughly warmed.
  7. Remove shrimp from oven, and spoon shrimp mix on top of garlic toast.
  8. Place on serving tray, sprinkle with chopped parsley, and garnish with lemon slices and.
3.2.2199


sister m signature


Disclosure: This post brought to you by Campbell’s Dinner Sauces. Weekend-worthy dinners with only weekday-level effort needed! Learn more at http://www.campbellsauces.com/


Filed Under: M's recipes Tagged With: appetizers, campbell's, campbell's skillet sauces, christmas, christmas eve, New Year's Eve, sponsored post

Easy Pecan Sticky Buns

Posted by Keelin Hollenbeck on December 20, 2013

Easy Pecan Sticky Buns

Disclosure: This post is sponsored by the the National Frozen & Refrigerated Foods Association and The Mom It Forward Blogger Network.  All opinions are our own.

One of our favorite holiday traditions is enjoying warm sticky buns after opening presents on Christmas morning.  We are usually ravenous by the time we get to breakfast on that special day and these easy pecan sticky buns hit the spot every time.  This recipe is great because you can prepare it ahead of time and bake it right before serving.  This recipe calls for puff pastry (found in the freezer aisle) and unsalted butter (from the dairy aisle).  These easy pecan sticky buns just might become a Christmas tradition for your family too!

Quick Sticky Buns

While you are planning your holiday menu over the next week, don’t forget to shop the freezer and dairy aisle.  Both aisles offer such a great variety of foods that can be used for special holiday meals and treats. For more holiday recipe ideas, check out the Easy Home Meals Pinterest boards or the Easy Home Meals website, sponsored by the National Frozen & Refrigerated Foods Association.

Sticky Buns from Frozen Puff Pastry Dough

Save Print
Easy Pecan Sticky Buns
Prep time:  30 mins
Cook time:  30 mins
Total time:  1 hour
 
Ingredients
Sticky Buns
  • 12 tablespoons (1 and ½ sticks) unsalted butter, at room temperature
  • ⅓ cup light brown sugar, lightly packed
  • ¾ cup pecans
  • 1 package (17.3-ounces/ 2-sheets) frozen puff pastry, defrosted
Filling:
  • 2 tablespoons unsalted butter, melted and cooled
  • ⅔ cup light brown sugar, lightly packed
  • 3 teaspoons ground cinnamon
  • ½ cup raisins
Instructions
  1. Using the bowl of an electric mixer, cream together the 12 tablespoons butter and ⅓ cup brown sugar with the paddle attachment. Use a small ice cream scoop to place the mixture in each of the 12 muffin cups. Add the pecans evenly among the 12 muffin cups.
  2. Meanwhile, flour a surface and unfold 1 sheet of the puff pastry with the folds going left to right. Brush the entire sheet with the melted butter. Leaving a 1-inch border on the puff pastry, sprinkle each sheet with ⅓ cup of the brown sugar, 1 and ½ teaspoons of the cinnamon, and ¼ cup of the raisins. Starting with the end closest to you, roll the pastry up tightly around the filling, finishing the roll with the seam side down.
  3. Cut off ½-inch off the ends of the roll and discard. Slice the roll in 6 equal pieces. Place each cut bun (spiral side up) into a cup of a standard-sized muffin pan.
  4. Repeat with the second sheet of puff pastry to make 12 pecan sticky buns in total.
  5. Cover muffin pan with plastic wrap and refrigerate until serving day.
  6. On serving day: Preheat the oven to 400 degrees F. Place the muffin pan on a foil-lined baking sheet. Bake for 30 minutes, until the sticky buns are golden to dark brown on top and firm to the touch. Allow to cool for 5 minutes only and flip the buns onto the parchment paper (use a spoon to scoop out any remaining filling and pecans and pour onto the buns). Enjoy!
3.2.2199

Source: Adapted from The Barefoot Contessa

Holiday cheers!

k & m


Filed Under: K's Recipes, M's recipes Tagged With: breakfast recipe, christmas, christmas morning, holiday baking, holiday helper, pecan sticky buns, puff pastry, sponsored post

3 Peanut Butter Reindeer Cookies

Posted by Meaghan Barry on December 19, 2013

Peanut Butter Reindeer Cookies {from 2 Sisters 2 Cities}

Today’s 12 Cookies of Christmas countdown post is brought to you by Kraft.

A Little Help For The Holidays From Kraft

Christmas is less than a week away and it’s time to get serious about Christmas preparations!  When I saw this Peanut Butter Reindeer Cookie idea on Pinterest, I knew I had to make these little guys.  These reindeer are so stinking cute and peanut butter cookies are a family favorite in our household.  They also reminded me of K’s Black Cat Cookies and I had fun making those for T this past Halloween.  Whether you are baking for kids or grown-ups, these reindeer cookies will be sure to bring a smile to their faces.

Peanut Butter Reindeer Cookies {from 2 Sisters 2 Cities}

I was able to save a little bit of money this holiday season by picking up some Planters Peanut Butter at Target.  Kraft is currently offering a number of coupons for exclusive use at Target to make your holiday entertaining a bit easier. ( Save up to $20 on participating Kraft products, only at Target.)  These Peanut Butter Reindeer Cookies will be the hit of your Christmas party!

Peanut Butter Reindeer Cookies {from 2 Sisters 2 Cities}

Save Print
Peanut Butter Reindeer Cookies
Author: 2 Sisters 2 Cities
Recipe type: cookie
Prep time:  50 mins
Cook time:  9 mins
Total time:  59 mins
Serves: 36
Ingredients
  • 1 stick unsalted butter, softened
  • ½ cup light brown sugar
  • ¼ cup sugar
  • 1 egg
  • ¾ cup Creamy Planters Peanut Butter
  • 1 teaspoon vanilla extract
  • ½ teaspoon baking soda
  • 1 and ¼ cup all-purpose flour.
  • ¼ teaspoon salt
  • chocolate-covered pretzels, cut in half (for the antlers)
  • mini brown M&Ms (for the eyes)
  • regular-sized red M&Ms (for the nose...you could also use brown M&Ms if you prefer non-Rudolph cookies!)
Instructions
  1. In the bowl of an electric mixer, cream together butter and sugar using the paddle attachment. Next, add in the peanut butter, egg, and vanilla and mix together until combined. In a separate mixing bowl, whisk together the baking soda, flour, and salt. Gradually add the flour mixture to the electric mixing bowl and mix until fully incorporated. Once all the flour mixture has been added, chill the dough in the refrigerator for about 30 minutes.
  2. Meanwhile, preheat the oven to 350 degrees Fahrenheit and prepare baking sheets with parchment paper. Once dough has chilled, use a mini ice cream scooper to scoop out small balls of dough. Place the ball of dough on the cookie sheet and gently flatten it with your hand. Bake for 8-9 minutes or until edges turn slightly golden.
  3. Remove cookies from oven and immediately add the chocolate-covered pretzels as antlers, two mini brown M&Ms for eyes, and red M&M for the mouth. Carefully transfer cookies to a wire rack to cool completely.
3.2.2199

Source: Reindeer Cookie idea from Bakergirl and Peanut Butter Cookie recipe slightly adapted from Sally’s Baking Addiction

Here’s the rest of our 2013 Cookie Countdown in case you have missed any!

4 Oatmeal Chocolate Mint Cookies
5 Sprinkle Cookies
6 Chocolate-Dipped Shortbread Cutouts
7 Chocolate Hazelnut Coins
8 Italian Lemon Drops
9 Chocolate Toffee Crackers
10 Cranberry Pistachio Shortbread Cookies
11 Christmas Snickerdoodles
12 Chocolate Raspberry Thumbprints

sister m signature


From shopping for gifts to planning family dinners, it’s hard to keep up with all your holiday to-do’s. This year, Kraft is helping out with great weeknight meals and entertaining ideas to make the season a little bit easier. Plus, Kraft is offering up to $20 in coupons, redeemable exclusively at Target, to make food shopping easier and to help you have a happy holiday season.

This is a sponsored conversation written by me on behalf of Kraft. The opinions and text are all mine.


Filed Under: M's Desserts, M's recipes Tagged With: 12 days of christmas cookies, chocolate chip cookie recipe, christmas, Christmas Cookies, cookie recipe, holiday baking, peanut butter cookies, planters peanut butter, reindeer cookies, sponsored post

7 Chocolate Hazelnut Coins

Posted by Keelin Hollenbeck on December 13, 2013

Chocolate Hazelnut Coins (from 2 Sisters 2 Cities)

Oh my gosh…I have been having the worst time following recipes lately!  I was making a cookie recipe earlier in the week and I could not figure out why the dough was so dry.  I re-read through the recipe and realized I forgot to add three eggs and two sticks of butter…think that could have been it?  Fortunately, the dough was still salvageable as I was still able to mix them in.

I had another mishap yesterday as I was trying to make these Chocolate Hazelnut Coins.  The cookies were all baked and I was drizzling the chocolate on.  I went to read the directions to figure out what point to garnish them with hazelnut and then I realized the hazelnuts were supposed to be baked into the cookie…oops!  I also burnt the the dark chocolate while I was melting it on the stovetop.  I used the microwave for my second attempt and it turned out much better.

I was going to scrap these and make them again today with the hazelnuts added to the dough this time, but everyone who has tried them so far really likes them with hazelnuts as the garnish.  You could also use walnuts in a pinch.

This recipe is a refrigerator cookie- you refrigerate the dough for an hour or so, slice them, and bake them.  If you are looking to get some cookies prepared ahead of time before Christmas, you could easily whip up this cookie dough and store it in the fridge until the 25th gets closer.  Or, you can bake them the same day and just freeze the finished cookies.  Or you could just eat them right away.

So, here is my recipe for Chocolate Hazelnut Coins in which hazelnuts serve as a lovely garnish.  If you are looking for a recipe where hazelnuts are incorporated into the cookie dough, check out the lovely source link below!

Chocolate Hazelnut Coins (from 2 Sisters 2 Cities)

Print
Chocolate Hazelnut Coins
Prep time:  1 hour 10 mins
Cook time:  6 mins
Total time:  1 hour 16 mins
 
Ingredients
  • 1 cup butter, softened
  • ½ cup sugar
  • ¼ teaspoon salt
  • 1 egg
  • 3 tablespoons unsweetened cocoa powder
  • 1 and ¾ cups all-purpose flour
  • ¼ cups finely chopped hazelnuts, lightly toasted
  • 6 ounces dark chocolate, chopped or dark chocolate chips (1-2 cups)
  • ½ teaspoon shortening
Instructions
  1. Add the butter to a bowl of an electric mixer. Using the paddle attachment, mix butter on medium speed for 30 seconds. Add sugar and salt and mix until thoroughly combined. Then, add in egg and cocoa powder. Use a spatula to clean off sides of bowl and continue to mix all ingredients until once again combined. Add in the flour in ½ cup increments and mix until incorporated.
  2. Lay out 2 large sheet of plastic wrap. Divide dough in half and place on top of each sheet of plastic wrap. Wrap the plastic wrap around dough and roll into an 11-inch log. Repeat for other half of dough. Refrigerate the two dough logs for 1 to 2 hours.
  3. Preheat the oven to 375 degrees Fahrenheit and prepare baking sheets with parchment paper. Cut the dough into thin slices (about ¼".) I was able to get about 25 cookies from each log, so there will be ~50 cookies in total. Bake for 6-8 minutes or until cookie tops are firm. Remove from oven and let cookies cool on a wire rack.
  4. Meanwhile, melt the chocolate and shortening together in the microwave in 30-second increments (I used a Pyrex glass.) Stir after each increment until melted. Place cooled cookies on wax paper and use a spoon to drizzle melted chocolate on top. Before chocolate hardens, sprinkle on chopped hazelnuts. Allow chocolate to set and then serve, store in an airtight container, or freeze.
3.2.2199

Source: Adapted from BHG.com

I’ve also shared my cornbread baking mishap…what holiday baking blunders have you ever made?

sister m signature


Filed Under: M's Desserts, M's recipes Tagged With: 12 days of christmas cookies, chocolate, chocolate cookies, Christmas Cookies, cookie recipes, hazelnut, holiday baking, recipe mishaps, refrigerator cookies

9 Chocolate Toffee Crackers

Posted by Meaghan Barry on December 10, 2013

Chocolate Toffee Crackers (from 2 Sisters 2 Cities)

I have seen this recipe for Chocolate Toffee Crackers so many times on Pinterest and I have been wanting to make it for such a long time.  It goes by a lot of different names- Christmas Crack, Chocolate Saltine Toffee, Sweet & Saltines, Saltine Toffee Candy, etc.  I knew I could not refer to this recipe as Christmas Crack as my son picks up on everything we say lately.  I really do not want a note from his nursery school asking why T made “crack” with his mother over the weekend.

{Side story: we made a joke about having raccoon and coyote steak this past summer while we were having a regular (cow) steak dinner.  T still requests raccoon and coyote steak to this day…it makes me snicker out loud when I think about him telling his teachers that his favorite meal consists of raccoon and coyote meat.}

Anywhoo…it’s a super easy recipe to make.  I once again attempted a cookie recipe while T & N were both awake.  I even made this one during the “witching hour”…basically anytime between 4:30-7:30pm in our house.  I let T add the nonpareil sprinkles to the top of the chocolate toffee crackers as they were cooling.  He was grabbing them by the fistful and throwing them on top.  We had a fun time making this recipe, but I tell you, my kitchen may never be the same after I brought out those nonpareil sprinkles.  I’m trying very hard this holiday season to let go of my need for everything to be clean all the time and to just have fun making memories with the kids!

Chocolate Toffee Crackers (from 2 Sisters 2 Cities)

Print
9 Chocolate Toffee Crackers
Prep time:  10 mins
Cook time:  4 mins
Total time:  14 mins
 
Ingredients
  • cooking spray
  • 40 saltine crackers
  • 1 cup unsalted butter
  • 1 cup light brown sugar
  • ½ teaspoon vanilla
  • 2 cups chocolate chips
  • nonpareil sprinkles or any other type of decorative candy (optional)
Instructions
  1. Preheat oven to 400 degrees Fahrenheit. Line a jelly roll pan with foil and spray it with cooking spray. Lay down a single layer of 40 saltines on the foil surface.
  2. Meanwhile, melt together the butter and brown sugar in a medium-sized sauce pan. Allow it to reach a boil, then lower the temperature and allow it to simmer for about 5 minutes. Stir the butter & sugar mixture occasionally and remove from the heat once it has thickened.
  3. Stir in the vanilla to the saucepan and pour the mixture over the crackers on the jelly pan. Use a spatula to spread the mixture over any crackers that are dry. Put in the oven and bake for 3-4 minutes, or until it gets bubbly. Remove pan from oven.
  4. Sprinkle chocolate chips over crackers evenly. Allow the chocolate chips to melt for a few minutes and use a spatula to smooth it out over the crackers. Then, sprinkle on nonpareil sprinkles or any other decorative candy (this step is optional). Place the pan in the fridge for 30-45 minutes or until chocolate is hard. Break up into pieces and serve. Store at room temperature in an airtight container.
3.2.2124

Source: Adapted from Trisha Yearwood and Averie Cooks

sister m signature


Filed Under: M's Desserts, M's recipes Tagged With: 12 days of christmas cookies, chocolate, chocolate chips, Christmas Cookies, cookie recipes, cookies, crackers, holiday baking, saltines, toffee

11 Christmas Snickerdoodles

Posted by Meaghan Barry on December 6, 2013

Christmas Snickerdoodles (from 2 Sisters 2 Cities)

For my first Christmas cookie recipe of the season, I decided to turn a traditional year-round cookie into a Christmas version of itself.  I used red and green sugar crystals in the recipe to turn these Snickerdoodles into Christmas Snickerdoodles!

This recipe was super simple and it was the perfect cookie recipe to make with a 3-year old and 5-month old.  After I formed a ball of cookie dough, I handed it to T and he would roll it in either the red or green sugar & cinnamon mixture, then place it on the pan.  We got a good laugh as Baby N sat in his Bumbo chair and kept trying to grab for the red cookies…you can have cookies soon baby!  I hope you have as much fun as I did making these Christmas Snickerdoodles this holiday season. (Just keep in mind that the dough needs to be refrigerated for one hour before baking- the perfect amount of time to grab a quick afternoon nap or watch a Christmas movie by the fire!)

Christmas Snickerdoodles (from 2 Sisters 2 Cities)

Print
11 Christmas Snickerdoodles
Prep time:  1 hour 30 mins
Cook time:  10 mins
Total time:  1 hour 40 mins
 
Turn this classic cookie recipe into a Christmas one by using green and red-colored sugars.
Ingredients
  • 1 cup butter, softened
  • 1 and ½ cups sugar
  • 1 teaspoon baking soda
  • 1 teaspoon cream of tartar
  • ¼ teaspoon salt
  • 2 eggs
  • 1 teaspoon vanilla
  • 3 cups all-purpose flour
  • 2 tablespoons red sanding sugar or sugar crystals
  • 2 tablespoons green sanding sugar or sugar crystals
  • 2 teaspoons ground cinnamon
Instructions
  1. Add the softened butter to a mixing bowl and use an electric mixer to beat butter on high for 30 seconds. Add the 1 and ½ cups sugar, baking soda, cream of tartar, and salt and mix until combined. Use a spatula to scrape the side of the mixing bowl if necessary. Turn off mixer and add in eggs and vanilla- mix for 30 more seconds until combined. Turn off mixer and add 1 cup of flour at a time, beating after each addition until flour is incorporated. Cover bowl with plastic wrap and chill for 1 hour or more.
  2. Preheat oven to 375 degrees F and prepare cookie sheets with parchment paper. Add the red sugar into a small bowl and the green sugar into a second small bowl. Add 1 teaspoon cinnamon into each bowl and mix. Shape dough into ~1 balls (you can make the balls smaller or larger based on how what size cookie you prefer. I ended up making 36 cookies from this batch of dough.)
  3. Roll balls in either the red or green sugar mixture until dough is coated. Place 2 inches apart on the parchment paper.
  4. Bake for 12-13 minutes or until bottoms are light brown. Transfer to wire racks and allow to cool.
3.2.2124

Source: BHG.com

sister m signature


Filed Under: M's Desserts, M's recipes Tagged With: 12 days of christmas cookies, baking, christmas, Christmas Cookies, cinnamon, cookie recipe, cookies, holiday baking, holiday cookies, snickerdoodles

12 Days of Christmas Cookies (The Past)

Posted by 2 Sisters 2 Cities on December 1, 2013

Why hello there December 1st!  I could have sworn Thanksgiving was a mere three days ago.  Time to put those pumpkin pie pans away and get ready for some Christmas baking!  We are so excited to kick-off our 3rd year of our annual 12 Days of Christmas Cookies.  Before we start our series for 2013, I wanted to highlight our 24 Christmas cookies from the past two years.

12 Days of Christmas Cookies {from 2 Sisters 2 Cities}

12 DAYS OF CHRISTMAS COOKIES 2012

  • Twelve Oreo Truffles
  • Eleven Mini Pecan Pie Bites
  • Ten Crisp Toffee Chocolate Bars
  • Nine Raspberry Linzer Cookies
  • Eight Kolacky
  • Seven Italian Butter Spritz Cookies
  • Six Chocolate Velvet Butter Balls
  • Five Peppermint Bark Cookies
  • Four Nutella and Sea Salt Stuffed Sugar Cookies
  • Three Heath Bar Butter Cookies
  • Two Mini Gingerbread Men with Cream Cheese Icing
  • One Salted Chocolate Chip Caramel Cookie Bars


12 days of Christmas cookies- 2011 {from 2 Sisters 2 Cities}

12 DAYS OF CHRISTMAS COOKIES 2011

  • Twelve Salted Caramel Chocolate Shortbread Bars
  • Eleven Buckeyes
  • Ten Glazed Lemon Cookies
  • Nine Mexican Wedding Cakes
  • Eight White Chocolate Ginger Drops
  • Seven Peanut Butter Temptations
  • Six Chocolate Crinkly Cookies
  • Five Candy Cane Kiss Cookies
  • Four Pieces of Salted Peppermint Bark
  • Three Scandinavian Almond Bars
  • Two Coconut-Lime Bars
  • One Cut-out Sugar Cookie

Happy Baking!

sister m signature


Filed Under: K's Desserts, K's Recipes, M's Desserts, M's recipes Tagged With: 12 days of christmas cookies, 2011, 2012, christmas, Christmas Cookies, christmas past, cookie recipes, cookies, holiday, holiday baking

Chorizo Cornbread Stuffing

Posted by Meaghan Barry on November 26, 2013

Chorizo Cornbread Stuffing

I know K has already touched on this, but seriously, how is it already late November already?  I am really trying to enjoy Thanksgiving as it’s own holiday, but with December 1st right around the corner, it’s hard not to start thinking about Christmas. But first, we must keep our focus on a truly great holiday- Thanksgiving.  And I have a truly special dish to commemorate this holiday, Chorizo Cornbread Stuffing.

While I always enjoy a serving of regular stuffing on Thanksgiving, I think I could enjoy this chorizo cornbread version year-round.  A local restaurant has a version of this recipe on it’s menu and my husband and I order it as a side dish every time we go.  I was so pleased that I was able to recreate a very similar version in my own kitchen!

If you are looking to mix it up with some non-traditional Thanksgiving recipes this year, I highly recommend making this version.  Or, if you wanted to go all out for the stuffing lovers out there, you could make traditional stuffing and Chorizo Cornbread Stuffing…just let me know what time to stop by!

Print
Chorizo Cornbread Stuffing
Prep time:  20 mins
Cook time:  35 mins
Total time:  55 mins
 
Ingredients
  • 1 tablespoon olive oil
  • 6 oz. dried Spanish chorizo (I used a smoked version), cut into small cubes
  • 1 medium white onion, chopped
  • 1 medium carrot, peeled and finely chopped
  • 1 celery stalk, finely chopped
  • 3 garlic cloves, pressed or minced
  • 3 cups cornbread, cut into cubes (you can buy it from pre-made or try this recipe for cornbread)
  • ¼ cup parsley, chopped (plus more for garnish if desired)
  • cooking spray
  • ¼ cup parsley, chopped
  • ½ cup low-sodium chicken broth or stock
Instructions
  1. Preheat the oven to 350 degrees F.
  2. Heat a large skillet on medium heat and heat the olive oil. Once hot, sauté the chopped chorizo for a few minutes. Add the onion, carrot, celery, and garlic and cook until the vegetables start to brown (8-10 minutes.) Add the cut-up cornbread pieces and chopped parsley (reserving some for garnish if you like.) Stir well to combine. Stir in ½ cup of chicken broth (add more if the stuffing appears too dry.)
  3. Meanwhile, use the cooking spray to prepare a medium-sized casserole dish. Add the stuffing to the dish and bake for about 20 minutes (look for it to be lightly golden on top.) Garnish with additional parsley before serving.
3.2.2124

Source: Adapted from Aaron Sanchez for Food Network Magazine

 sister m signature


Filed Under: M's Sides, M's recipes Tagged With: chorizo, corn bread, holiday recipes, side dish, stuffing, Thanksgiving, thanksgiving menu, thanksgiving recipe, thanksgiving sides

Rosemary Parmesan Popcorn

Posted by Meaghan Barry on November 22, 2013

rosemary parmesan popcorn

It’s time to discuss Thanksgiving Day eating strategies!  While you want to be hungry for the big meal, you don’t want to be ravenous and cranky leading up to the main event.  I like to have a variety of light appetizers available for my guests so they can pick and nibble at snacks throughout the day.

Popcorn is such an easy treat to prepare and I decided to create a savory recipe for Thanksgiving: Rosemary Parmesan Popcorn.  I usually like my butter/salt popcorn combo so much that I rarely make any other popcorn recipes, but I had a very difficult time removing my hand from the vicinity of the popcorn bowl with this version.  I highly recommend investing in a Whirley Pop* if you don’t know own already.  It makes popping popcorn a cinch.

Rosemary Parmesan Popcorn

Save Print
Rosemary Parmesan Popcorn
Prep time:  5 mins
Cook time:  3 mins
Total time:  8 mins
 
A savory popcorn recipe
Ingredients
  • 1 tablespoon coconut oil (you could also use canola or vegetable oil, but coconut is a healthier oil)
  • ½ cup popcorn kernels, popped (yields 14-16 cups popped popcorn)
  • 5 tablespoons extra virgin olive oil
  • 3 tablespoons grated Parmigiano Reggiano
  • 1 tablespoon rosemary, finely chopped
  • ½ teaspoon fine sea salt
Instructions
  1. Use the coconut oil and popcorn kernels to pop 14-16 cups popcorn (I recommend using a Whirley Pop*.) Pour popped popcorn into a large serving bowl.
  2. Whisk together olive oil, grated cheese, rosemary and sea salt in a small bowl.
  3. Pour olive oil mixture over popcorn and stir well to combine.
3.2.2124

If you prefer a sweeter popcorn recipe for an appetizer or snack, I highly recommend K’s Lightened-Up Caramel Corn:

Lighter-Version-of-Caramel-Corn_thumb.jpg

 What’s your favorite appetizer to eat/serve before the big Thanksgiving meal?

sister m signature


Disclosure: This post contains affiliate links, but all opinions are my own.

Related Posts Plugin for WordPress, Blogger...


Filed Under: M's recipes Tagged With: appetizer, parmesan, popcorn, popcorn recipes, rosemary, thanks, Thanksgiving, thanksgiving recipe

  • « Previous Page
  • 1
  • 2
  • 3
  • 4
  • …
  • 17
  • Next Page »

Recent Posts

  • Easy Holiday Office Party Tips
  • 5 Steps to an Easy Football Party
  • Gingerbread Biscotti
  • Holiday Coffee Bar and Thanksgiving Recipes
  • Soft Sugar Pumpkin Cookies
  • Cinnamon Sugar Apple Cake
  • Hello Pumpkin Season!
  • Make Your Own Milkshake Party!
  • Mama’s Pickles
  • S’more Cookies

Categories

  • About 2 Sisters 2 Cities (7)
  • Books (8)
  • Crafting & DIY (22)
  • Design & Decorating (15)
  • Gardening (5)
  • Giveaway (14)
  • Guest Bloggers (8)
  • K's post (46)
  • K's Recipes (191)
    • K's Desserts (75)
    • K's Entrees (23)
    • K's Sides (24)
  • M's post (72)
  • M's recipes (167)
    • M's Entrees (21)
    • M's Sides (14)
    • M's Desserts (30)
  • Organizing (7)
  • Party Ideas (49)
  • Uncategorized (1)
  • Vacation (12)
Stitch Fix

Archives

Blogroll

  • Annie's Eats
  • Bake at 350
  • Baked Bree
  • Boston Harbor Beacon
  • Confections of a Foodie Bride
  • Cook Like a Champion
  • Erin’s Food Files
  • Forever and a Recipe
  • Framed Cooks
  • Oh Happy Day
  • On Common Ground
  • Pennies on a Platter
  • Pink Parsley
  • Recipe Girl
  • Sally's Baking Addiction
  • Simply Scratch
  • The Curvy Carrot
  • The Pioneer Woman
  • Tidy Mom
  • Two Peas & Their Pod
  • What’s Gaby Cooking
  • Young House Love
Increase your website traffic with Attracta.com

grab a 2 sisters button!


Copyright © 2014 ~ 2 Sisters 2 Cities | Blog Design by Minx Design