2 Sisters 2 Cities

Image Map
  • About 2 Sisters 2 Cities
  • Recipe Index
  • Project Index
  • Contact Us
  • Like us on Facebook
  • Follow m on twitter
  • Follow k on twitter
  • Follow 2S2C on Pinterest
  • Follow 2S2C on G+
  • rss
  • e-mail 2S2C

Soft Sugar Pumpkin Cookies

Posted by Meaghan Barry on October 27, 2014

Soft Sugar Pumpkin Cookies 1

Wow- it is utterly amazing to me that it’s already the last week of October!  I can’t believe Halloween is this Friday!  Halloween is the beginning of a very busy few months in our home- T’s birthday comes up next, followed by Thanksgiving, Christmas, New Year’s, etc.  It all seems to come in such rapid succession each year.  I always struggle with enjoying the moment when things get busy, but I try to set aside a little time each day to enjoy a relaxing activity.

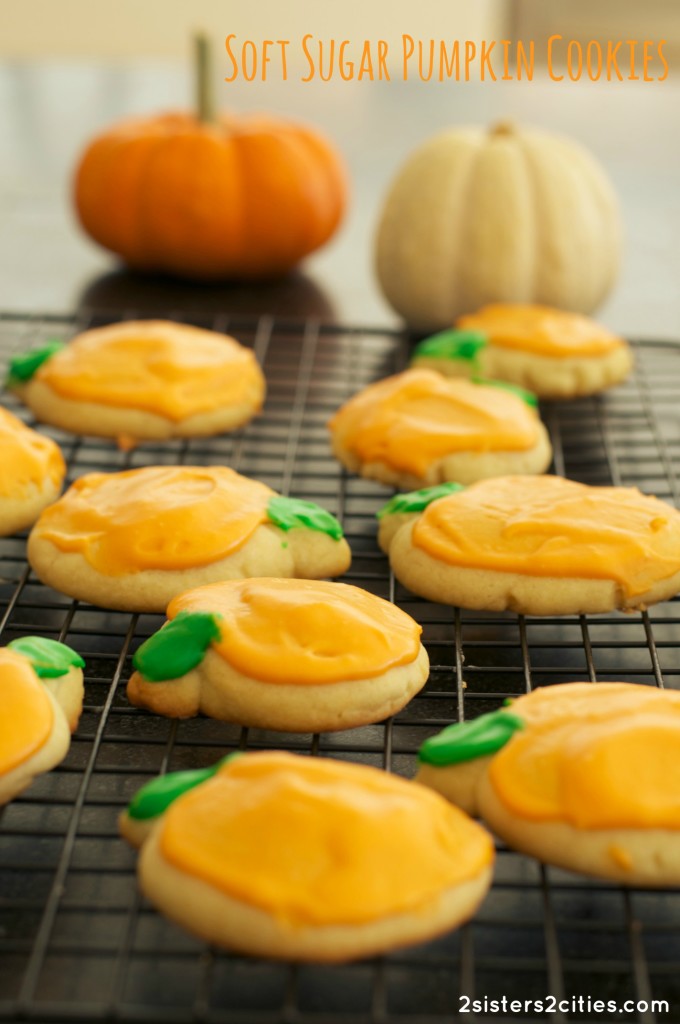
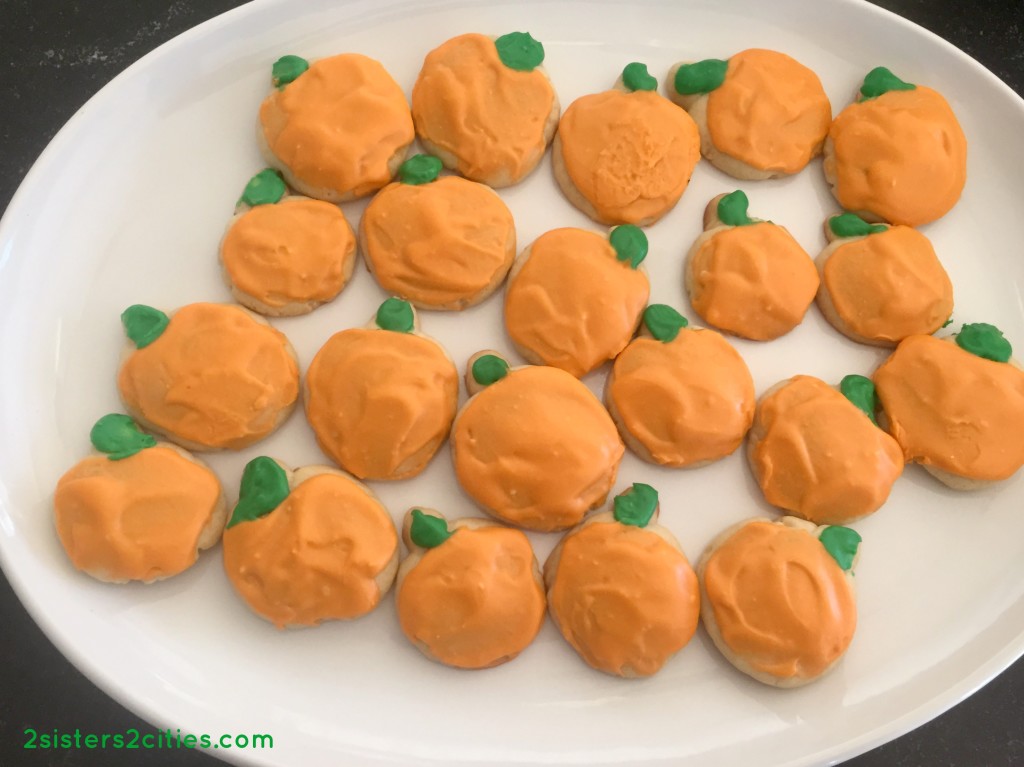
Today I made one of my favorite cookie recipes of all time and changed it up just a bit for Halloween.  I took K’s recipe for Soft Sugar Cookies with Buttercream Frosting and altered them just slightly to make Soft Sugar Pumpkin Cookies!  You don’t even need a cookie cutter to make this super soft, buttery cookies.  I love how each cookie turned out to be a slightly different shape and size- just like pumpkins!

soft sugar pumpkin cookies

This month I have been trying International Delight’s French Vanilla flavored cream with my coffee.  It was just perfect with my afternoon pumpkin cookie treat!  I’m feeling pretty confident the kids and my husband will enjoy these soft sugar pumpkin cookies for their treat tonight as well.

Soft Sugar Pumpkin Cookie with ID

Print
Soft Sugar Pumpkin Cookies
Author: 2 Sisters 2 Cities
 
Ingredients
Cookies:
  • 4½ cups AP flour
  • 4½ tsp. baking powder
  • ¾ tsp. salt
  • 3 sticks unsalted butter, at room temperature (1½ cup)
  • 1½ cups sugar
  • 3 large eggs
  • 5 tsp. vanilla extract
Frosting:
  • 5 cups confectioners’ sugar
  • ⅓ cup (5⅓ tbsp.) unsalted butter, melted
  • 1 tbsp. vanilla extract
  • 7-8 tbsp. milk (plus more, as needed)
  • Food coloring
  • Sprinkles
Instructions
  1. Line baking sheets with silicone non-stick mats or parchment paper. In a medium sized bowl, mix together flour, baking powder and salt. Next in a large bowl or the bowl of your electric mixer combine butter and sugar, Mix on medium–high until light and fluffy. Beat in eggs one at a time until combined. Next mix in vanilla extract being sure to scrape down the sides to combine everything. Gradually add in dry ingredients on low speed until combined, then cover and refrigerate for 1 hour.
  2. Preheat oven to 350 degrees. Using the large cupcake scoop or a ¼ measuring cup scoop out portions of dough and roll into balls (reserve a small amount of dough to make the pumpkin stems._ Flatten each dough ball with hand and place cookies 2-3 inches apart from one another on baking sheet. Take reserved dough and roll out tiny dough balls and attach to top of large, flattened dough balls. Pinch each "stem" to resemble a pumpkin stem. Bake for 10-12 minutes until set. Let cool on baking sheet for 2-3 minutes then move over to a cooling rack.
  3. In the bowl of the mixer with a whisk attachment add in 5 cups of confectioners’ sugar. Add in melted butter, vanilla and milk and whisk at low speed until smooth. Continue to whisk for 1 minute. Reserve a small amount of frosting in a small bowl and add a couple drops of green frosting for the stems. Add in orange food coloring to the large mixing bowl at this time and mix to combine. When cookies are completely cool, frost the round part of the cookies orange and the stems green. Leave cookies out at room temperature until the frosting hardens on top. Place the cookies in an airtight container and place wax paper between the layers.
3.2.2708

Source– adapted from Annie’s Eats

International Delight is currently offering everyone who signs up for their Member Delights program gets a free instant coupon towards I.D.  This month, they are also giving away a DSLR camera to a lucky Member Delights participant!

sister m signature

This is a sponsored conversation written by me on behalf of International Delight. The opinions and text are all mine.


Filed Under: M's Desserts, M's recipes Tagged With: buttercream frosting, halloween, halloween cookies, international delight, pumpkin cookies, pumpkins, soft sugar cookies, sponsored post

Happy Halloween & Mickey Mouse Costume Reveal

Posted by 2 Sisters 2 Cities on October 31, 2012

pumpkin patch

Happy Halloween everyone!  Is anyone else in shock that it is the last day of October?  We ended up pretty much unscathed from Hurricane Sandy.  One of our Japanese maples was uprooted and we lost power for a couple of hours, but pretty minor stuff compared to how others on the East Coast fared.  I hope everyone else out there that was affected by the storm is doing ok!

Since it’s now officially Halloween, I wanted to reveal baby T’s Mickey Mouse costume.  First, here’s a quick round-up of a few Halloween posts that we have done in the past.

Halloween round-up:

  • Scary Black Cat Cookies
  • Eery Half Moon Cookies
  • Boo-tiful Mini Pumpkin Muffins with Cream Cheese Frosting
  • Witch’s Cauldron Crockpot Cider with Mulling Spices
  • Spooky DIY Halloween Pennant Banner

Mickey Mouse Costume:

My son (who turns 2 in a couple of weeks) is pretty much obsessed with the tv show Mickey Mouse Clubhouse.  I decided a couple months ago to dress him up as Mickey Mouse for Halloween.  When I started looking for costumes on-line, I was unimpressed with the results so I decided to make the costume myself.  It was actually very simple to make and ended up costing less than $25.

DIY Mickey Mouse Costume

Materials Needed:

  • black Pants– $5.00
  • long-sleeved black t-shirt– $4.00
  • red shorts– $4.25
  • 2 large white  buttons- less than $2.00 at Michael’s
  • headband- 99 cents  in clearance box at Target
  • thick black pipe cleaner (also called chenille stem)- $2.99 at Michael’s
  • black and yellow felt- 29 cents a piece at Michael’s
  • needle and thread- already had
  • scissor- already had
  • glue gun- already had
  • safety pin- already had
  • black face paint- $4.99 at Michael’s (I know I could have gotten this cheaper somewhere else, but I was running short on time and picked up a set here)
Directions:
Use needle and thread to attach 2 large white buttons to the front of the red shorts.  Cut the chenille stem in half and attach one half to the red shorts with a safety pin.  Use the other half of the chenille stem and cut two small pieces out of (long enough to shape two circle ears out of).  Twist both pieces into circles and attach to headband.  Cut out 4 black circles from the felt and use the glue gun to attach to the circular chenille stems on the headband.  Next, cut a two half-circles and 2 small rectangles from the yellow felt.  Put one half-circle on top of a sneaker and wrap the rectangle piece around the bottom of the sneaker.  Use a glue fun to attach the two pieces so it is a snug fit to the shoe (be careful not to glue the felt directly to the shoe however.)  Repeat for the other shoe.
When it’s costume time, put on black pants and black long-sleeved t-shirt.  Put red shorts on over the pants.  Put on “yellow” shoes and Mickey Mouse ears.  Dab a bit of black face paint on nose and start doing the Hot Dog dance!

Here’s T getting ready to go trick-or-treating!

mickey mouse costume

Hope you have a great Halloween!

sister m signature


Filed Under: Crafting & DIY, Party Ideas Tagged With: diy costume, halloween, halloween diy projects, halloween recipes, mickey mouse clubhouse, mickey mouse costume

DIY Halloween Pennant Banner

Posted by 2 Sisters 2 Cities on October 26, 2012

Halloween Pennant Banner DIY Tutorial

I realized the other day that we have hardly any Halloween decorations in our house besides our cheapo plastic pumpkin that holds candy.  I didn’t want to spend too much money considering Halloween is only five days away so I decided to just focus on sprucing up our fireplace mantle.  The Halloween pennant banner is really easy to make and I’ve got a free printable below so you can use the same spooky letters if you want.

Halloween decorations

I picked up a few other decorations for the mantel earlier today.  The glittery pumpkins were 50 cents a piece at Michael’s.  I found the owl at Marshall’s for less than $10.  My husband and baby T and always complaining that an owl outside keeps them up at night so I thought he would fit in perfectly to our Halloween display.  I bought the baby pumpkin a few weeks ago. All the other pumpkins I bought  at the time have since rotted so we need to pick up a few more this weekend for carving.

Halloween Pennant Banner Tutorial

Materials Needed:

  • Orange, black, and white cardstock
  • A few yards of rickrack or another type of string/ribbon
  • Double-sided tape
  • Masking Tape
  • Large scallop punch (this step is optional if you don’t have one)
  • Ruler
  • Scissors
  • Pencil
  • Halloween candy to munch on

Directions:

Use a ruler to make a template for the pennant flags.  Mine measured out 6 inches on the short side and 9.5 inches on the two long sides.  Sketch out the measurements with a pencil and use scissors to cut out the flag.  Use this flag to trace 13 additional flags alternating the paper color if desired.  Cut out the rest of the flags.

Use a scallop punch to make 14 scalloped circles (Alternative idea: if you don’t have a scallop punch, you could use a can to trace a large circle.)  Print out the font templates below if you want to use the same message and font on my banner.  (For Macs: Save the two jpeg files and open it in Preview to print.)  If you want to create your own message or use a different type of font, I highly recommend checking out picmonkey.com.  They have a lot of different Halloween fonts right now as well.  Trace a small circle (I used a small can) over each letter and cut out the 12 letters.

templates for the letters T-R-I-C-K-O Template for the letters T-R-E-A-T-R

Use double-sided tape to attach the scalloped circle and font circle onto the pennant flag.  Lay out the rickrack and tape the flags to the rickrack using masking tape.  Hang the Halloween pennant banner on your mantel, step back, and admire!

sister m signature


Filed Under: Crafting & DIY, Design & Decorating Tagged With: DIY, diy project, diy tutorial, halloween, halloween pennant, mantel, mantel decorations, pennant, pennant banner

Half Moon Cookies – Our Family Recipe

Posted by 2 Sisters 2 Cities on October 19, 2012

half moon cookies

I have been wanting to post the recipe for my grandma’s half moon cookies for a long time and I finally got a chance to make them yesterday.  I thought the timing was also appropriate because they make great cookies for Halloween as well!  I loved having these cookies growing up- we called them half moon cookies.  When I moved to Boston, I realized most people around here call them black and white cookies (Wikipedia claims otherwise, but I have yet to meet a non-upstate NYer that calls them half moon cookies.)

half moon cookies on a cooling rack and plate

The half moon cookie originated in Utica, NY, but this recipe is from the now-defunct Mattot Bakery in Oswego, NY.  My step-great-grandmother got the half moon cookie recipe before the bakery closed and passed it along to my grandmother.  My grandma then passed along the recipe to us- it’s now published in our family cookbook.  Here are a couple of historical family photos.  The first is of my grandmother.  The second photo is my great-grandfather’s and my step-great-grandmother’s wedding in 1946:

historical family photos

Here is the recipe for the half moon cookies.  I updated two of the ingredients in the cookie recipe based on more contemporary ingredients, but I include the original ingredients in parentheses if you are interested.  I also created my own frosting recipe based on a few that I found.

Print
Half Moon Cookies
Author: 2 Sisters 2 Cities
Recipe type: cookie
Prep time:  35 mins
Cook time:  10 mins
Total time:  45 mins
Serves: 20
 
The original half moon cookie recipe from Mattot Bakery in Oswego, NY.
Ingredients
  • Cookie Ingredients:
  • 1 cup sugar
  • ½ cup butter (original recipe: margarine)
  • 2 eggs
  • ½ cup buttermilk (original recipe: sour milk or a vinegar milk combination)
  • 2 and ¼ cups flour
  • 1 tsp baking soda
  • 1 tsp baking powder
  • ½ tsp salt
  • 1 tsp vanilla
  • ⅛ tsp nutmeg
  • Frosting Ingredients:
  • 6 tablespoons butter, softened
  • 2 and ½ cups confectioner's sugar
  • ⅓ cup milk
  • 1 teaspoon vanilla
  • ¼ cup cup cocoa powder
Instructions
  1. Mix sugar, butter, eggs, and vanilla in a medium bowl. Combine flour, baking soda, baking powder, salt, and nutmeg in a separate bowl. Add dry ingredients to butter mixture and mix together. Chill for at least 30 minutes, up to 24 hours.
  2. Preheat oven to 350 degrees F. Drop cookie batter from tablespoon onto ungreased cookie sheet. Bake for 12 minutes.
  3. Meanwhile, make the frosting. Cream the butter in a small bowl. Mix in the confectioner's sugar, vanilla, and milk alternatively. Beat until the frosting consistency is smooth (no lumps.) Remove half the frosting into a separate bowl (this will be the vanilla frosting.) Mix in the cocoa powder with the remaining frosting to make the chocolate frosting.
  4. Once the cookies are cool, frost the flat bottoms with vanilla frosting on one half and chocolate frosting on the other half.
3.1.09

Do you have any family recipes that have been passed down that you still like to make?

sister m signature


Filed Under: M's Desserts, M's recipes Tagged With: black and white cookies, cookie recipe, cookies, family history, family recipe, half moon cookies, halloween, heirloom recipes, mattot bakery, upstate NY

Scribble Shop Guest Post

Posted by 2 Sisters 2 Cities on September 27, 2012

I’ve been a busy guest-blogger this week- today I’m guest-posting at the Scribble Shop blog.  I shared a number of K’s amazing (looking and tasting) cut-out sugar cookies that she has made to celebrate special occasions.  The post also has K’s favorite cut-out cookie recipe.  My Scribble Shop guest post can be found here.

Scribbleshop.com has tons of arts & crafts supplies, as well as an extensive amount of cookie and cake decorating supplies.  They have set up a special coupon code just for 2 Sisters 2 Cities’ readers to receive 15% off your order.  Just enter promotion code: 2CITIES2 to receive the 15% discount.  This promotion code is valid until November 1st!  It’s the perfect time to start stocking up for the holiday trifecta coming up.

Do you enjoy making cut-out cookies?  What’s your favorite cookie cutter that you own?  My personal favorites are some of the Christmas cookie cutters that my Grandma used to bake cookies with.


Filed Under: Guest Bloggers, M's recipes, Party Ideas Tagged With: 4th of july, baby's first birthday, christmas, cookie cutters, cut-out cookies, fourth of july, halloween, holidays, party favors, sugar cookies

Happy Halloween- Black Cat Cookies

Posted by 2 Sisters 2 Cities on October 30, 2011

These cookies are the cookie I remember growing up with on Halloween.   It was in our family cookbook and for some reason these cookies always stood out to me as the go-to Halloween cookie.

Maybe I am so partial to these cookies because of our  late cat Cricket,  a stray long-haired black cat,  whom we had taken in and quickly found a place in all of our hearts.  These cookies became even more important to our holiday traditions after owning a black cat.  We often thought Cricket was an alien because he tried to act like our dogs and could sort of talk to us.  I swear he would say “hellllwwoooo”  when we walked into a room or “whaaaaaaaat” when you called his name (maybe not pronouncing the “t,”  but you get my point.)     A few years ago Cricket died from a bad heart and my mom made these cookies in honor of him.  Every year since, we have made these cookies at Halloween time to honor Cricket (possibly our dog too because he once ate a whole tray of these cookies off the cupboard).  These are some black cat cookies that you won’t mind crossing paths with (no bad luck here!)

Black Cat Cookies

Ingredients

1 cup butter (2 sticks) at room temperature

2 cups sugar

2 eggs

1 tablespoon vanilla extract

3 cups  all-purpose flour

1 cup unsweetened cocoa

1/2 tsp. salt

1/2 tsp. baking powder

1/2 tsp. baking soda

candy corn and red hots

Preheat oven to 350 F.   Place butter in mixer and cream together with sugar.


Add eggs and vanilla, until all ingredients are incorporated. 


In a medium bowl on the side,  mix together  flour, cocoa, salt, baking powder, and baking soda. 


Gradually stir in dry ingredients into the butter mixture and mix well.


With the dough, form 2 inch balls, and place on a parchment paper lined cookie sheet.  


Take a glass, a small bowl of water, and a small bowl of granulated sugar, dip the glasses bottom in water and then dip in sugar. 


Take the sugar covered glass and flatten the cookie balls, keeping  the bottom of the glass well sugared, repeat for all the cookies. 


Next pinch 2 “ears” at the top of the cookies, so they look like cat ears.


Then with a fork, press into the sides of the cookies to form whiskers on either sides of where the nose will be.  


Bake for 10-12 minutes.   Remove from the oven and immediately add the candy corn for eyes (whites of the candy corn facing in) and a red hot for the nose.  Let cool.

Makes about 3 dozen cats

Enjoy!

-Sister K


Related Posts Plugin for WordPress, Blogger...


Filed Under: K's Desserts, K's Recipes Tagged With: baking, cat, cookies, halloween, halloween cat cookies, holidays

Recent Posts

  • Easy Holiday Office Party Tips
  • 5 Steps to an Easy Football Party
  • Gingerbread Biscotti
  • Holiday Coffee Bar and Thanksgiving Recipes
  • Soft Sugar Pumpkin Cookies
  • Cinnamon Sugar Apple Cake
  • Hello Pumpkin Season!
  • Make Your Own Milkshake Party!
  • Mama’s Pickles
  • S’more Cookies

Categories

  • About 2 Sisters 2 Cities (7)
  • Books (8)
  • Crafting & DIY (22)
  • Design & Decorating (15)
  • Gardening (5)
  • Giveaway (14)
  • Guest Bloggers (8)
  • K's post (46)
  • K's Recipes (191)
    • K's Desserts (75)
    • K's Entrees (23)
    • K's Sides (24)
  • M's post (72)
  • M's recipes (167)
    • M's Entrees (21)
    • M's Sides (14)
    • M's Desserts (30)
  • Organizing (7)
  • Party Ideas (49)
  • Uncategorized (1)
  • Vacation (12)
Stitch Fix

Archives

Blogroll

  • Annie's Eats
  • Bake at 350
  • Baked Bree
  • Boston Harbor Beacon
  • Confections of a Foodie Bride
  • Cook Like a Champion
  • Erin’s Food Files
  • Forever and a Recipe
  • Framed Cooks
  • Oh Happy Day
  • On Common Ground
  • Pennies on a Platter
  • Pink Parsley
  • Recipe Girl
  • Sally's Baking Addiction
  • Simply Scratch
  • The Curvy Carrot
  • The Pioneer Woman
  • Tidy Mom
  • Two Peas & Their Pod
  • What’s Gaby Cooking
  • Young House Love
Increase your website traffic with Attracta.com

grab a 2 sisters button!


Copyright © 2014 ~ 2 Sisters 2 Cities | Blog Design by Minx Design