2 Sisters 2 Cities

Image Map
  • About 2 Sisters 2 Cities
  • Recipe Index
  • Project Index
  • Contact Us
  • Like us on Facebook
  • Follow m on twitter
  • Follow k on twitter
  • Follow 2S2C on Pinterest
  • Follow 2S2C on G+
  • rss
  • e-mail 2S2C

Baby N’s Gray and Green-Themed Nursery

Posted by Meaghan Barry on September 23, 2013

So I started this post in early June and had hoped to finish it before Baby’s N’s arrival.  Fast forward three and a half months later and I am just getting to it!  I was still finalizing some of the details when Baby N decided to come a week early.  It took me up until this point to finally pull together the remaining elements of his gray and green-themed nursery.

While with T, I had a very specific theme in mind for his airplane-themed nursery.  However, for N, I really only had a color palette in mind…dark gray and green.  I spent a lot of time perusing the web to come up with this Pinterest board with this color scheme in mind.

gray nursery

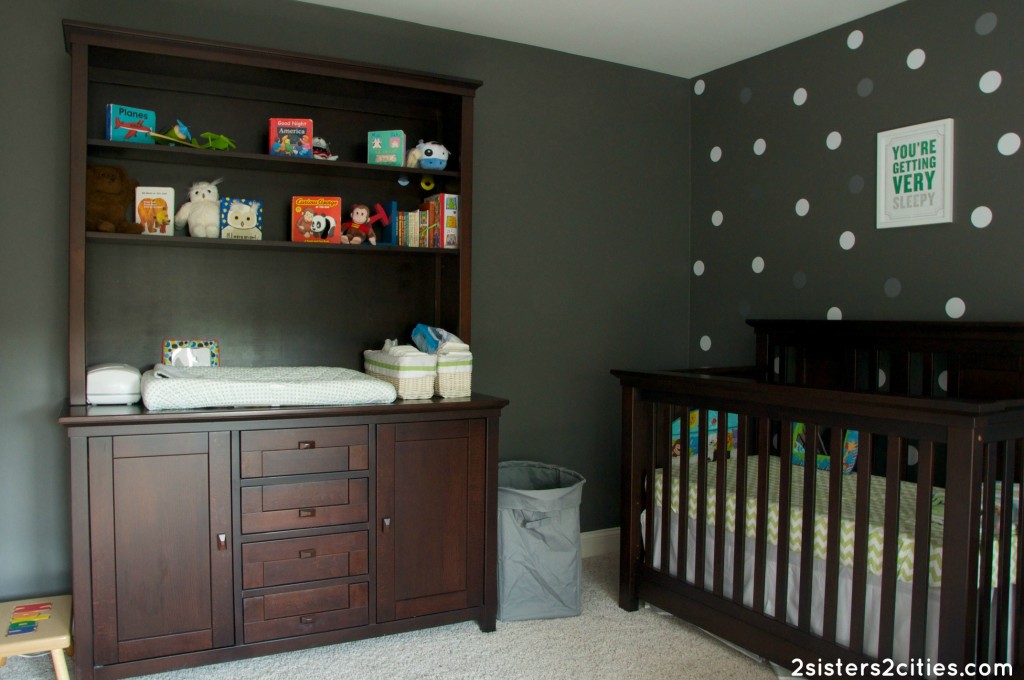
We ended up using furniture that we already owned to make up most of the nursery.  Since T is (hopefully) nearing the end of his diaper stage, we moved the diaper changing bureau to the nursery.  We also got T a “big-boy” bed and moved his crib to N’s room.  We also had a mahogany dresser from our old master bedroom that we were no longer using.  Our one furniture splurge was the new white glider from Land of Nod.

white glider

This room was previously our guest room and was painted a light green.  I wanted something a bit more dramatic for the nursery and I fell in love with a color called Kendall Charcoal (Benjamin Moore HC 166.)  I was a bit worried that it would be a little too dark, especially for a nursery, but I love the way the walls turned out.  It contrasts so nicely with the white and green.

quilt

My favorite addition to the room is the beautiful gray and green quilt that K made for Baby N.  It’s stunning and perfectly matches the room even though she had never seen it in person until her recent visit.  I love all the fabric she used, especially the cute little elephant.  It truly makes the room feel complete.  K took pictures of her progress on the quilt as she was making it and will be writing up a post soon with her tutorial.  I am so impressed with how it turned out and it puts a smile on my face every time I enter the room!

dots

My second favorite part of the room are the white and silver dot decals (also from the Land of Nod.)  I can attest that they are very easy to remove and reuse…I ended up changing it up three times before I was fully satisfied with the results (a big shout-out to sister M, K, and my husband who helped me adjust them and made sure they were random enough!)

you are getting very sleepy

I also spent some time on Etsy looking for wall art for the nursery.  I still want to buy one with Baby N’s birth info (weight, date, etc.), but I love the ones I have hanging up so far.  My favorite one is the letterpress print above the bed that says “You are getting very sleepy.”  It’s a family joke that my father always used to tell me that I looked sleepy when I was a baby and would just put me down and I would fall asleep.  Wishful thinking that my kids would be like that…Baby N is a pretty terrible sleeper thus far.  Hopefully that will change in the near future!

pic 7

Gray and Green-Themed Nursery Source List:

Crib and Changing Bureau- Romina Charisma
Dresser- Pottery Barn
Glider- Land of Nod
Side Table- Target
Book Caddy- Land of Nod
Knit Pouf- Land of Nod
Crib Sheets  & Skirt- Pottery Barn
Roman Shades- Pottery Barn
Green Lamp- Target
Dot Decals- Land of Nod
You are getting very sleepy” print- Etsy
“ABC/I Love You” print- Etsy
“Climb Trees” print- Etsy
Paint Color- Benjamin Moore Kendall Charcoal (HC 166)

sister m signature


Filed Under: Design & Decorating Tagged With: baby n, decorating, gray, green, nursery, nursery design idea

DIY Baby Closet Dividers

Posted by Keelin Hollenbeck on May 20, 2013

DIY Baby Closet Dividers {from 2 Sisters 2 Cities}

I’ve mentioned in a lot of my last posts that I have been busy nesting and getting ready for baby #2’s arrival.  This time around, I realize that the nursery does not need to be finished by the time the baby comes since he will be in a bassinet next to our bed most nights, but time will likely be a rare commodity with two little munchkins.  I’m trying to get as many things done ahead of time with just T around.

I wanted to share one of the latest baby projects that I just finished- DIY baby closet dividers.  These baby closet dividers are all the rage on etsy and I was originally going to just buy some.  I realized they would be fairly easy to make myself however so I decided to give it a try.  I had a few rolls of gray chevron contact paper that I picked up at Marshall’s a few months ago and I had put them aside for any projects that might come up.  I decided this paper would be perfect for making my own baby closet dividers.  {Side note: I’m not sure I’ve mentioned this in a past post, I decided to decorate this baby’s nursery in dark gray, bright green, and white.  Check out this post for a peek at baby T’s airplane-themed nursery that I did a few years ago.}

DIY Baby Closet Dividers

Materials

Materials for DIY Baby Closet Dividers

  • empty cereal, cracker, or snack cardboard boxes
  • large circle trace (I used a plastic take-out container)
  • small circle trace (I used a spice jar)
  • pencil
  • scissors
  • decorative contact paper
  • stickers or labels

Instructions

DIY Baby Closet Dividers {from 2 Sisters 2 Cities}

  1. Use the scissors to cut two large squares out of the decorative contact paper (make sure the squares are larger than the large circle trace you plan on using.)
  2. Remove the backing from the contact paper and place on both sides of a flat piece of cardboard.  The squares should match up so that when you cut a circle out of the cardboard, the contact paper will fully cover the circle on both sides.
  3. Using a pencil and large circle trace, trace a circle on one side of the square contact paper.  Then, using the small circle trace, trace a small circle in the middle of the large circle that you just traced.
  4. With your scissors, follow the large circle trace and cut the large circle from the piece of cardboard.  Then, cut two small even slits to cut out the small circle trace from the center.  Neaten any edges so that both circles appear even and smooth.
  5. Repeat this process 5-8 times depending on how many baby closet dividers you want to make.  (I made six of them since I will likely be storing away the baby clothes once the baby grows out of them.  I will then change the sticker out on the divider for a larger clothes size.)
  6. Label 6-9 stickers with common baby clothes sizes: newborn, 0-3 months, 3-6 months, 6-12 months, 12-18 months, 18-24 months, 2T, 3T, and 4T.  Apply sticker or label to top of clothes dividers.
  7. Hang in closet and organize baby’s clothes by size!

Baby Closet Dividers {from 2 Sisters 2 Cities}

I love how this project turned out!  Plus, I love being able to look at that first newborn onesie every time I open the closet door- I can never get over how little and cute newborn clothes are.  It barely even fits on the mini hanger!

T never had a closet in our city condo since the closet in his nursery served as my husband’s main closet.  I used a lot of baskets to divide his clothes by size and type and stored them on a bookshelf.  While that system worked well, I really like having everything organized and hanging in a closet this time around.  It’s much easier to visualize what I have by size with everything in sight.  I still need to do a little more organizing once I move the dresser and changing table into this room, but it’s come a long way from the catch-all closet it used to be.

Baby Nursery Closet

Have you ever seen an idea on Etsy or a retail store that you decided to make yourself?

sister m signature


Filed Under: Crafting & DIY, M's post Tagged With: baby, baby #2, baby closet dividers, baby clothes, baby's nursery, closet organization, DIY projects, etsy, getting organized, getting ready for baby, nesting, nursery, nursery storage, preparing for baby

Ready for Arrival: Airplane-Themed Nursery

Posted by Meaghan Barry on November 2, 2010

I’ve been on maternity leave for a little over a week now and I finally finished a few last minute touches to the baby’s nursery this morning.  I wanted to share some photos of the airplane-themed nursery that we put together.  Husband M and I decided (well, perhaps I decided) to go with an airplane theme as Husband M has loved planes since he was a little kid.  Growing up in London, his dad would take him to Heathrow every weekend to watch the planes take off.  When we were initially deciding on buying a place, I think one of the main selling points for South Boston  was its view of the runway approach to Logan Airport.  He spends half his summer up on the roof deck watching planes take off and land.  Hopefully our baby shares the same love of planes!

The final reveal:

airplane themed nursery

airplane mobile

airplane crib

We purchased all the furniture from Baby Furniture Warehouse in Braintree.  The crib, bookshelf, and baby station are from the Romina Karisma collection and the glider is from Dutalier.  The bedding, mobile, airplane & boat pictures, and storage containers are all from Pottery Barn Kids.  The airplane lamp was a gift from our good friends at Crescent Harbor Lighting.

As I reach the end of my to do list, all that is left is to wait for baby’s arrival.  Hopefully he is not following the trend of the airline industry and decides to come right on time!

-m

Related Posts Plugin for WordPress, Blogger...


Filed Under: Design & Decorating, M's post Tagged With: airplane nursery, airplane-themed nursery, baby, baby's nursery, getting ready for baby, nursery, nursery design idea, plane nursery, preparing for baby

Recent Posts

  • Easy Holiday Office Party Tips
  • 5 Steps to an Easy Football Party
  • Gingerbread Biscotti
  • Holiday Coffee Bar and Thanksgiving Recipes
  • Soft Sugar Pumpkin Cookies
  • Cinnamon Sugar Apple Cake
  • Hello Pumpkin Season!
  • Make Your Own Milkshake Party!
  • Mama’s Pickles
  • S’more Cookies

Categories

  • About 2 Sisters 2 Cities (7)
  • Books (8)
  • Crafting & DIY (22)
  • Design & Decorating (15)
  • Gardening (5)
  • Giveaway (14)
  • Guest Bloggers (8)
  • K's post (46)
  • K's Recipes (191)
    • K's Desserts (75)
    • K's Entrees (23)
    • K's Sides (24)
  • M's post (72)
  • M's recipes (167)
    • M's Entrees (21)
    • M's Sides (14)
    • M's Desserts (30)
  • Organizing (7)
  • Party Ideas (49)
  • Uncategorized (1)
  • Vacation (12)
Stitch Fix

Archives

Blogroll

  • Annie's Eats
  • Bake at 350
  • Baked Bree
  • Boston Harbor Beacon
  • Confections of a Foodie Bride
  • Cook Like a Champion
  • Erin’s Food Files
  • Forever and a Recipe
  • Framed Cooks
  • Oh Happy Day
  • On Common Ground
  • Pennies on a Platter
  • Pink Parsley
  • Recipe Girl
  • Sally's Baking Addiction
  • Simply Scratch
  • The Curvy Carrot
  • The Pioneer Woman
  • Tidy Mom
  • Two Peas & Their Pod
  • What’s Gaby Cooking
  • Young House Love
Increase your website traffic with Attracta.com

grab a 2 sisters button!


Copyright © 2014 ~ 2 Sisters 2 Cities | Blog Design by Minx Design