2 Sisters 2 Cities

Image Map
  • About 2 Sisters 2 Cities
  • Recipe Index
  • Project Index
  • Contact Us
  • Like us on Facebook
  • Follow m on twitter
  • Follow k on twitter
  • Follow 2S2C on Pinterest
  • Follow 2S2C on G+
  • rss
  • e-mail 2S2C

Shrimp Scampi with Garlic Toasts

Posted by Meaghan Barry on December 23, 2013

 Shrimp Scampi with Garlic Toasts

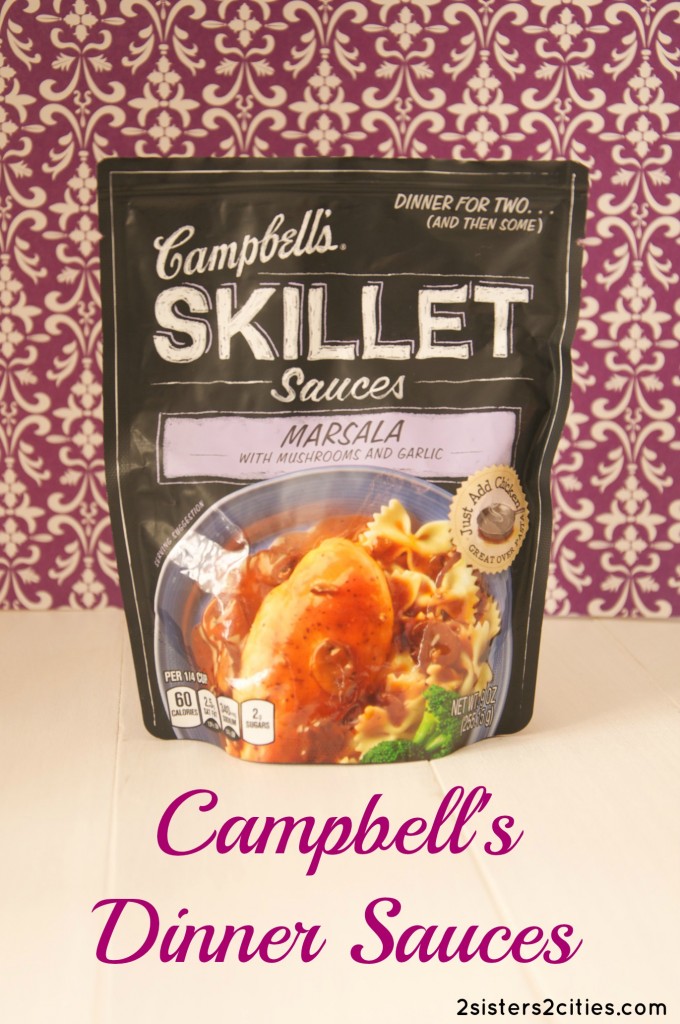
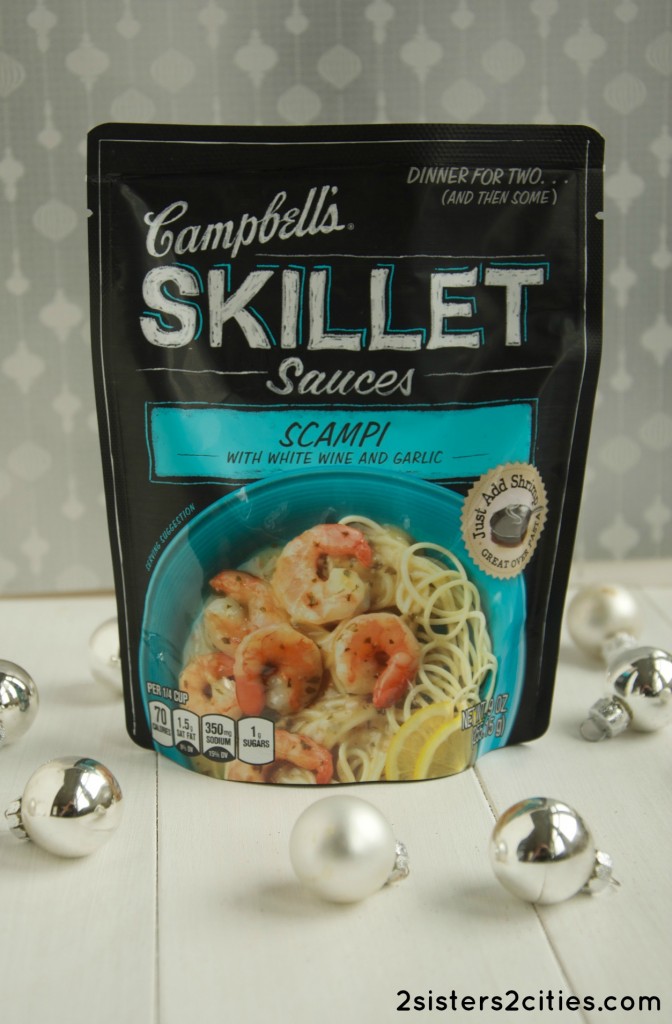
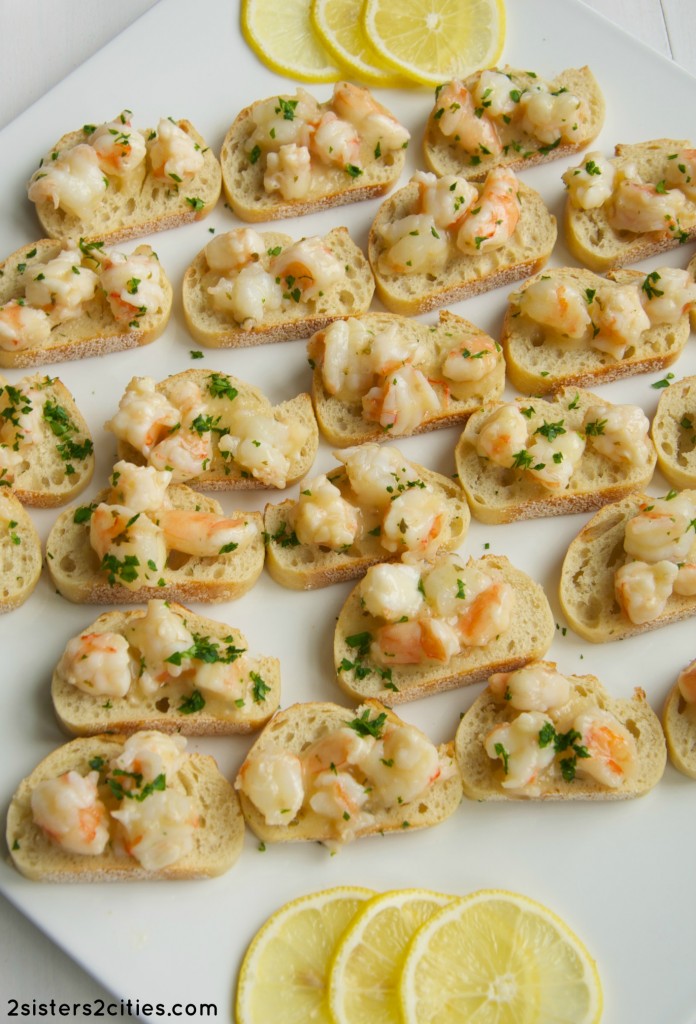
Another food tradition we enjoy in our family is serving lots of appetizers on Christmas Eve and New Year’s Eve.  It can be a bit hectic to prepare these apps with a full house so I am always looking for shortcuts to cut down on prep times.  Campbell’s asked us to share a holiday recipe using one of their skillet sauces or slow cooker sauces.  I decided to try out their Scampi Skillet Sauce to make an appetizer: Shrimp Scampi with Garlic Toasts.  This appetizer dish offers all the flavor of traditional shrimp scampi on a bite-size baguette…perfect for holiday entertaining!

shrimp scampi skillet sauce

I tested this recipe out with some guests that dropped by and it was approved by all (including the kids!)  The baguette slices can be toasted and rubbed with garlic ahead of time.  You could also clean and chop up the shrimp to have it all ready to be sautéed.  Whether you are planning your Christmas menu or looking ahead to New Year’s Eve, definitely consider adding this appetizer to your holiday!

Shrimp Scampi with Garlic Toasts

Print
Shrimp Scampi with Garlic Toasts
Prep time:  15 mins
Cook time:  15 mins
Total time:  30 mins
 
Ingredients
  • 1 french baguette
  • 2 garlic cloves, peeled and cut in half
  • 1 tablespoon extra virgin olive oil
  • 1 pound thawed shrimp, peeled, de-veined, and with tail removed
  • 1 package Campbell's Scampi Skillet Sauces
  • ¼ cup parsley, finely chopped
  • 1 lemon, sliced (optional, for garnish only)
Instructions
  1. Preheat over to 350 degrees (F). Cut baguette into thin slices and place on baking pan. Bake for five minutes on each side or until lightly golden
  2. Remove toasted baguette slices from oven and rub both sides with cut garlic, then set aside.
  3. Rinse shrimp and pat dry with paper towel.
  4. Pour olive oil into large skillet pan and heat to medium high.
  5. Meanwhile, chop shrimp into small pieces. Once oil is hot, add shrimp to pan, and cook until shrimp turns pink
  6. Once shrimp is cooked, turn heat to low and and add Campbell's Scampi Skillet Sauce. Cook until thoroughly warmed.
  7. Remove shrimp from oven, and spoon shrimp mix on top of garlic toast.
  8. Place on serving tray, sprinkle with chopped parsley, and garnish with lemon slices and.
3.2.2199


sister m signature


Disclosure: This post brought to you by Campbell’s Dinner Sauces. Weekend-worthy dinners with only weekday-level effort needed! Learn more at http://www.campbellsauces.com/


Filed Under: M's recipes Tagged With: appetizers, campbell's, campbell's skillet sauces, christmas, christmas eve, New Year's Eve, sponsored post

Get Minted For The New Year

Posted by Meaghan Barry on December 21, 2013

I know we are still a few days away from Christmas, but it’s time to start thinking about the next holiday around the corner- New Year’s!  If you didn’t get a chance to send Christmas cards out this year, check out the great selection of New Year’s cards at Minted.  I love the new tradition of photo cards…it’s so fun to see photos of everyone’s family from year to year!

While I love all the Christmas cards that we receive, there is also something special about New Year’s cards from friends.  After the bustle of the season has quieted, it’s nice to reflect on these cards.  Here are a few of my favorite designs:

new year stripe

new year card

2014

Minted also offers some great New Year’s personalized party decorations. I especially love the silver and gold themed party decor.  K and I were both swooning over the personalized bunting today.

bunting

These silver and gold wine tags would also be perfect to ring in the New Year with.

wine glass tags

I also love this table runner that can be customized with your own special message…so many possibilities!

table runner

While I certainly can’t wait to savor every moment of Christmas, just looking at these New Year’s ideas is getting me inspired for all the celebrating to be done over the next couple of weeks!  How do you like to celebrate the new year ?

sister m signature


Disclosure: This post is sponsored by Minted.  All opinions are our own.


Filed Under: M's post Tagged With: 2014, cards, minted, new year's, new year's day, New Year's Eve, sponsored post

Easy Pecan Sticky Buns

Posted by Keelin Hollenbeck on December 20, 2013

Easy Pecan Sticky Buns

Disclosure: This post is sponsored by the the National Frozen & Refrigerated Foods Association and The Mom It Forward Blogger Network.  All opinions are our own.

One of our favorite holiday traditions is enjoying warm sticky buns after opening presents on Christmas morning.  We are usually ravenous by the time we get to breakfast on that special day and these easy pecan sticky buns hit the spot every time.  This recipe is great because you can prepare it ahead of time and bake it right before serving.  This recipe calls for puff pastry (found in the freezer aisle) and unsalted butter (from the dairy aisle).  These easy pecan sticky buns just might become a Christmas tradition for your family too!

Quick Sticky Buns

While you are planning your holiday menu over the next week, don’t forget to shop the freezer and dairy aisle.  Both aisles offer such a great variety of foods that can be used for special holiday meals and treats. For more holiday recipe ideas, check out the Easy Home Meals Pinterest boards or the Easy Home Meals website, sponsored by the National Frozen & Refrigerated Foods Association.

Sticky Buns from Frozen Puff Pastry Dough

Save Print
Easy Pecan Sticky Buns
Prep time:  30 mins
Cook time:  30 mins
Total time:  1 hour
 
Ingredients
Sticky Buns
  • 12 tablespoons (1 and ½ sticks) unsalted butter, at room temperature
  • ⅓ cup light brown sugar, lightly packed
  • ¾ cup pecans
  • 1 package (17.3-ounces/ 2-sheets) frozen puff pastry, defrosted
Filling:
  • 2 tablespoons unsalted butter, melted and cooled
  • ⅔ cup light brown sugar, lightly packed
  • 3 teaspoons ground cinnamon
  • ½ cup raisins
Instructions
  1. Using the bowl of an electric mixer, cream together the 12 tablespoons butter and ⅓ cup brown sugar with the paddle attachment. Use a small ice cream scoop to place the mixture in each of the 12 muffin cups. Add the pecans evenly among the 12 muffin cups.
  2. Meanwhile, flour a surface and unfold 1 sheet of the puff pastry with the folds going left to right. Brush the entire sheet with the melted butter. Leaving a 1-inch border on the puff pastry, sprinkle each sheet with ⅓ cup of the brown sugar, 1 and ½ teaspoons of the cinnamon, and ¼ cup of the raisins. Starting with the end closest to you, roll the pastry up tightly around the filling, finishing the roll with the seam side down.
  3. Cut off ½-inch off the ends of the roll and discard. Slice the roll in 6 equal pieces. Place each cut bun (spiral side up) into a cup of a standard-sized muffin pan.
  4. Repeat with the second sheet of puff pastry to make 12 pecan sticky buns in total.
  5. Cover muffin pan with plastic wrap and refrigerate until serving day.
  6. On serving day: Preheat the oven to 400 degrees F. Place the muffin pan on a foil-lined baking sheet. Bake for 30 minutes, until the sticky buns are golden to dark brown on top and firm to the touch. Allow to cool for 5 minutes only and flip the buns onto the parchment paper (use a spoon to scoop out any remaining filling and pecans and pour onto the buns). Enjoy!
3.2.2199

Source: Adapted from The Barefoot Contessa

Holiday cheers!

k & m


Filed Under: K's Recipes, M's recipes Tagged With: breakfast recipe, christmas, christmas morning, holiday baking, holiday helper, pecan sticky buns, puff pastry, sponsored post

3 Peanut Butter Reindeer Cookies

Posted by Meaghan Barry on December 19, 2013

Peanut Butter Reindeer Cookies {from 2 Sisters 2 Cities}

Today’s 12 Cookies of Christmas countdown post is brought to you by Kraft.

A Little Help For The Holidays From Kraft

Christmas is less than a week away and it’s time to get serious about Christmas preparations!  When I saw this Peanut Butter Reindeer Cookie idea on Pinterest, I knew I had to make these little guys.  These reindeer are so stinking cute and peanut butter cookies are a family favorite in our household.  They also reminded me of K’s Black Cat Cookies and I had fun making those for T this past Halloween.  Whether you are baking for kids or grown-ups, these reindeer cookies will be sure to bring a smile to their faces.

Peanut Butter Reindeer Cookies {from 2 Sisters 2 Cities}

I was able to save a little bit of money this holiday season by picking up some Planters Peanut Butter at Target.  Kraft is currently offering a number of coupons for exclusive use at Target to make your holiday entertaining a bit easier. ( Save up to $20 on participating Kraft products, only at Target.)  These Peanut Butter Reindeer Cookies will be the hit of your Christmas party!

Peanut Butter Reindeer Cookies {from 2 Sisters 2 Cities}

Save Print
Peanut Butter Reindeer Cookies
Author: 2 Sisters 2 Cities
Recipe type: cookie
Prep time:  50 mins
Cook time:  9 mins
Total time:  59 mins
Serves: 36
Ingredients
  • 1 stick unsalted butter, softened
  • ½ cup light brown sugar
  • ¼ cup sugar
  • 1 egg
  • ¾ cup Creamy Planters Peanut Butter
  • 1 teaspoon vanilla extract
  • ½ teaspoon baking soda
  • 1 and ¼ cup all-purpose flour.
  • ¼ teaspoon salt
  • chocolate-covered pretzels, cut in half (for the antlers)
  • mini brown M&Ms (for the eyes)
  • regular-sized red M&Ms (for the nose...you could also use brown M&Ms if you prefer non-Rudolph cookies!)
Instructions
  1. In the bowl of an electric mixer, cream together butter and sugar using the paddle attachment. Next, add in the peanut butter, egg, and vanilla and mix together until combined. In a separate mixing bowl, whisk together the baking soda, flour, and salt. Gradually add the flour mixture to the electric mixing bowl and mix until fully incorporated. Once all the flour mixture has been added, chill the dough in the refrigerator for about 30 minutes.
  2. Meanwhile, preheat the oven to 350 degrees Fahrenheit and prepare baking sheets with parchment paper. Once dough has chilled, use a mini ice cream scooper to scoop out small balls of dough. Place the ball of dough on the cookie sheet and gently flatten it with your hand. Bake for 8-9 minutes or until edges turn slightly golden.
  3. Remove cookies from oven and immediately add the chocolate-covered pretzels as antlers, two mini brown M&Ms for eyes, and red M&M for the mouth. Carefully transfer cookies to a wire rack to cool completely.
3.2.2199

Source: Reindeer Cookie idea from Bakergirl and Peanut Butter Cookie recipe slightly adapted from Sally’s Baking Addiction

Here’s the rest of our 2013 Cookie Countdown in case you have missed any!

4 Oatmeal Chocolate Mint Cookies
5 Sprinkle Cookies
6 Chocolate-Dipped Shortbread Cutouts
7 Chocolate Hazelnut Coins
8 Italian Lemon Drops
9 Chocolate Toffee Crackers
10 Cranberry Pistachio Shortbread Cookies
11 Christmas Snickerdoodles
12 Chocolate Raspberry Thumbprints

sister m signature


From shopping for gifts to planning family dinners, it’s hard to keep up with all your holiday to-do’s. This year, Kraft is helping out with great weeknight meals and entertaining ideas to make the season a little bit easier. Plus, Kraft is offering up to $20 in coupons, redeemable exclusively at Target, to make food shopping easier and to help you have a happy holiday season.

This is a sponsored conversation written by me on behalf of Kraft. The opinions and text are all mine.


Filed Under: M's Desserts, M's recipes Tagged With: 12 days of christmas cookies, chocolate chip cookie recipe, christmas, Christmas Cookies, cookie recipe, holiday baking, peanut butter cookies, planters peanut butter, reindeer cookies, sponsored post

Personalized Gifts for Kids

Posted by Meaghan Barry on November 12, 2013

At my book club the other evening, I was discussing how baby N received so many personalized gifts with his name on it.  I really cherish these customized gifts because they are unique keepsakes.  It’s such a fun trend and there are so many different, creative options out there.

I also love that you can have these items made with any name.  The spelling of my name is somewhat unique and it was very hard to find personalized items with the spelling of my name growing up.  These days, any child can easily have personalized items with their name made on it!

With the holiday season quickly approaching, Bright Star Kids asked me to pull together a list of some of my favorite personalized gifts that I have seen lately.

 Bright Star Kids

  1. Personalized clothing- Bright Star Kids offers so many adorable personalized baby & kid clothes.  I love that you can order any of their customized designs and have it printed on a onesie, t-shirt, or bib (and it is 100% organic cotton.)  I am totally swooning over this Christmas Truck design…it’s so sweet!  I also love the big and little brother t-shirt designs.  One of my only complaints about having boys is the lack of cute boy clothing out there…Bright Star Kids may be changing my mind on that one!  I think T and N may be getting a few of these fun clothing items under our Christmas tree this year.bright star kids shirts
  2. Custom labels for kids- I ordered some of these for T as his nursery school teachers recommend that all kids label their coats, shoes, mittens, hats, cups, etc. so they don’t get mixed up.  I love that they don’t come off in the washing machine or dishwasher.  Bright Star kid also offers their own line of name labels.  These would make a great stocking stuffer for all your favorite preschoolers.
  3. Baby & toddler books- I recently ordered this baby book for N and this toddler memory book for T.  I love the customized front covers of these books.  It’s so much more personable that just some generic baby book from a store.  The inside pages are really nice as well.
  4. Customized name burp clothes- We go through a lot of burp clothes in our household and one of my favorites is a personalized one from Moonbeam Baby.  It’s basically a monogrammed diaper cloth embellished with some decorative fabric.  Who knew spitting up could be so cute?
  5. Name Puzzle Step Stool- Another gift that Baby N received was a personalized name puzzle step stool.  Right now only T uses it, but it’s such a cute gift idea.  Plus, T has already learned how to spell N’s name since he has put the puzzle together so many times.  T uses it to brush his teeth, wash his hands, and whenever he needs a little boost to get to counter height.

If you are looking for more personalized gift ideas for kids this holiday season, be sure to also check out my Pinterest board on the topic!  What are some of your favorite personalized gifts to give kids?

 bsk boy

sister m signature


Be different this Christmas & get the kids a super cute gift personalized especially for them! Save 15% when you use the code “GIFT” in the shopping cart. Min spend $30. Expires December 15, 2013.

This is a sponsored conversation written by me on behalf of Bright Star Kids. The opinions and text are all mine.


Filed Under: M's post Tagged With: bright star kids, christmas, gift ideas, kids, personalized gifts, sponsored post

Campbell’s Dinner Sauces

Posted by Meaghan Barry on November 5, 2013

Campbell's Dinner Sauces

K and I are always on the look-out for easy to prepare dinner ideas.  K is usually tired when she gets home from her long workday and commute.  I am also looking for easy dinner solutions when 5:00 rolls along after taking care of my two crazy boys all day.   We were recently asked to try Campbell’s line of skillet sauces and slow cooker sauces.  I was excited about the prospect of an easy dinner idea to add to our weekly menu!

Campbell’s has an entire line of skillet sauces, in addition to a line of slow cooker sauces.  They include:

Campbell’s Skillet Sauces

  • Marsala
  • Toasted Sesame
  • Scampi
  • Thai Green Curry

Campbell’s Slow Cooker Sauces

  • Tavern Style Pot Roast
  • Sweet Korean BBQ
  • Apple Bourbon BBQ
  • Hawaiian Luau
  • Mexican Red Chile Taco
  • Moroccan Spiced Stew

Campbell's Marsala Skillet Sauce

I decided to try the Campbell’s Marsala Skillet Sauce as I have not had chicken marsala in quite awhile.  It was extremely easy to pull together.  I heated up a little vegetable oil in my skillet, browned the chicken for a few minutes, added the Marsala Skillet Sauce, and then allowed the chicken to finish cooking in the sauce.  I paired it with steamed green beans and some egg noodles.  So easy!  I usually try to pull together dinner during the boys’ naptime, but this meal was easy enough to make with both of them up.

Campbell's Marsala Skillet Sauce

The final result: so delicious!  I’m so happy to have come across an easy and satisfying dinner option to feed our family.  Sometimes I feel such pressure to pull a nice dinner together and it’s nice to know that I will always have Campbell’s dinner sauces as an option in my back pocket.

I’m looking forward to trying more of the Campbell’s dinner sauces…next up I plan to try the Sweet Korean BBQ Slow Cooker Sauce.  The back of the pouch features Korean Tacos- shredded beef, cabbage, and spicy sour cream rolled up in a flour tortilla…sign me up!

Which of the  Campbell’s dinner sauces sound appealing to you?

sister m signature


Disclosure: This post brought to you by Campbell’s Dinner Sauces. Weekend-worthy dinners with only weekday-level effort needed! Learn more at http://www.campbellsauces.com/.


Filed Under: M's post Tagged With: campbell's, campbell's skillet sauces, campbell's slow cooker sauces, chicken marsala, dinner recipe, easy dinner ideas, marsala, quick dinners, sponsored post, sponsorship

Britax Advocate 70-G3 Review & Giveaway

Posted by Meaghan Barry on October 14, 2013

britax contest

I realize that at 2 Sisters 2 Cities, we usually focus on recipe posts and DIY projects.  However, I was recently asked to review the Britax Advocate 70-G3 car seat and I agreed to it as car seats are a major part of our life now!  There would be no trips to the grocery store or craft store without our trusty carseats!  And the best part is that Britax is also giving away a Britax Advocate 70-G3 convertible car seat to one lucky 2S2C reader (keep reading this post for more details…)

As an owner of two other Britax car seats (the Britax Advocate 70-CS and the Britax Marathon 70), I was excited to try the latest and greatest product from Britax.  In addition, baby N Hates (with a capital H!) his infant bucket carseat. He cries almost non-stop whenever we are in the car…it is torture to listen to my poor little guy cry his heart out.  It’s funny to hear about people taking their babies for car rides to get them to sleep.  That would never happen in our household!  I was thinking about moving him to a convertible car seat to see if he tolerated the car better.  The timing could not have been better to try out the Advocate 70-G3!

When the car seat arrived, T ran out the front door to check it out.  What can I say…we get really excited about safety in our house!

britax_delivery

After watching an episode of Curious George in the new car seat, T agreed to let baby N have a try.  Both 3-year old T and 3-month old N are able to use this car seat as Britax convertible car seats can be used rear-facing from 5 to 40 pounds and forward-facing from 1 year and 20 pounds, up to 70 pounds.  With the Quick-Adjust Harness system, it’s super easy to adjust the shoulder height for each kid (no re-threading of straps necessary!)  Everyone seemed to be a fan of the Britax Advocate 70-G3 during our dry run in the house.

britax advocate 70g3

Next up was installing the Advocate 70-G3 in the car.  While admittedly this is not my favorite task in the world, it was actually pretty easy to install with the LATCH system.  I had the bucket seat out and the new convertible car seat installed in less than five minutes.

The real trial was up taking baby N on his first car ride in the new convertible car seat.  The result: definite improvement!  While he still cries about 50% of car trips we take, he seems to like the new seat a lot better.  And the best result (besides a safe car ride,) a sleeping baby!

britax_sleeping_baby

The best part of the Britax Advocate 70-G3 are all the amazing safety features that are incorporated into the seat.  One of Britax’s car seat taglines is “Safety You Can See” as all of their safety features are in plain sight.  They include:

  • True Side Impact Protection is deep side walls with energy-absorbing EPP foam along with a head restraint which offers a double layer of EPP foam to distribute crash forces, shield from vehicle intrusion, and contain the head, neck and body while keeping them “in true” or aligned
  • HUGS Chest Pads with SafeCell Technology are affixed to the seat shell to ensure proper positioning while SafeCells compress to manage energy and provide resistance to the forward movement of your child in a crash, reducing the risk of head injury
  • Base with SafeCell Technology features SafeCells designed to compress in a crash, significantly lowering the center of gravity and counteracting the forward rotation of the child seat which normally propels the child toward the front seat
  • Integrated Steel Bars strengthen the connection to the vehicle and reduce forward flexing of the child seat during a crash
  • Energy-Absorbing Versa-Tether features a staged-release tether webbing to slow the forward movement, reducing the crash forces reaching the child, and a two-point attachment to minimize forward rotation while anchoring the top of the child seat
  • Click & Safe® Snug Harness Indicator is an audible aid that provides extra assurance when the harness is within range of appropriate snugness
  • Tangle-Free, Five-Point Harness distributes crash forces across the strongest parts of the body and provides a secure fit

britax advocate 70g3 safety features

I was especially impressed with the new HUGS Chest Pads.  T has a tendency to pull the chest clip down and remove the straps from his shoulders when he gets bored in the car.  This new feature would definitely prevent (or at least make it more difficult) to lower the chest clip.  I also definitely like the True Side Impact Protection that would provide extra protection if we ever got into a car accident.

One of the drawbacks of switching baby N to the Advocate 70-G3 is that I can’t simply unlatch the seat and carry him in it if he falls asleep.  I usually have to transfer him to his bassinet or the Moby Wrap if we are out and about and he usually wakes up.  This is more of an issue of an infant bucket seat vs. a convertible car seat however.

Another limitation is that the seat is pretty bulky and wide.  If you have a small car, this carseat might be a tight squeeze.  Traveling with the Advocate 70-G3 might be a bit cumbersome for airline travel.  In the past, we have used the Britax Car Seat Travel Cart to tote T and his car seat around the airport.  It’s always a bit tricky then installing a large convertible car seat into a tiny airplane seat.  I have not yet attempted it with this car seat, but I imagine it would also be a bit tight on certain airline carriers.  However, all of the great safety features greatly outweigh these drawbacks in my opinion.

Now it’s your chance to try the Britax Advocate 70-G3…enter this giveaway through the Rafflecopter widget below.  Good luck and safe travels!

a Rafflecopter giveaway

sister m signature


Safety matters when it comes to car seats. I want one that will protect my child. And Britax convertible car seats have so many safety features — and knowing that makes me feel like my child is safe while in the car. Click here to learn more about Britax safety features.

This is a sponsored conversation written by me on behalf of Britax. The opinions and text are 100% mine.


Filed Under: M's post Tagged With: baby, baby n, baby t, britax, britax carseat, car, carseat, grocery shopping, parenthood, safety, sponsored post, toddler, travel

Glazed Baked Doughnuts

Posted by Keelin Hollenbeck on August 11, 2013

Glazed Baked Doughnut made with Creamer

Since I bought my doughnut pan, I have been really into making baked doughnuts.  I have made cinnamon sugar coated and powdered sugar coated.  I had an idea to make glazed baked doughnuts, but wanted to flavor the donuts with something besides cinnamon and nutmeg.

Glazed Doughnuts

International Delight has come out with Cold Stone Creamery flavored creamers.  I love Cold Stone Creameries ice cream and International Delight was able to capture some of these flavors to enjoy in your coffee creamer.  I found the Founder’s Favorite, a mixed flavor of brownies, pecans, caramel, and fudge at my Target and decided it would be the perfect addition to my baked doughnuts.

The other Cold Stone Creamery flavors consist of Sweet Cream, Hot for Cookie, and Churro Caramel.   I love to have a baked doughnut with my coffee in the morning so why not put the creamer taste I love into a doughnut?  I took my basic baked doughnut recipe and omitted some sugar and milk and replaced it with the Cold Stone Creamery International Delight Creamers.  All of the flavors would work perfectly for this baked doughnut recipe, so pick your favorite!  The sweet glaze is the perfect mix to the delicious cakey doughnuts.

Glazed Baked Doughnuts

Print
Glazed Baked Doughnuts
 
Ingredients
For Doughnuts-
  • 2 cups AP flour
  • 1 cup sugar
  • 2 tsp. baking powder
  • ½ tsp. kosher salt
  • 1 large egg
  • ½ cup milk
  • ¾ cup International Delight Cold Stone Creamery creamery (you pick the flavor!)
  • 2 tbsp. unsalted butter, melted
  • 1 tsp. vanilla extract
  • 1 tsp. almond extract
For Glaze-
  • 2 cups confectioners’ sugar
  • ¼ tsp. vanilla extract
  • 2-4 tbsp. water
Instructions
  1. Preheat oven to 350 degrees. Spray doughnut pan with non-stick cooking spray (I only have one 6-doughnut pan so I just had to make the doughnuts in batches)
  2. In a large bowl whisk together flour, sugar, baking powder, and salt. Then in a small bowl whisk together the egg, milk, creamer, melted butter and vanilla extract. Take the wet ingredients and add them to the dry ingredient bowl. Mix together until just combined.
  3. Spoon the batter into prepared doughnut pans filling about ¾th the way.
  4. Bake for 15-17 minutes until doughnuts spring back when poked.
  5. Let doughnuts cool.
  6. To make glaze- Add confectioners sugar to a medium sized bowl. Whisk this sugar to take out any lumps. Add in vanilla extract and 2 tbsp. of water an whisk until smooth. Mix in more water if glaze is too thick, if it gets too watery add additional confectioners’ sugar.
  7. Dip cooled doughnuts in glaze and place on a wired rack placed on a baking sheet so that extra glaze can drip off into the baking sheet. Let glaze dry and enjoy!
3.2.1753

Doughnuts
sisterk (2)


Love ice cream + coffee? This summer, International Delight is bringing your favorite Cold Stone Creamery ice cream flavors to coffee and they’re celebrating by giving away five $400 grand prizes to throw this summer’s ultimate Ice Cream Social!  To enter, visit the ID + Ice Cream Pinterest board and pin your favorite image using the #IScream4ID hashtag. Good luck! 

This is a sponsored conversation written by me on behalf of International Delight. The opinions and text are all mine.


Filed Under: K's Recipes Tagged With: baked doughnuts, cold stone creamery, donuts, doughnuts, glazed doughnuts, international delight, sponsored post

Diet Cran-Strawberry Spinach Smoothie

Posted by Meaghan Barry on March 4, 2013

Diet Cran-Strawberry Spinach Smoothie

I was recently asked by Ocean Spray to try their Diet Cranberry Juice Drink in a smoothie recipe.  I had been wanting to try a smoothie that involved spinach for the past few months and I thought cranberries and spinach sounded like the perfect combination.  I came up with a diet cran-strawberry spinach smoothie recipe as a result.  By swapping out a full calorie juice for a diet juice, such as Diet Ocean Spray Cranberry Juice, you can cut calories and still enjoy a delicious, nutrient-packed smoothie.  This smoothie would definitely be a great way to kick-start your day, especially if you are calorie conscious.

Ocean Spray Diet Cranberry Juice

Since Diet Ocean Spray Cranberry Juice only has 5 calories per serving, you can focus your calories in this smoothie on really nutritious ingredients.  I love to use Greek yogurt in smoothie recipes as it packs in so much protein.  I also used strawberries and half of a banana to add more nutrients and flavor.  I used about 1/4 of a cup of spinach leaves in this particular smoothie, but I’ve heard that you can add up to 1 cup for a smoothie.  Since it was my first time trying it, I started off with a small amount of spinach and I hope to build up to more as I get used to the taste.  You could also try adding a little bit of flax seed or chia seeds to add in some omega-3 fatty acids.

Ocean Spray Diet Cranberry Juice Ingredients

While I thought the Diet Ocean Spray Cranberry Juice was great in a smoothie, I also enjoyed it mixed with a glass of sparkling water.  Ocean Spray also sent me a recipe card for an awesome sounding 50-calorie Cosmo which I definitely look forward to trying this summer post-pregnancy.  For other Diet Cranberry Juice recipes, check out the Ocean spray website.

Diet Cran-Strawberry Spinach Smoothie

Print
Diet Cran-Strawberry Spinach Smoothie
Prep time:  5 mins
Total time:  5 mins
 
Ingredients
  • ¾ cup Diet Ocean Spray Cranberry Juice Drink
  • ¾ cup fresh or frozen strawberries (if you use fresh strawberries, be sure to add about ¼ cup of ice as well)
  • ¾ cup low-fat, plain Greek yogurt
  • ½ banana
  • ¼ cup baby spinach or regular spinach leaves (you can add up to 1 cup of spinach, but I recommend starting off with a small amount and working up to more if this is your first green smoothie)
  • 1 teaspoon vanilla extract
Instructions
  1. Combine all ingredients in a blender. Blend for a few seconds on high speed (you may need to stop the blender and scrape down the sides so that all ingredients get incorporated.) Continue to blend until everything is thoroughly combined. Serve in a large glass ( and preferably with a fun straw!)
3.2.1682

 Source: Adapted from Ocean Spray


Please note: I have partnered with Ocean Spray through DailyBuzz to help promote their new Ocean Spray Diet product. I have been compensated for my time commitment to work with this product, however my opinions are entirely my own and I have not been paid to publish positive comments.

sister m signature


Filed Under: M's recipes Tagged With: bananas, breakfast recipe, cranberry juice, diet recipe, diet smoothie, ocean spray, smoothie, smoothie recipe, sponsored post, strawberries

New Culinary Collection from Lean Cuisine

Posted by 2 Sisters 2 Cities on February 6, 2013

One thing that I have never been able to get in the habit of is packing my lunch for work the night before.  I have tried and tried to get ahead of things by getting the coffee pot ready and packing my lunch, but as far as I get is occasionally setting up the coffee pot.  And that’s not even with a timer because setting that darn clock would be too much work.

This isn’t anything new-  I have been fighting this battle since I started making my lunches in middle school.  But now, time is at a premium more than ever because I have to catch my train pretty early each day.  When I pack my lunch in the morning, I usually allocate myself about four minutes.  If I don’t have leftovers from the previous night’s dinner, my go-to lunch is a Lean Cuisine.   I pack them with a snack bag of veggies (carrots,  bell pepper slices, snow peas, or cucumber slices), a few pieces of fruit for snacking throughout the day, a granola bar, and a cheese stick.  I have healthy snacks every couple of hours so I am not ravished when it’s time for lunch or dinner.   Lean Cuisine is constantly coming out with new delicious meals to satisfy whatever you are craving.  Need more convincing? How about the money you will save from not going out for lunch everyday!


Lean Cuisine has paired up with some really great chefs to create the Culinary Collection.  This collection of entrees includes Spinach Artichoke  Ravioli, Asparagus Ravioli, Ranchero Braised Beef, Chile Lime Chicken, Mushroom Mezzaluna Ravioli, Chicken Makhani, Chicken & Vegetables, Chicken in Peanut Sauce, Chicken Carbonara, Glazed Chicken, Steak Tips Portobello, Chicken with Basil Cream Sauce, Chicken Pecan, Thai-Style Chicken, Chicken Marsala, Lemon Chicken, and Orange Chicken.

Chile Lime Chicken- Lean Cuisine Box

I picked out two from this selection-  it was so hard to get down to two!  I made the Chili Lime Chicken Lean Cuisine.  It was juicy tender white chicken breast in a chili lime sauce with a side of rice, corn, and roasted peppers on the side.

  Lean Cuisine's Chile Lime Chicken

I mixed each bite of chicken with some sauce and the rice mixture.  It was very enjoyable.

Chicken with Basil Cream Sauce- Lean Cuisine Box

Then my boyfriend had the Chicken with Creamy Basil Sauce, which was also awesome. This entrée consisted of cheese tortellini with tender white chicken breast, bright-colored vegetables, and a delicious creamy sauce.

Lean-Cuisines-Chicken-wtih-Basil-Cream-Sauce_thumb.jpg

We paired these meals with a piece of fruit and some veggies.  The best part of our meal was that it was only 6 PointsPlus for those of you who are Weight Watchers followers.  Lean Cuisine posts the point value on the side of most of their product which makes shopping and point-counting that much easier.  Also, another great thing about Lean Cuisine is that they post all their nutrition facts on their website if you want to find out if any particular meals fit into whatever type of diet you are on.

Do you pack a lunch for work or school?  What are your usual go-to options?

sisterk (2)

I have partnered with Lean Cuisine through DailyBuzz Food to help promote their new line of Chef’s Pick products. I have been compensated for my time commitment to work with this product. However, my opinions are entirely my own and I have not been paid to publish positive comments. Thank you Lean Cuisine!

Related Posts Plugin for WordPress, Blogger...


Filed Under: K's post Tagged With: chef's pick, chicken with basil cream sauce, chili lime chicken, culinary collection, lean cuisine, sponsored post

  • « Previous Page
  • 1
  • 2
  • 3
  • Next Page »

Recent Posts

  • Easy Holiday Office Party Tips
  • 5 Steps to an Easy Football Party
  • Gingerbread Biscotti
  • Holiday Coffee Bar and Thanksgiving Recipes
  • Soft Sugar Pumpkin Cookies
  • Cinnamon Sugar Apple Cake
  • Hello Pumpkin Season!
  • Make Your Own Milkshake Party!
  • Mama’s Pickles
  • S’more Cookies

Categories

  • About 2 Sisters 2 Cities (7)
  • Books (8)
  • Crafting & DIY (22)
  • Design & Decorating (15)
  • Gardening (5)
  • Giveaway (14)
  • Guest Bloggers (8)
  • K's post (46)
  • K's Recipes (191)
    • K's Desserts (75)
    • K's Entrees (23)
    • K's Sides (24)
  • M's post (72)
  • M's recipes (167)
    • M's Entrees (21)
    • M's Sides (14)
    • M's Desserts (30)
  • Organizing (7)
  • Party Ideas (49)
  • Uncategorized (1)
  • Vacation (12)
Stitch Fix

Archives

Blogroll

  • Annie's Eats
  • Bake at 350
  • Baked Bree
  • Boston Harbor Beacon
  • Confections of a Foodie Bride
  • Cook Like a Champion
  • Erin’s Food Files
  • Forever and a Recipe
  • Framed Cooks
  • Oh Happy Day
  • On Common Ground
  • Pennies on a Platter
  • Pink Parsley
  • Recipe Girl
  • Sally's Baking Addiction
  • Simply Scratch
  • The Curvy Carrot
  • The Pioneer Woman
  • Tidy Mom
  • Two Peas & Their Pod
  • What’s Gaby Cooking
  • Young House Love
Increase your website traffic with Attracta.com

grab a 2 sisters button!


Copyright © 2014 ~ 2 Sisters 2 Cities | Blog Design by Minx Design