2 Sisters 2 Cities

Image Map
  • About 2 Sisters 2 Cities
  • Recipe Index
  • Project Index
  • Contact Us
  • Like us on Facebook
  • Follow m on twitter
  • Follow k on twitter
  • Follow 2S2C on Pinterest
  • Follow 2S2C on G+
  • rss
  • e-mail 2S2C

Holiday Coffee Bar and Thanksgiving Recipes

Posted by Meaghan Barry on November 20, 2014

Holiday Coffee Bar 1

Now that we’ve officially wrapped up T’s birthday extravaganza, I’ve finally started thinking about Thanksgiving…which is probably a good idea considering it is next week!  I have a whole section in one of my recipe binders reserved just for Thanksgiving recipes.  I’m also always adding to my Thanksgiving Pinterest board for hosting inspiration.

Thanksgiving Coffee Bar

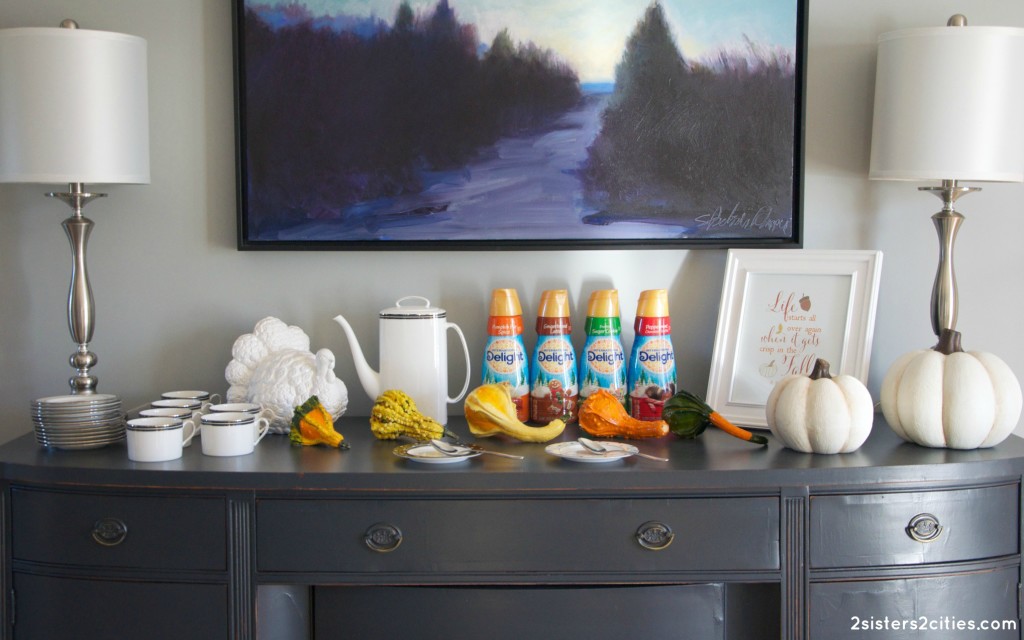
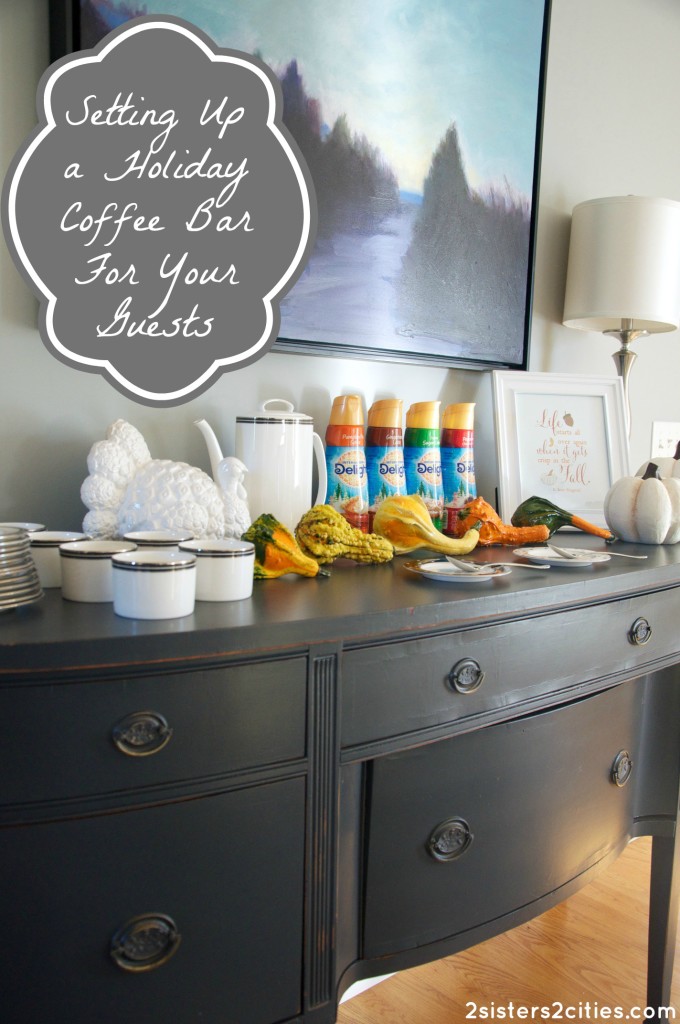
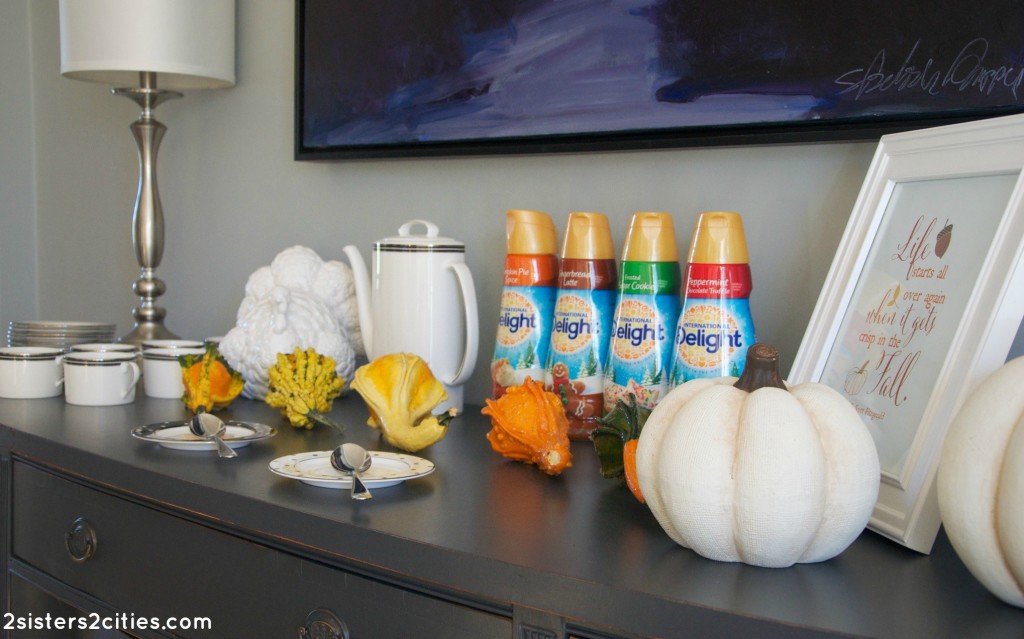
Over the past few years, I have hosted Thanksgiving at our home and I am always looking for fun new ideas and recipes for the big day.  This year I have decided to do a full coffee bar set-up so that my guests can have coffee and their favorite International Delight Creamers before, during, or after their Thanksgiving dinner.  I was able to find four of the I.D. holiday flavors at Target today.  It’s going to be a very hard decision to pick which one to try first- Gingerbread Latte, Sugar Cookie, Peppermint Chocolate Truffle, or Pumpkin Pie Spice?!  To set up your holiday coffee bar, just add freshly brewed coffee, coffee cups, your favorite International Delight Creamers, a couple of spoons to stir things up, and a few decorative Thanksgiving pieces.

Coffee Bar ID

A few coffee bar tips- You may want to throw your International Delight on ice if you plan to have it out for a few hours so it’s stays cold and fresh!  If you are stocking up on International Delight for your Thanksgiving guests, be sure to sign up for their Member Delights program to get a free instant coupon towards I.D.  Also, you can create an easy and cheap table decor piece by searching Pinterest for free Thanksgiving printables.  There is a lot of great stuff out there…just print and frame once you find something that catches your eye!  If you have a single-serve coffee maker (such as a Keurig,) you could also set that up on your coffee bar with your favorite K-cup selection so that your guests can make their own cups of hot coffee as needed.  

International Delight Coffee Bar

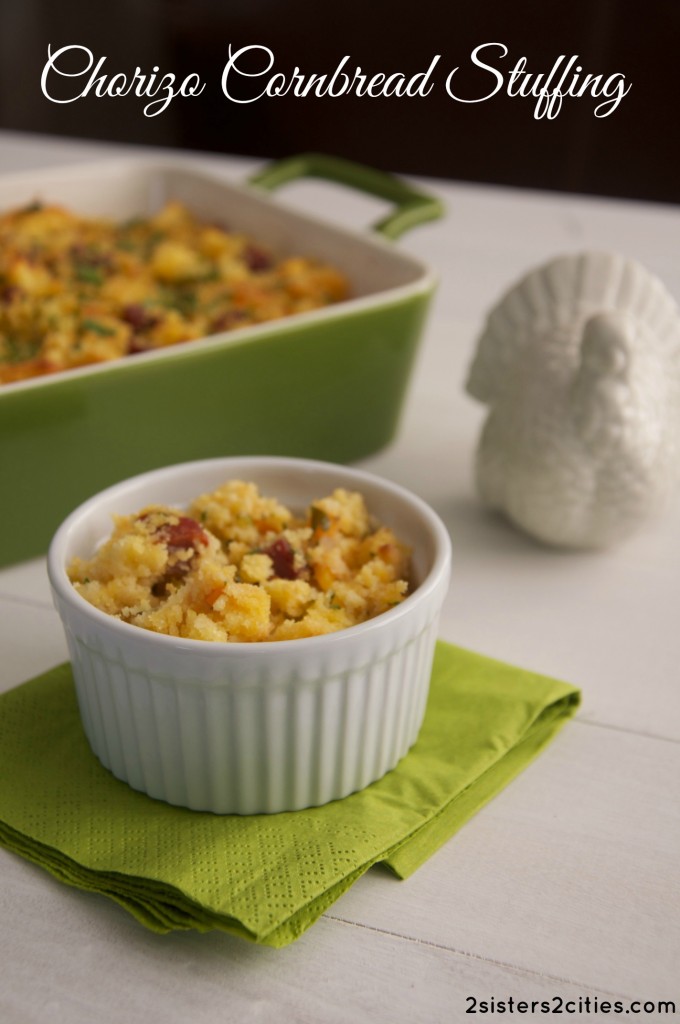
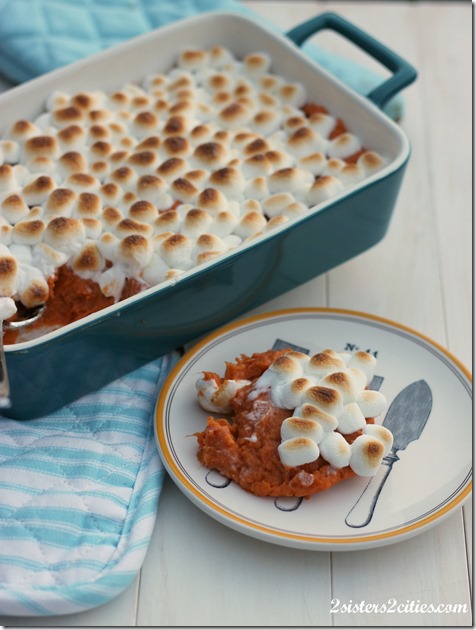
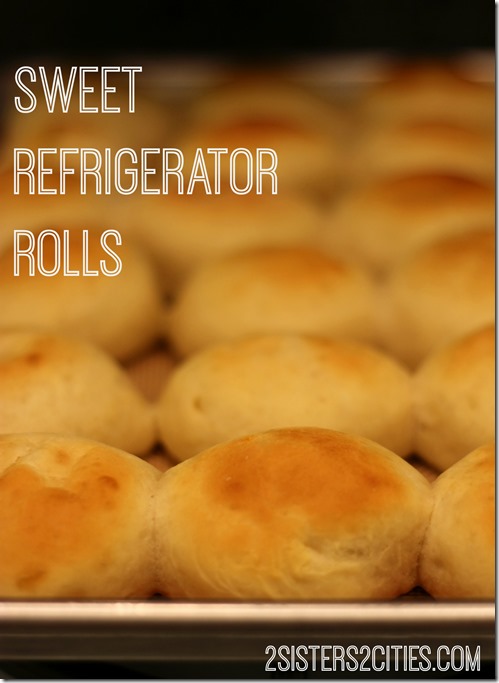
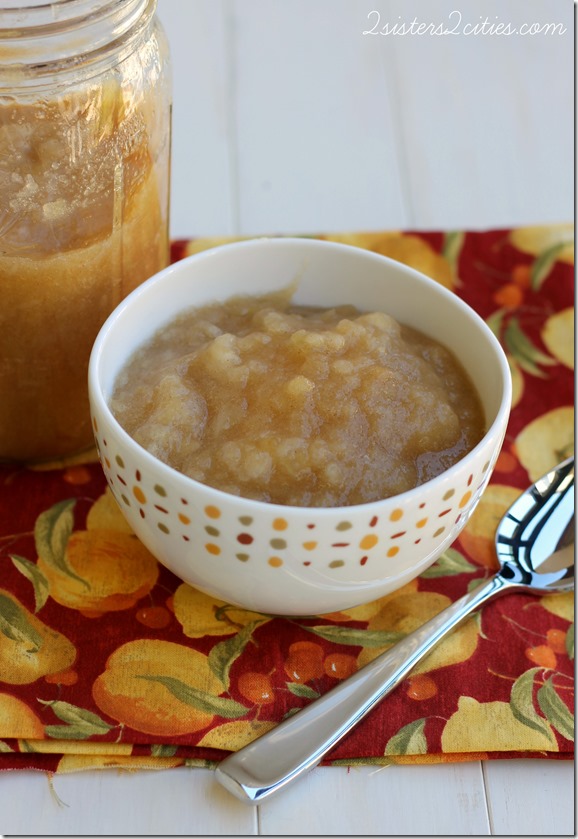
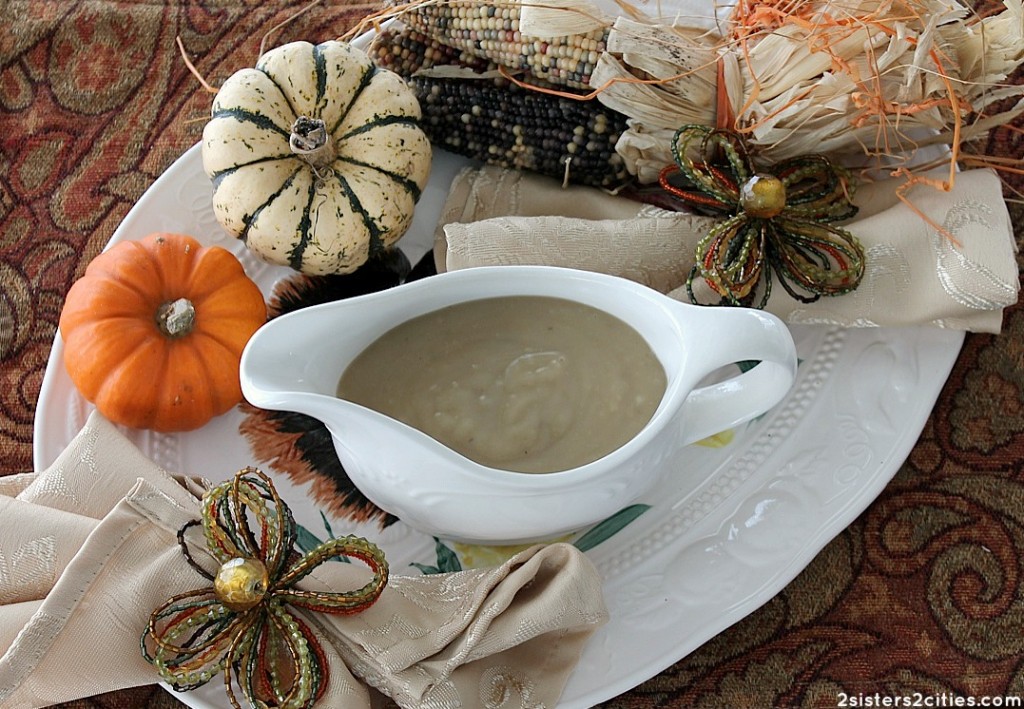
I’ve also started picking some of my favorite Thanksgiving recipes from the 2S2C archives to make for next week.  Here’s my current list so far:

rosemary parmesan popcorn

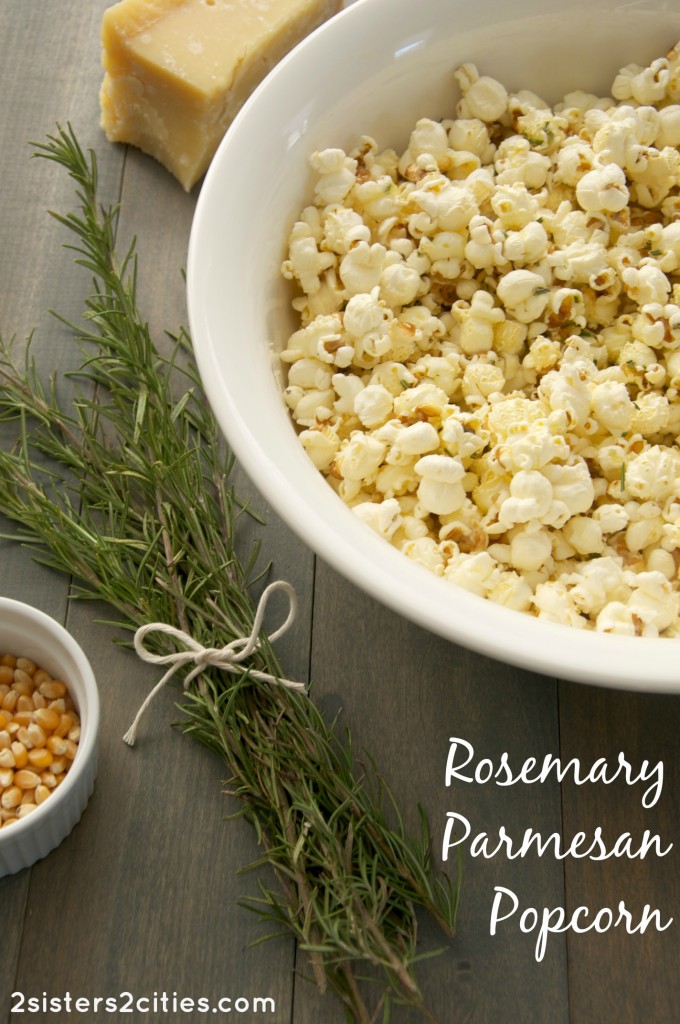
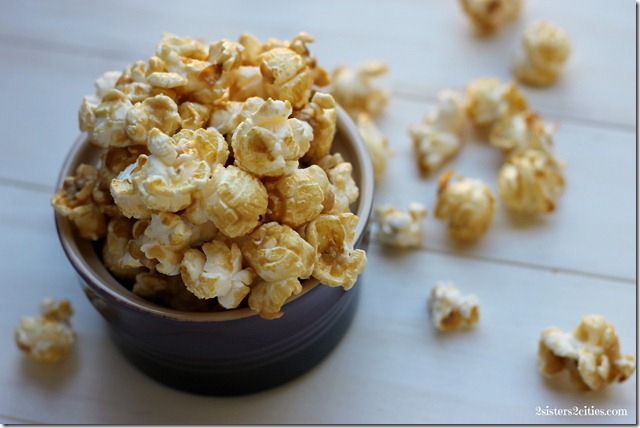
  • Rosemary Parmesan Popcorn (for a light snack/appetizer before the big dinner)

Chorizo Cornbread Stuffing

  • Chorizo Cornbread Stuffing

Sweet-PotatoYam-Casserole-_thumb.jpg

  • Sweet Potato Casserole

Sweet-Refrigerator-Rolls_thumb.jpg

  • Grandma’s Sweet Refrigerator Rolls

Apple-Sauce_thumb.jpg

  • Homemade Apple Sauce

Make-Ahead Turkey Gravy {from 2 Sisters 2 Cities}

  • Make-Ahead Turkey Gravy

Do you host Thanksgiving each year or do you usually travel to family or friends?  What’s your favorite go-to Thanksgiving entertainment idea and/or recipe?

sister m signature


This is a sponsored conversation written by me on behalf of International Delight. The opinions and text are all mine.


Filed Under: M's recipes, Party Ideas Tagged With: coffee, coffee bar, holiday coffee bar, hosting, hosting Thanksgiving, international delight, party ideas, Thanksgiving, thanksgiving recipes

Sweet Potato Casserole

Posted by Keelin Hollenbeck on November 27, 2013

Sweet PotatoYam Casserole

Speaking of classic Thanksgiving recipes, this is the classic baked sweet potatoes or yam casserole recipe.  I know there are a lot of new moderns versions of this side, but I love this original marshmallow-covered one too much to give it up.  When we were younger my mom made the mistake of trying to update the sweet potato recipe to a more modern version which was topped with candied walnuts or pecans.  I am sure it would have been delicious, but my sisters and I threw such a fuss that she ended up having to put marshmallows on half.

What can I say?  To me it wouldn’t be Thanksgiving without marshmallow-covered candied yams/ sweet potatoes or canned jelled cranberry sauce (sliced at the can ring lines…. Not mashed up!) I call this sweet potatoes, but really I use yams because they are cheaper.  Preparing this dish is so easy, you will never use yams out of a can again!

Yams!

Print
Sweet Potato Casserole
Author: 2 Sisters 2 Cities
 
Ingredients
  • 2-3 pounds of yams or sweet potatoes
  • ¼ cup brown sugar
  • ¼ cup butter, melted
  • 2 tbsp. maple syrup
  • 2-3 cups marshmallows
Instructions
  1. Peel and cut sweet potatoes up into 1-1/2 inch pieces. Place in a large pot and cover with water. Bring to a boil and cook for about 10-12 minutes until sweets potatoes are tender.
  2. Drain sweet potatoes
  3. In a large bowl add cooked sweet potatoes, butter, maple syrup, and brown sugar. Mix together until combined and smooth.
  4. Spread out sweet potatoes in casserole dish. Bake for 20-25 minutes at 375 degrees until sides are bubbling. Add marshmallows on the top during the last 5 minutes. To get the toasted marshmallow effect, turn broiler on for the last 2 minutes. Be careful because they can burn easily!
  5. These yams can be made ahead, up until the baking step and then refrigerated or frozen. You will need to add extra time to the baking to make sure they heat thoroughly.
3.2.2124

Baked Yams with Marshmallows
sisterk (2)


Filed Under: K's Sides, K's Recipes Tagged With: candied yams, holiday, side dish, sides, sweet, sweet potato, Thanksgiving, thanksgiving menu, thanksgiving recipe, yams

Chorizo Cornbread Stuffing

Posted by Meaghan Barry on November 26, 2013

Chorizo Cornbread Stuffing

I know K has already touched on this, but seriously, how is it already late November already?  I am really trying to enjoy Thanksgiving as it’s own holiday, but with December 1st right around the corner, it’s hard not to start thinking about Christmas. But first, we must keep our focus on a truly great holiday- Thanksgiving.  And I have a truly special dish to commemorate this holiday, Chorizo Cornbread Stuffing.

While I always enjoy a serving of regular stuffing on Thanksgiving, I think I could enjoy this chorizo cornbread version year-round.  A local restaurant has a version of this recipe on it’s menu and my husband and I order it as a side dish every time we go.  I was so pleased that I was able to recreate a very similar version in my own kitchen!

If you are looking to mix it up with some non-traditional Thanksgiving recipes this year, I highly recommend making this version.  Or, if you wanted to go all out for the stuffing lovers out there, you could make traditional stuffing and Chorizo Cornbread Stuffing…just let me know what time to stop by!

Print
Chorizo Cornbread Stuffing
Prep time:  20 mins
Cook time:  35 mins
Total time:  55 mins
 
Ingredients
  • 1 tablespoon olive oil
  • 6 oz. dried Spanish chorizo (I used a smoked version), cut into small cubes
  • 1 medium white onion, chopped
  • 1 medium carrot, peeled and finely chopped
  • 1 celery stalk, finely chopped
  • 3 garlic cloves, pressed or minced
  • 3 cups cornbread, cut into cubes (you can buy it from pre-made or try this recipe for cornbread)
  • ¼ cup parsley, chopped (plus more for garnish if desired)
  • cooking spray
  • ¼ cup parsley, chopped
  • ½ cup low-sodium chicken broth or stock
Instructions
  1. Preheat the oven to 350 degrees F.
  2. Heat a large skillet on medium heat and heat the olive oil. Once hot, sauté the chopped chorizo for a few minutes. Add the onion, carrot, celery, and garlic and cook until the vegetables start to brown (8-10 minutes.) Add the cut-up cornbread pieces and chopped parsley (reserving some for garnish if you like.) Stir well to combine. Stir in ½ cup of chicken broth (add more if the stuffing appears too dry.)
  3. Meanwhile, use the cooking spray to prepare a medium-sized casserole dish. Add the stuffing to the dish and bake for about 20 minutes (look for it to be lightly golden on top.) Garnish with additional parsley before serving.
3.2.2124

Source: Adapted from Aaron Sanchez for Food Network Magazine

 sister m signature


Filed Under: M's Sides, M's recipes Tagged With: chorizo, corn bread, holiday recipes, side dish, stuffing, Thanksgiving, thanksgiving menu, thanksgiving recipe, thanksgiving sides

Grandma’s Sweet Refrigerator Rolls

Posted by Keelin Hollenbeck on November 25, 2013

Sweet Refrigerator Rolls

What is Thanksgiving without homemade rolls?  This recipe is from our family cookbook that my aunt put together for everyone many, many years ago.  We are actually on our second edition and I use both cookbooks in my kitchen all of the time.  It’s great to have all my favorite family recipes in one place.  This recipe for sweet rolls is really special to me and M, it is our Grandma’s recipe for rolls that she made for Thanksgiving each year. We lost our grandma a few years ago, but we still have her recipes and family tradition that lives on.

These rolls not only have a place in our heart, but they are really tasty!  Their sweet taste goes perfectly with a small amount of butter and of course a thanksgiving dinner.   Make these rolls for your holiday meal this year!

These rolls can be frozen or the dough can be made the day before and then rolled and baked an hour before dinner (if you have extra oven space.)  I made these rolls over the weekend and froze them for my work Thanksgiving lunch Friday.  We are all about making things ahead here around here!  In the past when I was only cooking for four people, I cut the recipe in half and it turned out great.

Homemade Rolls Rising

The rolls rising for 30 minutes before baking (plus my mixer in the background, isn’t she so pretty?)

Sweet Rolls

Mmmm rolls…..

Print
Grandma's Sweet Refrigerator Rolls
Author: 2 Sisters 2 Cities
Serves: 30-36 rolls
 
Ingredients
  • ¾ cup butter
  • 1 cup boiling water
  • ⅓ cup sugar
  • 4½ tsp. active dry yeast
  • 1 cup luke warm water
  • 2 eggs
  • ⅓ cup sugar
  • 6 cups flour
  • 2 tsp. salt
Instructions
  1. Combine butter and 1 cup of boiling water. Stir until butter is melted.
  2. In the bowl of your mixer with paddle attachment add ⅓ cup of sugar, yeast, and 1 cup luke warm water. Combine on low.
  3. Once the butter reaches room temperature, add into yeast mixture and mix until combined.
  4. Add in eggs and another ⅓ cup of sugar, mix well.
  5. Next add in flour and salt. Combine completely.
  6. Cover bowl with plastic wrap and place in the refrigerator for at least 4 hours or overnight. If leaving overnight, punch the dough down before you go to bed so it doesn’t overflow in your fridge.
  7. One hour before dinner, turn dough out on a floured surface. The dough will be sticky so make sure your hands and surface are well floured.
  8. Preheat the oven to 400 degrees F. Form dough 30-36 rolls evenly sized. Place rolls 1-inch apart on a silicone mat lined baking sheet, you may need 2 baking sheets.
  9. Allow to rise for 30 minutes, then bake for 10-12 minutes. For best results cook each baking sheets one at a time.
  10. Serve immediately or store in an airtight container once cooled. Rolls can be frozen for up to 2 months.
3.2.2124

Source-  Adapted from Grandma H’s original recipe
sisterk (2)


Filed Under: K's Sides, K's post Tagged With: Bread, family recipe, grandma's sweet rolls, rolls, Sweet Refrigerator rolls, Sweet rolls, Thanksgiving, thanksgiving sides

Make-Ahead Turkey Gravy

Posted by 2 Sisters 2 Cities on November 24, 2013

K and I are both cooking up a storm in our kitchens this weekend so we asked our mom to do a guest post on her traditional make-ahead turkey gravy recipe.  By completing this step ahead of time, it cuts down on a lot of the cooking time (and stress!) on Thanksgiving day.  Take it away mom!

Make-Ahead Turkey Gravy {from 2 Sisters 2 Cities}

I love to get many of the sides for Thanksgiving dinner done ahead of time. There are so many tasks to complete towards the end  of the cooking session that this recipe is a great time saver and delicious, too!  Before I  found this recipe, roasting a turkey dinner and then making gravy was a dreaded event. After nearly four decades of cooking for my husband and family, I have resolved that part of my holiday stress.

On a calm day in early November, this  recipe comes together easily – don’t let all the steps scare you. Most of the time is spent smelling the awesome vegetable -turkey broth simmering on the stove.  Easy enough to place in a couple quart mason jars, and freeze up to 1 month. Then, take out two days before Thanksgiving, put in refrigerator to thaw. The final steps of reheating can easily be delegated to a willing guest or one of my four daughters in my case!

Print
Make-Ahead Turkey Gravy
Author: 2 Sisters 2 Cities
Recipe type: Sauce
Cuisine: American
Prep time:  30 mins
Cook time:  3 hours
Total time:  3 hours 30 mins
Serves: 10
 
Makes 6-7 cups Planning tip: Freeze up to 1 month then refrigerate 2 days to thaw. Reheat in saucepan, whisking to combine.Turkey drippings from roast pan can be added at that time.
Ingredients
  • 4 turkey wings ( 3-4 lbs)
  • 2 medium onions, peeled and quartered
  • 8 cups chicken broth ( RESERVE 2 CUPS)
  • 1 cup dry white wine or water
  • 1 cup sliced carrots
  • 3 peeled garlic cloves
  • ½ tsp. dried thyme
  • ¾ cup flour
  • 2 Tbsp butter
  • salt and pepper to taste
Instructions
  1. Heat oven to 400 degrees. Put wings in a single layer in a roasting pan. Scatter the onions on top. Roast 1 and ¼ hours or until wings are nicely browned.
  2. Put roasted wings and onions in a 5- to 6-qt. pot. Add 1 cup of the broth to the roasting pan and scrape any of the brown bits from the bottom. Add this back to pot with 5 more cups chicken broth,( Keep the remaining 2 cups broth in the frig until later), carrots, garlic and thyme. Bring to a boil, reduce heat and simmer gently, uncovered 1 and ¼ hours.
  3. Remove wings from broth. Optional: When cool, pull off skin and can save meat for another use. Otherwise discard.
  4. Strain broth through fine mesh strainer, pressing vegetables to extract as much broth as possible. Discard vegetables. Skim fat off broth ( easy way to do this if time permits, refrigerate overnight and remove any solidified fat.)
  5. Whisk the flour into the reserved chicken broth until well blended and smooth.
  6. Bring strained broth to a gentle boil. Whisk in flour mixture. Whisk until thickened and boiling. Boil 3-4 minutes to cook out any flour taste. Stir in butter , season to taste.
  7. On Thanksgiving, after the turkey is removed from the roasting pan, you can spoon the fat off the drippings and add 1-2 cups of the drippings to the gravy as it is being reheated.
3.2.2124

Have a wonderful Thanksgiving!!

-2S2C Mom


Filed Under: Guest Bloggers Tagged With: gravy, guest post, holiday planning, make-ahead, mom, Thanksgiving, thanksgiving menu, thanksgiving recipe, turkey

Rosemary Parmesan Popcorn

Posted by Meaghan Barry on November 22, 2013

rosemary parmesan popcorn

It’s time to discuss Thanksgiving Day eating strategies!  While you want to be hungry for the big meal, you don’t want to be ravenous and cranky leading up to the main event.  I like to have a variety of light appetizers available for my guests so they can pick and nibble at snacks throughout the day.

Popcorn is such an easy treat to prepare and I decided to create a savory recipe for Thanksgiving: Rosemary Parmesan Popcorn.  I usually like my butter/salt popcorn combo so much that I rarely make any other popcorn recipes, but I had a very difficult time removing my hand from the vicinity of the popcorn bowl with this version.  I highly recommend investing in a Whirley Pop* if you don’t know own already.  It makes popping popcorn a cinch.

Rosemary Parmesan Popcorn

Save Print
Rosemary Parmesan Popcorn
Prep time:  5 mins
Cook time:  3 mins
Total time:  8 mins
 
A savory popcorn recipe
Ingredients
  • 1 tablespoon coconut oil (you could also use canola or vegetable oil, but coconut is a healthier oil)
  • ½ cup popcorn kernels, popped (yields 14-16 cups popped popcorn)
  • 5 tablespoons extra virgin olive oil
  • 3 tablespoons grated Parmigiano Reggiano
  • 1 tablespoon rosemary, finely chopped
  • ½ teaspoon fine sea salt
Instructions
  1. Use the coconut oil and popcorn kernels to pop 14-16 cups popcorn (I recommend using a Whirley Pop*.) Pour popped popcorn into a large serving bowl.
  2. Whisk together olive oil, grated cheese, rosemary and sea salt in a small bowl.
  3. Pour olive oil mixture over popcorn and stir well to combine.
3.2.2124

If you prefer a sweeter popcorn recipe for an appetizer or snack, I highly recommend K’s Lightened-Up Caramel Corn:

Lighter-Version-of-Caramel-Corn_thumb.jpg

 What’s your favorite appetizer to eat/serve before the big Thanksgiving meal?

sister m signature


Disclosure: This post contains affiliate links, but all opinions are my own.


Filed Under: M's recipes Tagged With: appetizer, parmesan, popcorn, popcorn recipes, rosemary, thanks, Thanksgiving, thanksgiving recipe

Homemade Apple Sauce

Posted by Keelin Hollenbeck on November 21, 2013

Homemade Apple Sauce
Oh dear, where have I been for the last few months?  This is a great question!  I have been busy moving… again!  I didn’t move across the country again, just across the bay.  I moved from the South Bay of San Francisco to the East Bay which equals a shorter commute for me and a larger kitchen! A win-win in my book.  I have over 1-2 hours back in my life each day,  which is beyond amazing.  People who don’t commute in major cities probably wouldn’t understand the excitement of moving from a 2-hour commute each way to a little bit less than an hour each way, but it is life altering!

I can’t believe next week is Thanksgiving, but I also can’t believe it’s almost December!  No fear the 2 sisters in 2 cities are here to help you with you last minute holiday meal planning.

One of my favorite sides for a holiday meal is homemade apple sauce.  It is so easy to make and 1000 times better than store-bought apple sauce.  Homemade apple sauce is like eating the inside of an apple pie- so delicious!  You don’t have to use the most expensive apples to make apple sauce.  You can use a variety of apples and they don’t need to be perfect.

What do you need?
Apples for Apple Sauce
A bunch of apples is a must!  Get those apples that have been chilling in your fruit drawer for weeks.
Peeled Apples for Apple Sauce
Peel those apples… bruises are okay!
Slice Apples for Apple Sauce
Slice the apples evenly (and meticulously stack your apples cores.)
Cooking Apple Sauce
Cook those apple slices with water until softened.
Mash Apples for Apple Sauce
Mash the apples once softened.
Apple Sauce
Tada!

Print
Apple Sauce
Author: 2 Sisters 2 Cities
 
Ingredients
  • 8-10 apples
  • ½ cup water
  • ¼ –1/2 cup granulated sugar (to taste)
  • ¼ tsp. cinnamon
Instructions
  1. Peel all the apples. Cut apples into evenly sized slices. Throw your peels and cores in your compost pile.
  2. Place sliced apples into a large pot. Add in water to pot and cook over medium heat. Put on cover and cook for 10-20 minutes until apples soften. Turn heat down if the apples start to boil.
  3. Apples should be easily mashed with a fork or potato masher when cooked. Mash apples to preferred thickness.
  4. Add in sugar, to taste, and cinnamon. Stir and cook for a few more minutes. Serve warm or cold and store in an air tight container in the refrigerator.
3.2.2124

sisterk (2)


Filed Under: K's Sides, K's Recipes Tagged With: apple sauce, apples, autumn, autumn recipes, easy sides, fall, fruit, holiday sides, homemade sides, sides, Thanksgiving, thanksgiving recipe

Thanksgiving Menu 2012

Posted by 2 Sisters 2 Cities on November 21, 2012

happy thanksgiving from 2 sisters 2 cities!

A photo from Thanksgiving 2006

I know it’s a little late to be writing this, but I wanted to share my 2012 Thanksgiving menu with you!  I ended up picking up our turkey and doing all the grocery shopping today- talk about last minute!  Now that I have all the ingredients at my house, I’m hoping to start prepping dishes this afternoon as my guests start to linger in from their original destinations.  Tomorrow morning I am running in a our town’s 5K turkey trot with my husband and sister.  Then, it’s a full day of cooking and fun family time!  Here’s my current menu for the next few days:

Wednesday Night:

  • Appetizer- Pre-cooked shrimp with cocktail sauce
  • Dinner: P.F. Chang’s Chicken Lettuce Wraps

Thursday (aka The Big Day!):

  • Breakfast: Baked French Toast
  • Lunch: Greek  Salad Pitas (tbd…only if people are hungry)
  • Appetizers: Popcorn, Spinach & Artichoke dip, Spiced Pepitas & Pecans, Cheese & Chorizo plate, and Crockpot Mulled Cider
  • Dinner: Deep-Fried Turkey, Gravy,  Canned and Fresh Cranberry Sauce, Green Bean Almondine, Garlic Mashed Potatoes, Apple & Sausage Stuffing, store-bought rolls (although I bought all the ingredients to make these honey yeast rolls, but I don’t think I have enough time), Green & Black Olives, and Marshmallow Sweet Potato Casserole
  • Dessert: Pumpkin Mousse (this is one of our first posts ever at 2S2C!)

Friday:

  • Breakfast: Bagels and veggie cream cheese (hoping to post this recipe soon!)
  • Lunch: Sandwiches made from leftovers!
  • Dinner: Pork Carnitas and Guacamole (brought by my mom)
  • Dessert: Salted caramel bars and gluten-free brownies

I would love to hear what’s on your Thanksgiving menu this year.  I hope everyone has a wonderful holiday!

sister m signature


Filed Under: M's recipes Tagged With: Thanksgiving, thanksgiving menu

How to Deep Fry a Turkey

Posted by 2 Sisters 2 Cities on November 18, 2012

how to deep fry a turkey

Like last Thanksgiving, we are planning on deep-frying a turkey for our Thanksgiving dinner on Thursday.  While I prepare the appetizers, sides, and dessert, I let me husband handle the bird logistics.  I asked my husband to write up a quick tutorial on how to deep fry a turkey:

Frying a turkey is fun experience that produces an excellent product if done correctly. If done incorrectly, it can be extremely dangerous, so if you decide to fry a turkey, there is a great need to pay very close attention to instructions (not to mention staying sober).

There are multiple warnings on the internet, like this one, but this type of caution is warranted. There are several steps in the process that if done incorrectly can cause a fire or explosion. Remember, you are dealing with oil here, which can be more than 3.0X the temperature of boiling water.

The disaster scenario is that when the turkey is placed in the pot the oil overflows onto the open flames and causes a huge fire, thereby burning you and igniting your house. This is what we want to avoid. So here is how to avoid it.

  • When you set up the frying apparatus, do it FAR from any structure. This means outside, not nearby a roof, and not close to anything flammable.
  • Make sure the turkey is dry and COMPLETELY defrosted. If it is still even slightly frozen the water will react with the boiling water to explode.
  • Don’t fully fill the pot. Remember that the turkey will displace the pot and raise the oil level. You only want to turkey to be covered when it is in- you don’t want an overflow.
  • After the oil is preheated, turn the flames OFF! This way, if the oil does overflow, it won’t fall onto the open flames and create an explosion. Once the turkey is safely in the hot oil, then you can re-ignite the flames. While cooking, don’t allow the temperature to get over 350 degrees Fahrenheit.
  • Wearing safety googles and being sober while you do this are prerequisites.

Before we started cooking the turkey, we rubbed it with a dry rub mix.  We used a mix of Paula Deen’s spice rub and some Dinosaur BBQ Cajun Spice Rub that we had on hand.

how to deep fry a turkey before and after

Have you ever deep fried a turkey before?  Share your favorite turkey cooking tips in the comments!

sister m signature


Filed Under: Guest Bloggers, M's recipes Tagged With: fried turkey, guest post, how to deep fry a turkey, husband m, safety tips, Thanksgiving, thanksgiving recipe, turkey, turkey recipe

A Turkey Alternative- The Original Turducken!

Posted by 2 Sisters 2 Cities on November 15, 2012

original turducken logo

Every year for Thanksgiving, I have lofty dreams of extensive menus planned in advance and all recipes prepped and ready to go on for the big day.  This does not usually match up with reality however.  Thanksgiving is officially one week away and I have no menu plans and no grocery list and I certainly have not started prepping anything.  I’ve now reached the phase where I start to think of ways to cut down on work the day of Thanksgiving.

Cooked Turducken

I came across an easier alternative to the traditional roasted turkey- the Original Turkducken!  Echelon Foods’ Original Turducken consists of a turkey stuffed with layers of duck and chicken and a choice of either Spicy Italian or Chicken Apple stuffing.  It will be sure to please all the meat lovers in your family :) The Turducken is completely boneless and when sliced correctly, everyone at your Thanksgiving table will receive some duck, chicken, turkey, and stuffing in their slice.

the original turducken packaging

The Turducken is actually easier to cook than a regular turkey.  It takes five days to defrost since it is solid meat (vs. a frozen turkey which has a hollow cavity) and then you just need to pop it in the oven on Thanksgiving day.  There is no need to worry about brining, prepping, stuffing, and basting your turkey!  The Original Turducken is available in many stores across the US and Canada.  (Fellow Massachusetts residents: Roche Bros. carries the Turducken.)

Turducken slices

Have you ever tried the Original Turducken?  Are you a stickler for tradition or do you have plans to mix it up a bit at your Thanksgiving table?

Disclosure: This post was sponsored by Echelon Foods and The Original Turducken.  All opinions are my own.

sister m signature

Related Posts Plugin for WordPress, Blogger...


Filed Under: M's post Tagged With: echelon foods, fall dinner, sponsored post, Thanksgiving, turducken, turkey

  • 1
  • 2
  • Next Page »

Recent Posts

  • Easy Holiday Office Party Tips
  • 5 Steps to an Easy Football Party
  • Gingerbread Biscotti
  • Holiday Coffee Bar and Thanksgiving Recipes
  • Soft Sugar Pumpkin Cookies
  • Cinnamon Sugar Apple Cake
  • Hello Pumpkin Season!
  • Make Your Own Milkshake Party!
  • Mama’s Pickles
  • S’more Cookies

Categories

  • About 2 Sisters 2 Cities (7)
  • Books (8)
  • Crafting & DIY (22)
  • Design & Decorating (15)
  • Gardening (5)
  • Giveaway (14)
  • Guest Bloggers (8)
  • K's post (46)
  • K's Recipes (191)
    • K's Desserts (75)
    • K's Entrees (23)
    • K's Sides (24)
  • M's post (72)
  • M's recipes (167)
    • M's Entrees (21)
    • M's Sides (14)
    • M's Desserts (30)
  • Organizing (7)
  • Party Ideas (49)
  • Uncategorized (1)
  • Vacation (12)
Stitch Fix

Archives

Blogroll

  • Annie's Eats
  • Bake at 350
  • Baked Bree
  • Boston Harbor Beacon
  • Confections of a Foodie Bride
  • Cook Like a Champion
  • Erin’s Food Files
  • Forever and a Recipe
  • Framed Cooks
  • Oh Happy Day
  • On Common Ground
  • Pennies on a Platter
  • Pink Parsley
  • Recipe Girl
  • Sally's Baking Addiction
  • Simply Scratch
  • The Curvy Carrot
  • The Pioneer Woman
  • Tidy Mom
  • Two Peas & Their Pod
  • What’s Gaby Cooking
  • Young House Love
Increase your website traffic with Attracta.com

grab a 2 sisters button!


Copyright © 2014 ~ 2 Sisters 2 Cities | Blog Design by Minx Design