2 Sisters 2 Cities

Image Map
  • About 2 Sisters 2 Cities
  • Recipe Index
  • Project Index
  • Contact Us
  • Like us on Facebook
  • Follow m on twitter
  • Follow k on twitter
  • Follow 2S2C on Pinterest
  • Follow 2S2C on G+
  • rss
  • e-mail 2S2C

Slow Cooker Chicken Tortilla Soup

Posted by Meaghan Barry on February 26, 2013

slow cooker chicken tortilla soup

As we approach June (my due date,) I am on the hunt for recipes for easy to prepare meals.  In addition to quick preparation, they also must be really tasty, healthy, and also easy to clean-up afterwards.  Most slow cooker recipes I come across usually fulfill three of those four criteria.  I find that sometimes either taste or healthiness is sacrificed.

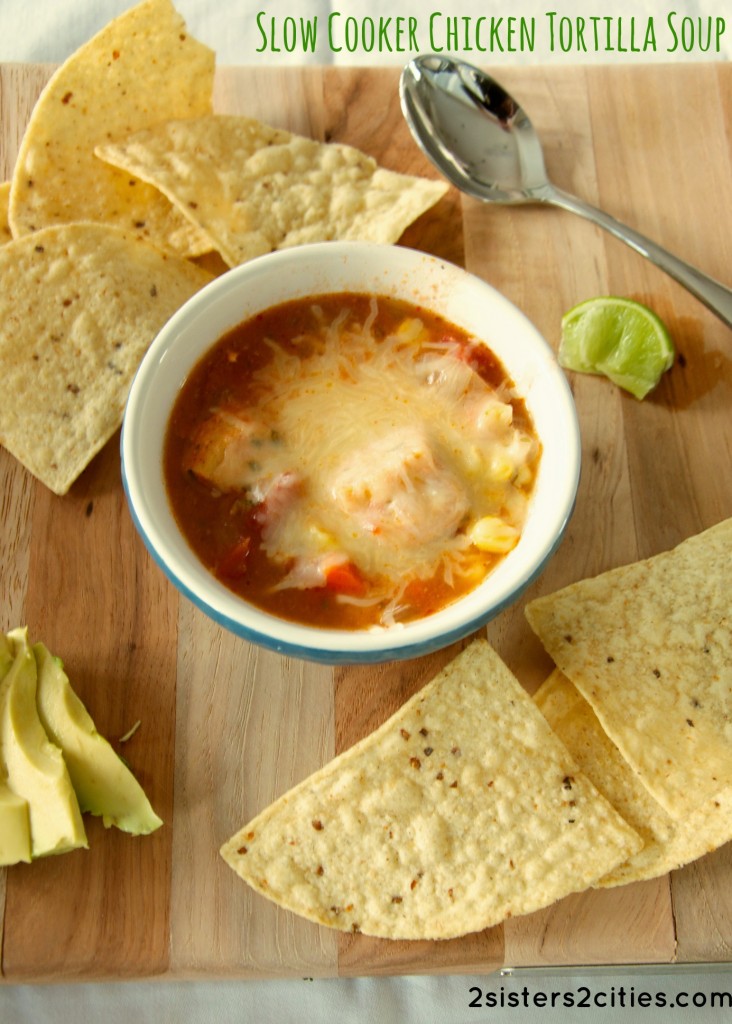
This recipe for slow cooker chicken tortilla soup meets all my requirements.  I pulled it together in less than 15 minutes, the whole family loved the soup, it’s pretty healthy and packed with veggies, and the only pan to wash was the crock pot insert.  (It does call for a can of cheddar cheese soup which some may consider to be an unhealthy option given the loooooong ingredient list on the soup can- I think an easy swap for this ingredient would be 1/2 cup of shredded cheddar cheese and 1/2 cup of half & half.  I ended up using the canned soup this time, but would consider swapping this out for my alternative suggestion next time I make it.)

slow cooker chicken tortilla soup

I feel like I was pretty prepared mentally for parenthood while I was pregnant with Baby T, but I have to admit the one thing that really surprised me was how many things there were to get done in a day and how little time there was to do them.  In my head, once I had 50+ hours freed up from not working anymore, I would have oodles of free time.  I quickly realized a few weeks into motherhood that my free time was more scarce and more precious than ever.  I’m starting to come to terms that whatever projects I don’t get finished by June will probably have to wait for a year or two (especially since this time around I will have a two-year old to tend to as well.)  I do love everyday of being a mom and having the opportunity to stay home with my little guy, but it’s amazing to think of the number of diapers changed, messes cleaned up, meals served, and loads of laundry washed that I have done over the past 2+ years.  Fortunately, recipes like this one help make life a little easier.

slow cooker chicken tortilla soup

Print
Slow Cooker Chicken Tortilla Soup
Author: 2 Sisters 2 Cities
Prep time:  15 mins
Cook time:  6 hours
Total time:  6 hours 15 mins
Serves: 6
 
Ingredients
Soup
  • 1-1.5 pounds boneless, skinless chicken breasts, cut into ½ inch pieces
  • 14.5 oz can diced tomatoes with Green Chiles
  • 8oz can tomato sauce (The can of tomato sauce I used was 14.5 oz.- I poured in about half of it and froze the remainder in an ice cube tray for future use)
  • 32oz container of low-sodium chicken broth or stock
  • 10.75oz can cheddar cheese soup (alternative: sub soup out for ½ cup shredded cheddar cheese and ½ cup half & half)
  • 2 cups carrots, chopped
  • 8 oz. frozen corn
  • 1 large yellow onion, chopped
  • 2 cloves garlic, minced
  • ½ teaspoon ground cumin
  • 1 and ½ teaspoons chili powder
  • ¼ cup cilantro, chopped
  • salt and pepper (to taste)
Toppings (use all or any combination)
  • Shredded cheese (Monterey Jack, Cheddar, or a Mexican blend)
  • Sliced avocados or guacamole
  • Tortilla chips
  • Sour cream
  • Green onions, chopped
  • Limes, squeezed into soup
Instructions
  1. Combine all soup ingredients (not toppings) into a slow cooker. Cook on high for 5-6 hours or on low for 8 hours.
  2. To serve the soup, lay out all toppings in bowls and allow everyone to add garnishes to their soup as they see fit.
3.2.1682

Source: Slightly adapted from The Crockin’ Girls

Do you have a favorite slow cooker recipe that helps make getting dinner to the table a little easier?

sister m signature


Filed Under: M's Entrees, M's recipes Tagged With: chicken recipes, chicken tortilla soup, crock-pot, crockpot recipes, easy to prepare meals, easy weeknight dinner, parenthood, slow cooker recipes, soup, soup recipe

Chicken Fajitas

Posted by 2 Sisters 2 Cities on January 21, 2013

Chicken Fajitas

These Chicken Fajitas are one of my main go-to meals that I have been making since I started cooking for myself in college.  The recipe has come along over time and matured (just like me!)  I no longer need my George Forman to cook a piece of chicken like I did in college.  I have moved on to making chicken in my Le Creuset cast iron skillet and it comes out so juicy and tender.

Sliced-Peppers-and-Onions_thumb.jpg

They key to not overcooking with the cast iron skillet is to cut the chicken breast (which can be so huge!) into thin pieces that are around the same thickness. I use my instant read thermometer to know when the chicken is done so there is no overcooking.  I then prepare some fresh sliced bell peppers and onion in a large frying pan with  a small amount of oil until they onions are cooked and then stir in some fresh cilantro, lime juice, and cayenne pepper.  I serve the sliced chicken and veggies in a warm whole wheat tortilla topped with salsa and light sour cream.   Since my boyfriend and I are trying to eat healthier, the fajitas have been making it into our menu line-up most weeks.

Chicken-Fajitas-with-Toppings_thumb.jpg

Print
 
Ingredients
  • 1 red pepper
  • 1 green pepper
  • 1 yellow pepper
  • 1 onion
  • Juice from 2 limes
  • 2-3 tablespoons Cilantro
  • 8 oz. of Chicken Breast, butterflied into two
  • ½ tsp. Cayenne Pepper
  • 2 tsp. Olive Oil
  • Salt and pepper, to taste
  • Light Sour Cream
  • Salsa
  • Whole Wheat Flour Tortillas
Instructions
  1. In a medium bowl, marinade the chicken with 2 tablespoons of lime, 1 tsp. olive oil, ¼ tsp. cayenne paper, salt and pepper. Allow chicken to marinade for 20-25 minutes while chopping vegetables.
  2. Cut the peppers and onion in thin slices.
  3. Heat a skillet on medium and cook the thin chicken breast until cooked, registering a 160 degrees on a meat thermometer.
  4. Heat the remaining olive oil in a large frying pan. Sauté vegetables until the onions are cooked. Once cooked, take off heat and stir remaining lime juice and cayenne pepper and all of the cilantro into veggies.
  5. Slice the cooked chicken.
  6. Warm tortillas in the microwave between two pieces of paper towel.
  7. In the middle of tortilla place a few slices of chicken, some peppers and onions and then top with salsa and light sour cream to your liking.
3.2.1337

What is your favorite recipe that you have been cooking for a long time and that you have improved over time?

sisterk (2)


Filed Under: K's Entrees, K's Recipes Tagged With: bell peppers, chicken, chicken fajitas, chicken recipes, easy to prepare meals, easy weeknight dinner, improved recipes, mexican, onions, weeknight dinner

Corn Pancakes with Smoked Salmon

Posted by 2 Sisters 2 Cities on August 16, 2012

I’ve hit the point of summer where I don’t really want a huge meal for dinner each night.  While I was perusing the August issue of Cooking Light, I came across this recipe that sounded really interesting- Corn Pancakes with Smoked Salmon and Lemon-Chive Cream. We ended up getting a ton of corn in our CSA last weekend so the timing worked out well to make it this week.

I loved the combination of flavors- the savory corn pancakes melded perfectly with the smoked salmon and the light sour cream topping was the perfect touch to top it off with.  Baby T also enjoyed the corn pancakes (although I did not give him any of the smoked salmon- I did a little research online and the results were a bit iffy if it’s ok for toddlers.)  I actually made this recipe in the early afternoon and stored each individual pancake in layers of wax paper and the smoked salmon and cream in separate containers.  Then, at dinner, I reheated the pancakes in the microwave in 30 second intervals and then topped it with the slices of salmon and a dollop of sour cream.  While we had these for dinner, it would also work out great for a light lunch or a party appetizer.

Print
Corn Pancakes with Smoked Salmon and Lemon-Chive Cream
Author: m
Recipe type: Appetizer or Entree
Prep time:  15 mins
Cook time:  15 mins
Total time:  30 mins
Serves: 3-6
 
Ingredients
  • ¼ cup light sour cream
  • 2 tablespoons chopped fresh chives, plus extra for garnish
  • ½ teaspoon grated fresh lemon rind
  • ½ cup all-purpose flour
  • ½ cup yellow cornmeal
  • 1 teaspoon sugar
  • ¼ teaspoon baking soda
  • ¼ teaspoon kosher salt
  • ⅛ teaspoon ground red pepper
  • 1¼ cups fresh corn kernels, divided (about 3 ears)
  • ⅔ cup low-fat buttermilk
  • 3 tablespoons butter, melted
  • 1 egg
  • 12 thin slices cold-smoked salmon (4 ounces)
Instructions
  1. Combine first sour cream, chopped chives, and grated lemon rind in a small bowl and refrigerate.
  2. Combine flour, cornmeal, sugar, baking soda, salt, and ground red pepper in a medium bowl. Combine 1 cup corn kernels, buttermilk, butter, and egg in a blender; process until pureed. Add pureed corn mixture to flour mixture, stirring until combined. Fold in remaining ¼ cup corn.
  3. Spray a nonstick pan with cooking spray and place over medium heat. Pour about 2 tablespoons batter per pancake into pan. Cook 3 minutes or until tops are covered with bubbles and edges look cooked. Carefully turn pancakes over; cook 3 minutes or until bottoms are lightly browned. For an appetizer serving: arrange 2 pancakes on each of 6 plates; top each pancake with 1 slice salmon and 1 teaspoon lemon-chive cream. Double or triple serving size for an entree size.
2.2.8

Source: Slightly adapted from Cooking Light, August 2012


Filed Under: M's Entrees, M's recipes Tagged With: corn, corn pancakes, easy to prepare meals, smoked salmon, summer appetizer recipe, summer dinner, summer meal

Freezer Sausage, Egg, & Cheese Breakfast Sandwiches

Posted by 2 Sisters 2 Cities on May 18, 2012

A few weeks ago when I was visiting my parents, I tried some egg and sausage sandwiches that my mom had prepared ahead of time and froze.  They are just glorified Egg McMuffins, but I was very surprised at how great they tasted after being frozen and then reheated in the microwave.  I made a batch a few weeks ago and we went through them so quickly that we are already on our second batch.  They are a great grab-n-go breakfast when you are short on time.

This recipe would also be such an easy way to serve a crowd, especially if you wanted something ready completely ahead of time.  I’m definitely bookmarking this recipe to make ahead and pack in a cooler for future trips – all you need is a small freezer and microwave to prepare these egg sandwiches once you get to your ski condo, beach house, summer-getaway cabin, etc.

Freezer Sausage, Egg, & Cheese Breakfast Sandwiches Recipe:

5.0 from 2 reviews
Print
Freezer Sausage, Egg, & Cheese Breakfast Sandwiches
Author: m
Recipe type: Breakfast
Prep time:  10 mins
Cook time:  15 mins
Total time:  25 mins
Serves: 12
 
Ingredients
  • 12 eggs
  • 12 English muffins (I used whole-wheat)
  • 12 breakfast sausage patties
  • 3 cups shredded cheddar cheese
  • salt and pepper to taste
  • cooking spray
Instructions
  1. Preheat broiler on oven. Split the English muffins and place on a large baking sheet. Toast both sides under broiler (1-2 minutes). Set English muffins aside. Turn off broiler and preheat oven to 400 degrees.
  2. Cook sausage patties in a frying pan until completely cooked and nicely browned. Set sausage patties aside.
  3. Crack all the eggs into a large measuring cup, add salt and pepper (to taste), and whisk thoroughly. Spray a 12-cup muffin tin with cooking spray and pour the egg mixture evenly into the 12 cups. Bake for 10-12 minutes, or until the eggs are set.
  4. Remove eggs from oven and top each cup evenly with the shredded cheese. Return to oven until cheese is just melted. Remove from oven.
  5. Assemble the sandwiches in the following order: 1 English muffin half, one egg and cheese round, one sausage patty, 1 English muffin half.
  6. Once the sandwiches are cool, wrap each one individually in plastic wrap and place each wrapped sandwich into a resealable freezer bag.
  7. To reheat- Remove plastic wrap and wrap egg sandwich in a paper towel. Microwave for 1 and ½ to 2 minutes (depending on the strength of your microwave.)
2.2.6

Source: Adapted from Foodie with Family


Filed Under: M's recipes Tagged With: beach house breakfast, breakfast recipe, cabin breakfast, easy to prepare meals, egg sandwiches, freezer breakfast meals, freezer egg sandwiches, freezer meals, grab-n-go breakfast, group vacation breakfast, kitchenette breakfast, sausage egg and cheese sandwiches, ski condo breakfast, vacation breakfast

Menu Plan Monday: Once a Month Mom Meal Plan

Posted by 2 Sisters 2 Cities on April 2, 2012

As I was scrolling through Pinterest yesterday, I came across a few pins for meal plan menus from once a month mom.  They are a series of menu plans that allow you to cook a whole month of meals in one day to store in your freezer.  I once went to a “meal assembly” franchise like  Dream Dinners, My Girlfriend’s Kitchen, and Let’s Dish, but I don’t really need or want to pay the mark-up to have someone else prep all the ingredients for me.  There are six different menus available each month- traditional, whole foods, diet, vegetarian, gluten/dairy-free, and baby food.  I am going to attempt to make the diet freezer menu this week as we are back in diet-mode in our house and it looks pretty delicious!

I am heading to the grocery store this afternoon to stock up on ingredients with the pre-made grocery list for the meal plan.  I love how everything is linked up in Excel…so fun to see Excel being put to good use outside of financial spreadsheets.  Along with the printable grocery list, there are  recipe cards for each meal, instructions with detailed steps on how to cook all the meals in one day, and my favorite item- printable labels for freezer bags with heating instructions and nutritional information.

After I’m done cooking, I should have 6-10 breakfasts, 8 lunches, and 16 dinner for two people.  While this is not enough for an entire month of meals, the plan takes into account that you will periodically be getting take-out, eating out, or preparing a meal fresh that night.  You can however make enough for the full month if you double the recipes accordingly.

I am hoping to get the prep work done tonight (it’s recommended that you do the chopping and a small amount of prep work the night before.)   I’m not sure I will be able to do the full day of cooking in one day as Baby T requires a lot of attention and would be jumping off my kitchen table if I left him unchecked all day.  I’m also slightly concerned about the amount of freezer space I have, but I think I can make a lot more room with some organization and removing the ice gel packs that are taking up about a quarter of the space.  I am hoping this will make evenings less of scramble to get baby fed and dinner on the table.

I am hoping to make the baby/toddler menu once we use up our current stockpile of baby meals in the freezer.

Have you ever made a huge amount of meals in one day?  What was your strategy in planning all the meals?


This post is linked at:


Filed Under: M's Entrees, M's recipes Tagged With: diet, easy to prepare meals, freezer meals, meal plan monday, once a month mom

Pumpkin Granola

Posted by 2 Sisters 2 Cities on February 11, 2012

My mom had told me about this granola recipe after she made it in the fall. I thought I didn’t have the right oats because the original recipe calls for rolled oats and I only had old-fashioned oats.   My mom assured me that old-fashioned oats would be fine. I finally got around to making it in January and I have made it several times since. This granola is amazing and healthier than most granolas because there is no oil and less sugar.  For all of January, I had this granola with a few ounces of Fage 0% Greek Yogurt for breakfast. It was good enough to get me out of my warm bed every morning to get some more granola!  I cut the original recipe in half just so it would stay fresher and it made about 6 servings (a rounded 1/2 cup.)
Pumpkin Granola

Ingredients:
2 1/2 cups Old Fashioned oats
1/2 tsp. pumpkin pie spice
1/2 tsp.cinnamon
1/8 tsp. nutmeg
1/4 tsp. salt
1/4 and 1/8 cup of brown sugar
1/4 cup pumpkin puree
1/8 cup unsweetened applesauce
1/8 cup maple syrup
1/2 tsp. vanilla extract
1/3 cup of dried cranberries

Directions:
Preheat the oven to 325 degrees F.  Line a baking sheet with parchment paper or a silicone non-stick mat.  In a large mixing bowl mix in oats, spices and salt.  Mix until combined.   Next in another mixing bowl , whisk together brown sugar, pumpkin puree, apple sauce, maple syrup and vanilla extract until smooth.  Combine wet and dry ingredients until oats are coated evenly.  Spread oats out on baking sheet and bake for 20 minutes.  Remove from oven and stir with spatula.  Return to oven and bake for an additional 15-20 minutes until granola is golden and crispy.  Once removed from oven,  mix in the dried cranberries.   Allow to cool completely and then store in an airtight container.

Source- Adapted from Two Peas & Their Pod originally adapted from Baking Bites

Weight Watchers PointsPlus- 5 PointsPlus for 1/6 of recipe  (about a rounded half cup)

-K


Filed Under: K's Recipes Tagged With: breakfast, Brunch, brunch ideas, easy to prepare meals, granola, Greek yogurt, greek yogurt mix-ins, pumpkin granola

Super Easy Weeknight Dinner- Jambalaya

Posted by 2 Sisters 2 Cities on February 1, 2012

Jambalaya is a ridiculously easy weeknight meal that I make once awhile during the winter.  It probably doesn’t even warrant a post, but I just wanted to throw the idea out there in case you have never made it before.  This recipe uses a box of Zatarains Jambalaya mix, but I like to change a few things up from their recommendation to make it a bit more healthy.  Once you are done cutting up the vegetable and meat, you throw it into the rice mix and let it cook.  Some days you just need something that easy!

Jambalaya:

Ingredients:
-1 box Zatarains Reduced-Sodium Jambalaya mix
-2 and 1/2 cups water
-2 tablespoons olive oil
-13 oz turkey polska kielbasa links, sliced into 1/4 inch pieces
-1 green pepper, diced

Directions:
Mix the water and olive oil in a Dutch Oven.  Bring to a boil.  Add the Jambalaya mix, kielbasa, and green pepper.  Mix well.

Return to boil.  Reduce heat to low, cover, and simmer for 25 minutes.  Remove from heat and let stand for 5 minutes before serving.

What are you go-to easy weeknight meals when you don’t feel like spending too much time in the kitchen?

-m


Filed Under: M's Entrees, M's recipes Tagged With: easy to prepare meals, easy weeknight dinner, jambalaya, weeknight dinner

Quick Weeknight Dinner- Easy Red Pasta Sauce!

Posted by 2 Sisters 2 Cities on January 6, 2012

Hello Readers,

I haven’t officially made any New Year’s Resolutions yet, but I know I want to make some changes in my life.   I want to be healthier, more organized, and to do more with my free time,  like blogging and cooking!   I know I have made the same New Year’s Resolution each year,  and some years I am really good with them,  and some years I am not so good.

Instead of saying I want to “lose weight,”  I am just going to try to be healthier.   The reason for this is that I have struggled with my weight most of my life,  and this isn’t something that is going to go away.   I have gained and lost the same 20 pounds twice in the last three years.   I am back to trying to lose it again,  and truthfully I would like to lose another 20-30 on top of that,  but I love food way too much to know that will never be sustainable.  I went back to my Weight Watchers meetings this week.  I stopped going during December because you can’t make twelve types of cookies and go sit at Weight Watchers and wonder why you are gaining weight.   I am owning it- this cookie weight was hard earned!   Haha- well anyways,  I will be cooking healthier recipes for the next few months!

This week I have cooked meals every night for my boyfriend and me.  I made grilled chicken with roasted garlic potatoes; Black Bean Burritos;  pork tenderloin with rice; Sausage, Pepper, Onion, and Potato Bake; and pasta with red sauce and light garlic bread  (I know you are thinking that this bowl does not look like a weight watchers serving of pasta, but it is!  I measured it on a scale before I cooked it.   I used Wegman’s Super Pasta which is whole wheat pasta with protein. I highly recommend!)

Quick Red Sauce

Ingredients:
1 tbsp of olive oil
1 onion, chopped
1/4 teaspoon of kosher salt
2 garlic cloves, minced
1/2 teaspoon red pepper flakes
1 28 oz can crushed tomatoes
1 tablespoons dried parsley

In a sauce pan, heat olive oil over medium heat.   Add onion and cook until translucent, about 5 minutes.   Next add garlic and red pepper flakes, stir for about 1 minute until you can smell the garlic.  Then stir in tomatoes and parsley flakes.   Lower heat to medium low and allow sauce to come to a boil.  Simmer for 5-10 minutes, stirring occasionally.  Serve with pasta.

Source– adapted from Fabulicious: Teresa’s Italian Family Cookbook by Teresa Giudice (from NJ Housewives)

*K’s tip-  After cooking pasta, drain, and place pasta back in hot pot.   Add some sauce and stir in with pasta.  Stir in more sauce to your liking, allowing sauce and pasta to heat up together. Then serve as normal.

Light Garlic Bread

Finely mince a half of a clove of garlic and place in a small bowl.  Add in 2 tablespoons of light butter (I used Land O’ Lakes Light Butter with Canola Oil) and a pinch of parsley, and stir together.  Spread the butter mixture on to both sides of 3 slices of Italian bread (or any leftover bread that you have.)  Place bread on an aluminum foil-lined baking sheet and place in oven on broil.  Watch the bread until it is toasted,  then flip to toast other side.  Make sure to watch carefully because it’s really easy to burn!  My boyfriend knows all about my “broiling” skills :).

Enjoy!

-K


Filed Under: K's Entrees, K's Recipes Tagged With: easy spaghetti sauce, easy to prepare meals, homemade spaghetti sauce, Pasta sauce, quick dinners, Red sauce, weeknight dinner

Easy Grilled Chicken Salad

Posted by Keelin Hollenbeck on July 22, 2010

I bet you can already guess what magazine I cooked out of tonight.  I cooked Easy Grilled Chicken Salad from my August Cooking Light, of course!   This recipe was super easy to make (hence the name) and really, really, really good (yes it gets three reallys).

I made a couple of exchanges in this recipe because I already owned some items and I wanted to save some money while I was grocery shopping. First, I replaced the celery with cucumber because I really don’t care for celery.  I didn’t know how it was going to taste, but it ended up being really good and sort of reminded me of taziki sauce a little.  I ate this right away.  I would say if you were going to make this for a meal ahead of time, the cucumbers may get soggy and ruin the salad.  The next replacement I made was that I switched the chopped pecans to chopped almonds.  Finally, I used a little bit of regular onion instead of green onion.  In the end, I think the changes I made were really good.   I ended making on 1/4th the recipe because I was making it for just myself.  You should try some variations of it yourself and tell me how it goes.  The chicken salad is placed on a bed of baby spinach and I also served it with a steamed summer squash.  MMMMmmmm!

Enjoy!

-K


Filed Under: K's Recipes Tagged With: cooking light recipes, easy to prepare meals

Quinoa with Roasted Garlic, Tomatoes, and Spinach

Posted by Keelin Hollenbeck on July 21, 2010

Once again, I decided to try a recipe out from my new August Cooking Light.  Tonight, I made Quinoa with Roasted Garlic, Tomatoes, and Spinach.  This is a side dish but my roommate and I doubled the recipe and made it for 2 meals.   I have never cooked with quinoa and I didn’t even know where to find it in the grocery store (which is rare because I know everything in my grocery store).   I had to call my mom to ask her where she would find her quinoa.  Apparently I was pronouncing it wrong (pronounced KEEN-Wah.)  I eventually found it in the organic sections (where would we be without super moms!)

Roasting the garlic is pretty easy- just peel some of the papery skin off and then cut it half (so you are basically cutting every piece of garlic in half.)  Next, wrap it in aluminum foil and bake for an hour at 350 degrees.  The recipe it pretty simple and besides the hour it takes the roast the garlic, it is pretty quick.   It was so good that I ate my serving for tomorrows lunch!   Oops!

I used an onion instead of shallots because I already had one, and the garlic bunch in the picture is not a whole one because the whole one is in the oven during this picture.   I also used Pecorino Romano cheese instead of parm because I like it better.

Enjoy!

-K

Related Posts Plugin for WordPress, Blogger...


Filed Under: K's Sides, K's Recipes Tagged With: cooking light recipes, easy to prepare meals, summer dinner

  • 1
  • 2
  • Next Page »

Recent Posts

  • Easy Holiday Office Party Tips
  • 5 Steps to an Easy Football Party
  • Gingerbread Biscotti
  • Holiday Coffee Bar and Thanksgiving Recipes
  • Soft Sugar Pumpkin Cookies
  • Cinnamon Sugar Apple Cake
  • Hello Pumpkin Season!
  • Make Your Own Milkshake Party!
  • Mama’s Pickles
  • S’more Cookies

Categories

  • About 2 Sisters 2 Cities (7)
  • Books (8)
  • Crafting & DIY (22)
  • Design & Decorating (15)
  • Gardening (5)
  • Giveaway (14)
  • Guest Bloggers (8)
  • K's post (46)
  • K's Recipes (191)
    • K's Desserts (75)
    • K's Entrees (23)
    • K's Sides (24)
  • M's post (72)
  • M's recipes (167)
    • M's Entrees (21)
    • M's Sides (14)
    • M's Desserts (30)
  • Organizing (7)
  • Party Ideas (49)
  • Uncategorized (1)
  • Vacation (12)
Stitch Fix

Archives

Blogroll

  • Annie's Eats
  • Bake at 350
  • Baked Bree
  • Boston Harbor Beacon
  • Confections of a Foodie Bride
  • Cook Like a Champion
  • Erin’s Food Files
  • Forever and a Recipe
  • Framed Cooks
  • Oh Happy Day
  • On Common Ground
  • Pennies on a Platter
  • Pink Parsley
  • Recipe Girl
  • Sally's Baking Addiction
  • Simply Scratch
  • The Curvy Carrot
  • The Pioneer Woman
  • Tidy Mom
  • Two Peas & Their Pod
  • What’s Gaby Cooking
  • Young House Love
Increase your website traffic with Attracta.com

grab a 2 sisters button!


Copyright © 2014 ~ 2 Sisters 2 Cities | Blog Design by Minx Design