2 Sisters 2 Cities

Image Map
  • About 2 Sisters 2 Cities
  • Recipe Index
  • Project Index
  • Contact Us
  • Like us on Facebook
  • Follow m on twitter
  • Follow k on twitter
  • Follow 2S2C on Pinterest
  • Follow 2S2C on G+
  • rss
  • e-mail 2S2C

Valentine’s Day Gift Packaging

Posted by Keelin Hollenbeck on February 11, 2014

Valentine's Day Gift Jars

Valentine’s Day is almost here and if your haven’t started thinking about gifts for your loved ones, I have just the idea for you!  For my Christmas gift to my co-workers and friends this year, I made mason jars filled with homemade candy.  I then covered the jar with muslin fabric (stenciled with the holiday greeting “cheers!”) and tied it on with red and green ribbon.  Like most things around here, I finished it late the day before I was handing them out with no day light left.  Therefore, I never came up with a good picture to share with you all.

Getting Heart Jars Ready

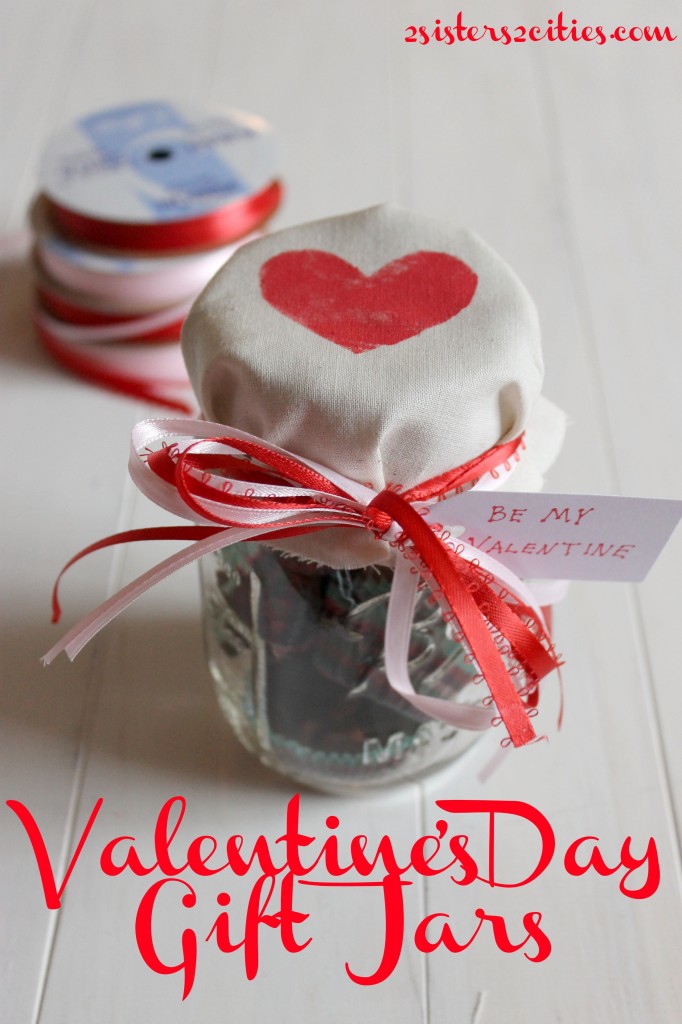
After thinking about what I could make and write about on the blog for Valentine’s Day, I thought of re-creating the gift jars, except for a Valentine’s day gift.   Mason jars are such a cute way to gift and are usually less than a dollar.  The jars can be filled with whatever store-bought candy or homemade candy you would like to fill them with.  For Christmas I filled them with crock pot candies and peanut brittle.   The crock pot candy was so popular that I decided to fill my jars with them again because it was so simple to make.  I had originally planned to make homemade peanut butter cups for my jars, but had run out of time and calories!

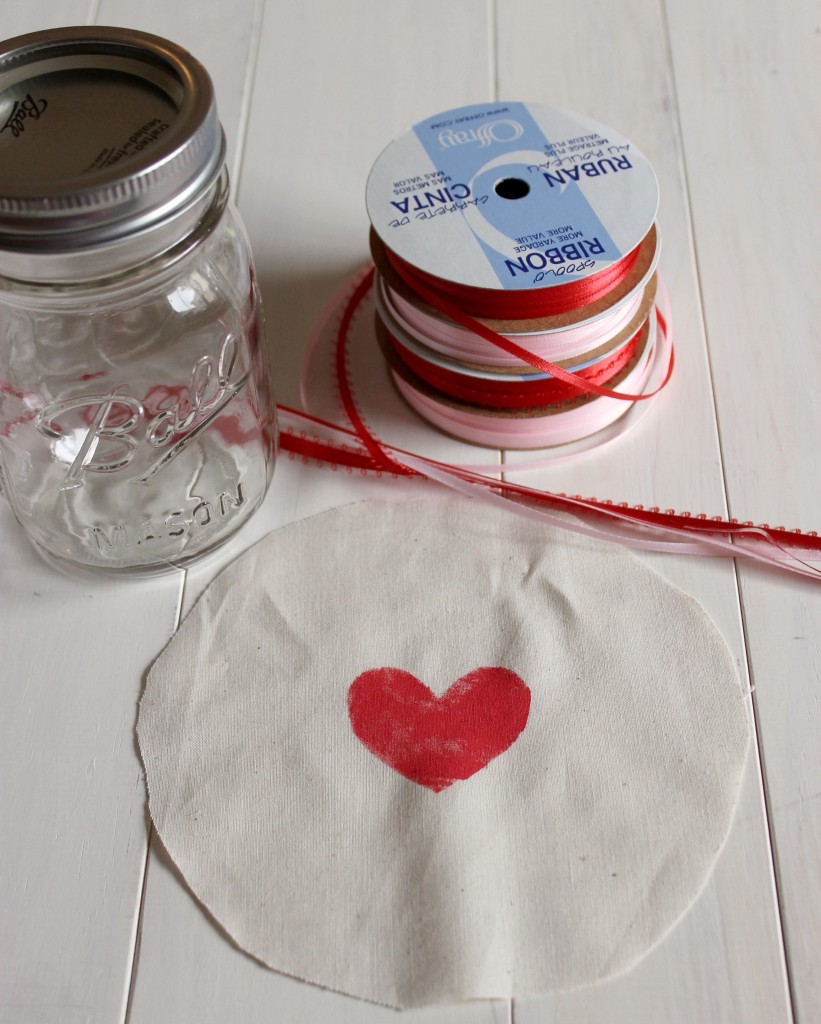
Muslin fabric is one of the cheapest kinds of fabric you can buy.  I bought four yards at Christmas time and used a 50% off coupon so it ended up costing about four dollars!  I will have enough fabric to make gift jars for every holiday for the rest of my life!  As for ribbon, I always stock up on the 50 cent Offray ribbon at the craft stores in all the colors and different sizes.   For 50 cents, you just can’t go wrong!  I love combining different colors and sizes for a texture effect.  Mason jars can be bought at the grocery store, Target or even Amazon for less than a dollar each.

If this project is last minute for you, think about using store-bought Valentine’s Day candies such as conversation hearts, M&M’s, Reese’s, Mini Snickers, and or Hershey’s Kisses.  I also came up with a list of homemade candies that you could gift in these jars if you have more time (lucky!)

From our Blog:

  • Crock Pot Candies
  • Light Caramel Corn
  • Chocolate Oreo Truffles
  • Golden Oreo Truffles
  • Puppy Chow
  • White Trash Party Mix

From Other Blogs:

  • Homemade Peanut Butter Cups from Brown Eyed Baker
  • Valentine’s Day Homemade Gumdrops from Mom on Timeout
  • Peanut Butter Pretzel Truffles from Annie’s Eats
  • Chocolate Chip Cookie Dough Truffles from Inside BruCrew Life
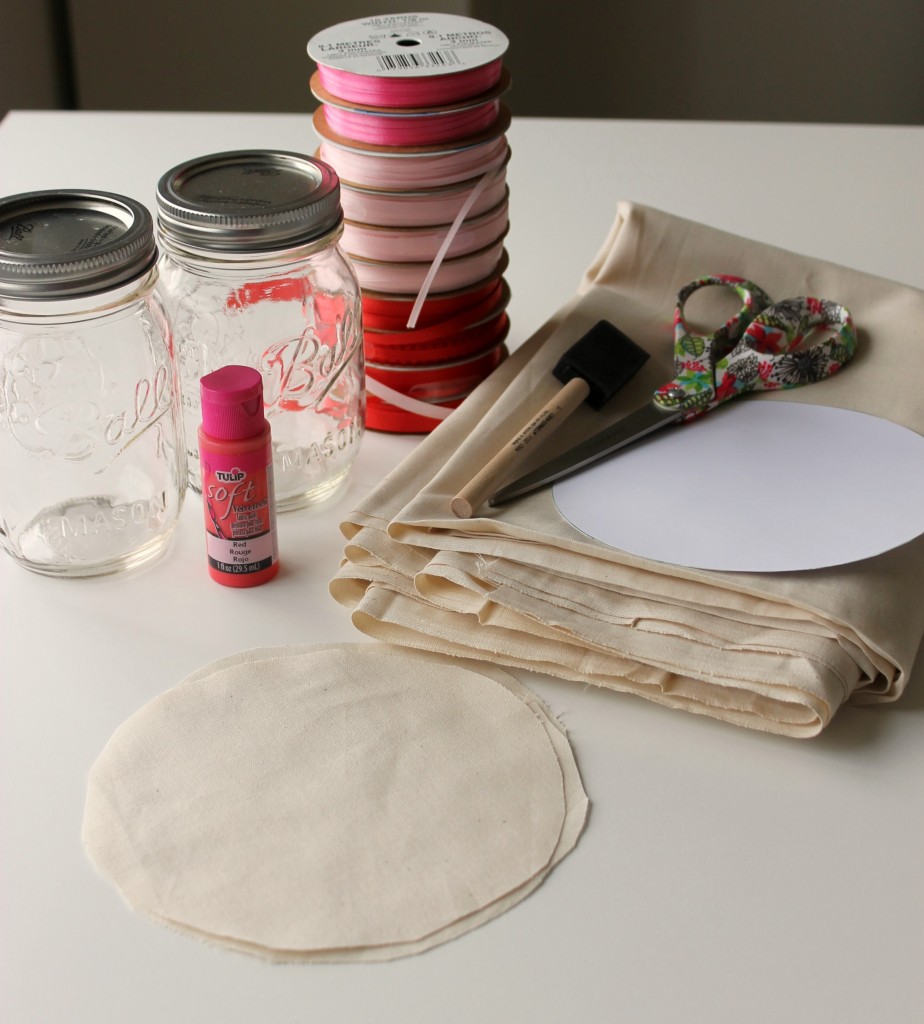
Gift Jar Supplies

Materials:

  • Muslin Fabric
  • Fabric Scissors
  • Fabric Paint
  • Foam Brush
  • Heart Stencil (or card stock paper with a heart cut out of it)
  • Rubber Band
  • Colored Ribbons
  • Mason Jars, cleaned and dried
  • Tags

Stenciling Heart

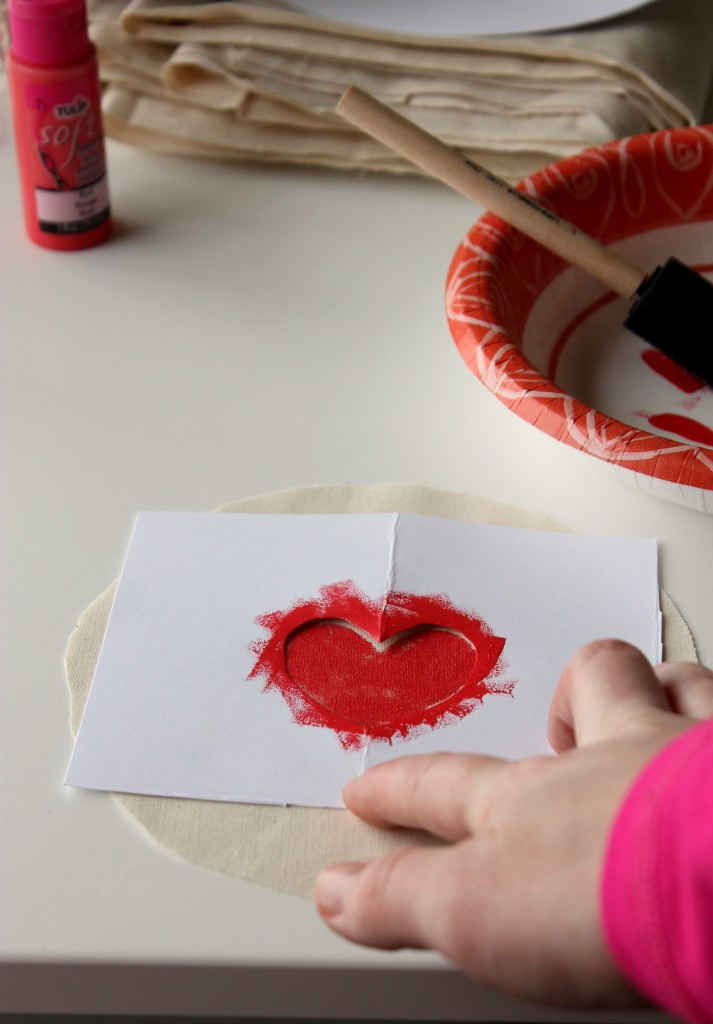
Cut muslin fabric in a 6-inch circle. Stencil the middle of fabric with heart by dabbing fabric paint with a foam brush.  Make sure to put scrap paper underneath because some paint might bleed through.
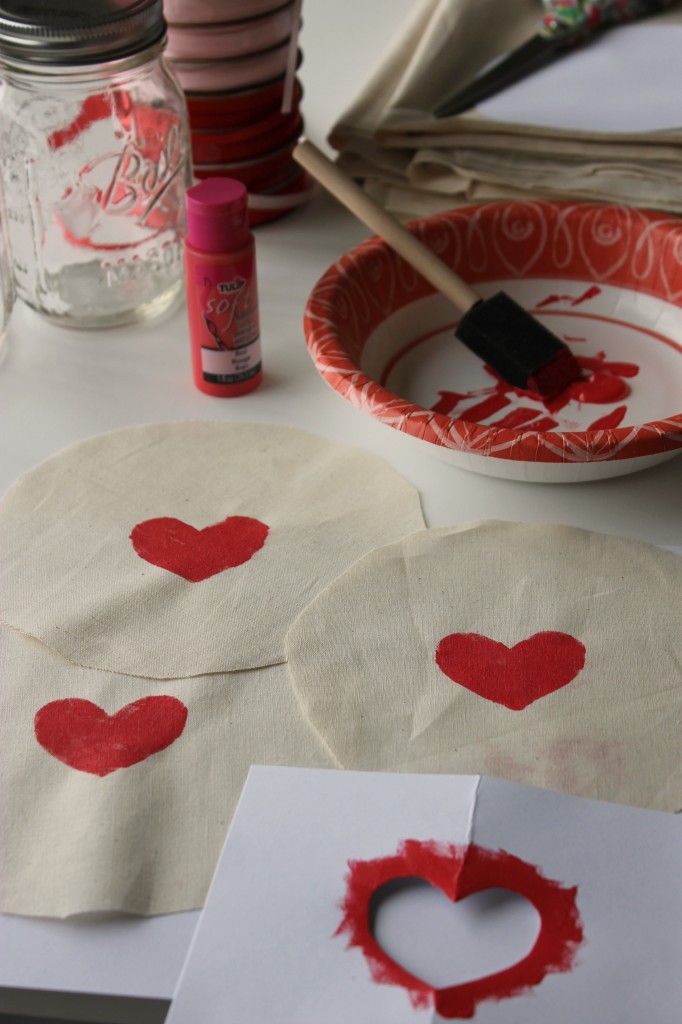
Stenciled Fabric

Let the fabric dry.

Fill Jar with Candy

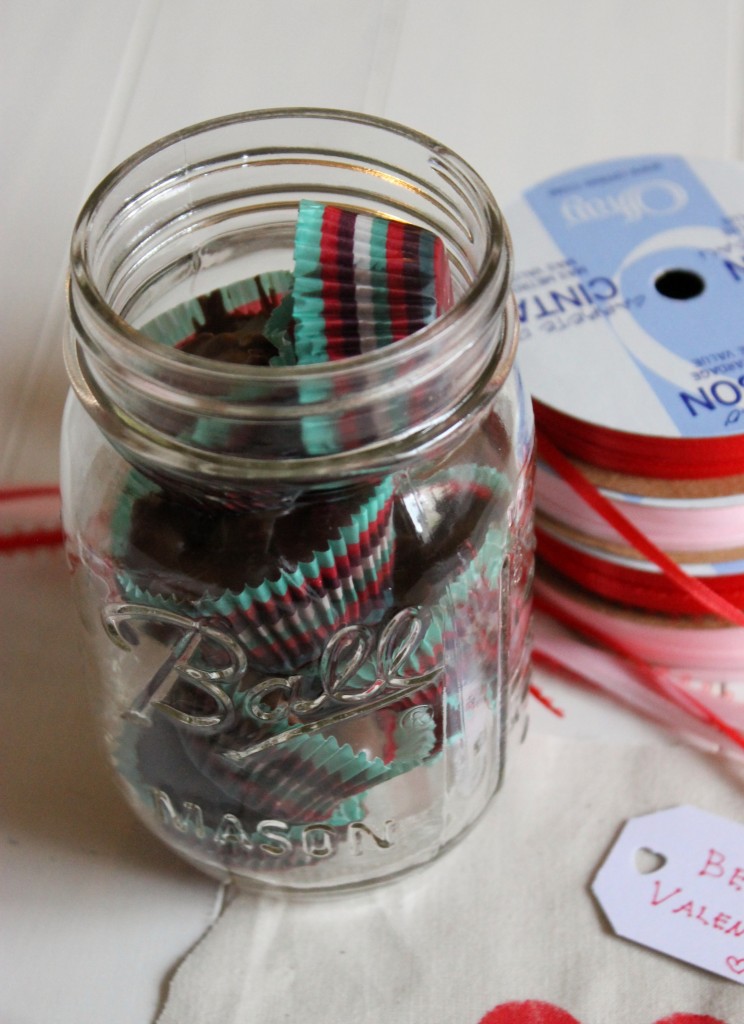
Fill your jars with candy and close with lids.

Rubberband around Jar

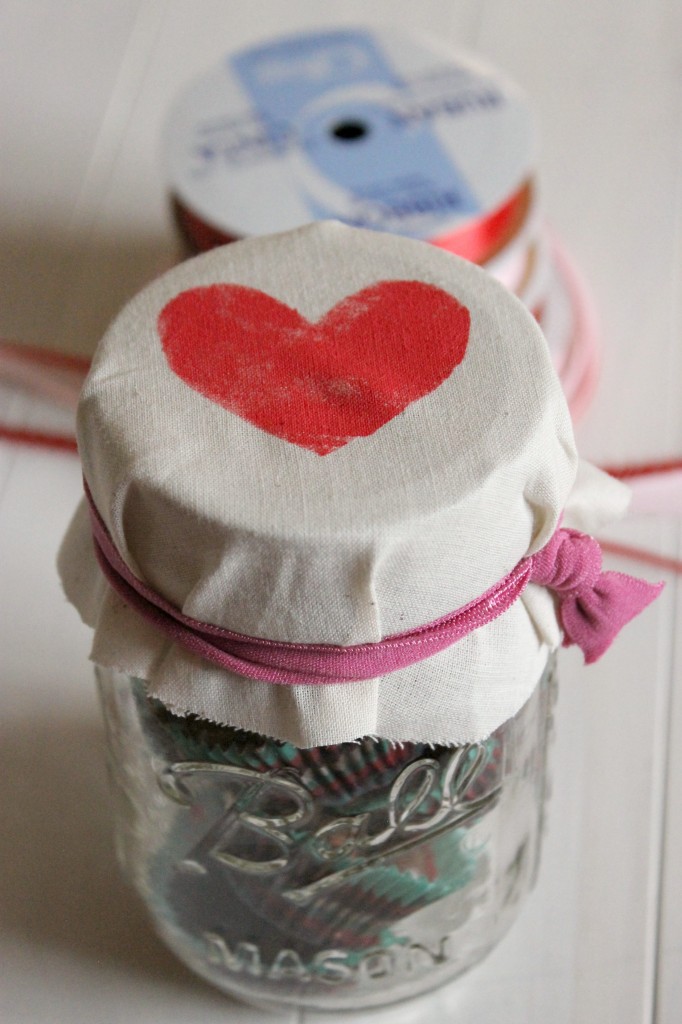
  Take the fabric circle on the top of the lid and place rubber band to hold it in place around the lid.

Tie Ribbon on Jar

 Cut about 2 feet of each ribbon color you intend to use.   Double knot the ribbon on top of the rubber band and then carefully pull the rubber band out from below so that ribbon remains holding the fabric over lid.

Finished Gift Jars for Valentine's Day

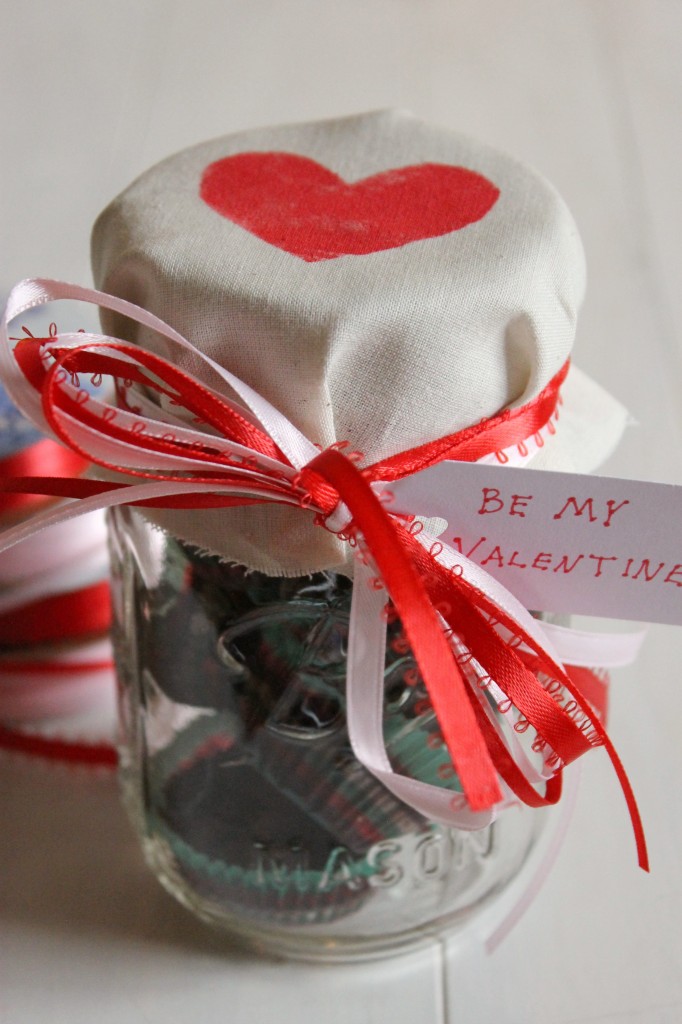
String tag onto of the ribbons and then tie bow on top. Ta da!  Happy Valentine’s Day!

sisterk (2)


Filed Under: Crafting & DIY, K's post, Party Ideas Tagged With: crockpot candies, gift jars, gift packaging, valentine's day, valentine's day gift idea

Coffee and Caramel-Themed Gift Basket

Posted by Meaghan Barry on June 11, 2013

June is such a busy month with the end of the school year, graduation parties, bridal & baby showers, and weddings.  I’m always racking my brain for creative gifts that would be appreciated and I came up with a coffee and caramel-themed gift basket.  While T doesn’t start school until September, I think this would make a great teacher gift for his future teachers next year (God bless their hearts already…they are going to have their hands full!)

I recently gave my little sister a “working girl” graduation present since she will be starting a real office job this summer.  I filled a clear acrylic tray with items that I have always found helpful to have at my work desk.  I brainstormed with K about our favorite cubicle essentials- we came up an iced coffee mug, Starbucks Via iced coffee packets, tissues, antibacterial hand gel, cleaning wipes, lip balm, Altoids, and a Charlie Ticket (which is used to pay for busses and subways in Boston.)  The tray I used to hold all the stuff wasn’t necessarily for work- I figured it would be fun to use as a serving tray while entertaining or organize small household items, such as make-up or stationery.

I was recently asked by International Delight to come up with a craft project using an International Delight creamer bottle.  Since a creamer bottle snowman isn’t very seasonal for this time of year (seriously, Google it- there are a lot of creamer bottle snowmen out there,) I decided to come up with a coffee and caramel-themed gift to give to teachers for the end of the school year.  I picked the caramel part of the theme because my favorite International Delight creamer is the Caramel Macchiato flavor.

coffee and caramel‐themed gift tray

I included the following in my themed gift tray:

  • A bottle of International Delight Caramel Macchiato creamer
  • A large bag of Starbucks coffee beans
  • Copco iced coffee cup (I love this cup so much…I just bought a second one since I use my first one so much.  I usually fill it with water or decaf iced tea since I’m still pregnant, but I plan on filling them with large quantities of iced coffee in a few weeks once this baby is born!)
  • Starbucks Via iced coffee packets
  • Fleur de Sel caramels from Trader Joe’s (regular caramels would work as well, but these are extra special!)
  • Caramel Layerer Brownies while I was pulling this gift tray together.)
  • A special thank you note

If this is above your gift budget, it could easily be simplified to just an iced coffee cup filled with iced coffee packets, caramels, and an ice-cold bottle of I.D. Caramel Macchiato Creamer.

coffee and caramel‐themed teacher gift

You could also mix the gift theme up a bit if you knew the recipient preferred a certain flavor.  Just swap out the Caramel Macchiato creamer and Fleur de Sel caramels for any of these combinations:

  • French Vanilla International Delight with a packet of vanilla beans and a recipe for your favorite vanilla bean ice cream
  • Southern Butter Pecan International Delight with a batch of Mini Pecan Pie Bites
  • Hershey’s S’mores International Delight with graham crackers, marshmallows, chocolate bars, and wooden skewers
  • York Peppermint Patty International Delight with a big bag of Peppermint Patties
  • Cinnabon International Delight with a Cinnabon gift card

Tie it up with some ribbon matching the school colors.  Your gift recipient will be able to kick off their summer and enjoy their caffeine fix with some special treats!

What’s Your ID? International Delight is looking for their most passionate flavor fans. Put your ID on the map to enter to win a Magical Trip, play games and discover more unexpected delight. Share your ID flavor at http://whatsyourid.com.

Disclosure: This is a sponsored conversation written by me on behalf of International Delight. The opinions and text are all mine.

sister m signature


Filed Under: Crafting & DIY, M's post Tagged With: caramel, caramel macchiato, coffee, creamer, DIY gifts, end of school year, gift ideas, iced coffee, international delight, summer gifts

Graduation Party Decor

Posted by Meaghan Barry on May 29, 2013

Graduation Party Decor {from 2 Sisters 2 Cities}

A couple weekends ago, I hosted a small college graduation party for my baby sister. {Side note: am I allowed to use the terms college and baby in the same sentence?}  It was just our direct family attending, but with my parents, husband, three sisters and a toddler, it was still a pretty lively event!  Since we were at the graduation ceremony for most of the first half of the day, we had the party catered so we wouldn’t have to worry about being in a rush to pull together a celebratory meal afterwards.  K had to catch a flight back to San Francisco that night so a dinner out at a restaurant was also out of the picture.  I forgot to take a lot of photos of the graduation party decor, but I did want to share a few of the photos I took.

Since I didn’t have to worry about pulling together a big meal for the graduation party, I decided instead to focus on making my own decor for the party.  “Baby Sister” M’s school colors were blue and yellow so I decided to use this as the theme for the decorations.  I took a page from K’s party decor for our family reunion’s Fourth of July luncheon last year and used a paper punch to create handmade paper garlands to hang up around the kitchen and dining room.

Graduation Party Decor {from 2 Sisters 2 Cities}

I have a pretty large supply of decorative paper and card stock and I went through my stockpile to find some cute yellow card stock and a roll of Paper Source dark blue polka dotted paper that I had from leftover from my wedding.  I used my scallop punch that I bought to make the favor bags for T’s 2nd birthday party and punched out ~100 large scalloped circles.  I then used double-sided tape and affixed them to some blue twine (I stuck two of scalloped circles together with the twine running up the middle between the two circles.)

blue garland

I then took some blue and yellow washi tape to create tiny flags between each of the scalloped circles.  I stuck together a long piece of washi tape around each string of twine and then snipped the edges to create a tiny flag.  I then used masking tape to hang each string of garland from the ceiling (I tried using the washi tape at first, but they all fell down within minutes.)  I love that I can reuse the paper and washi tape garlands again for a future party.  I carefully took each one down and stored them in a ziploc storage bag for future use.

I also took her graduation announcements (one from the school and one my mom had made on Tiny Prints) and placed them in small white frames on the buffet table.  My mom had picked up some blue and yellow jelly beans that and we served those in cute little polka dot candy cups that I had bought at Shop Sweet Lulu awhile back.  T insisted on getting a cake for the party so we picked up the little graduation hat cupcake from Whole Foods.

Graduation Party Decor

My mom also made a project similar to the silver flower pot party favors we made for T’s baptism a few years ago.  She painted three terra cotta pots yellow and planted blue/purplish flowers in each pot.  I also bought some yellow daisies for the party and placed them in two mason jars tied with ribbon.  We then placed all five flower decorations in the middle of the dining room table for our tablescape.

Graduation Party Flower Decor

I also printed off a few of these 2013 graduation party decor printables from Catch My Party that I found on Pinterest (most notably the foldable labels to write down the types of food that were being served.)  I didn’t get a chance to take a picture of these and the food because I was way too excited about trying all of it.  Our gluten-free menu included Thai shrimp spring rolls with spicy chili sauce, chicken mango curry, coconut rice, Thai steak salad, and coconut flan.  (For those of you living in the Boston South Shore area, I highly recommend you check out The Fresh Feast in Cohasset where we ordered the food from- so delicious and very reasonably priced!)

Do you have any favorite ways to make your own decorations for parties?

sister m signature


Filed Under: Crafting & DIY, Party Ideas Tagged With: blue and yellow party, college graduation, commencement, diy decorations, graduation, graduation 2013, graduation party, graduation party decor, handmade decorations, paper garland, party decor, yellow terra cotta pots

DIY Baby Closet Dividers

Posted by Keelin Hollenbeck on May 20, 2013

DIY Baby Closet Dividers {from 2 Sisters 2 Cities}

I’ve mentioned in a lot of my last posts that I have been busy nesting and getting ready for baby #2’s arrival.  This time around, I realize that the nursery does not need to be finished by the time the baby comes since he will be in a bassinet next to our bed most nights, but time will likely be a rare commodity with two little munchkins.  I’m trying to get as many things done ahead of time with just T around.

I wanted to share one of the latest baby projects that I just finished- DIY baby closet dividers.  These baby closet dividers are all the rage on etsy and I was originally going to just buy some.  I realized they would be fairly easy to make myself however so I decided to give it a try.  I had a few rolls of gray chevron contact paper that I picked up at Marshall’s a few months ago and I had put them aside for any projects that might come up.  I decided this paper would be perfect for making my own baby closet dividers.  {Side note: I’m not sure I’ve mentioned this in a past post, I decided to decorate this baby’s nursery in dark gray, bright green, and white.  Check out this post for a peek at baby T’s airplane-themed nursery that I did a few years ago.}

DIY Baby Closet Dividers

Materials

Materials for DIY Baby Closet Dividers

  • empty cereal, cracker, or snack cardboard boxes
  • large circle trace (I used a plastic take-out container)
  • small circle trace (I used a spice jar)
  • pencil
  • scissors
  • decorative contact paper
  • stickers or labels

Instructions

DIY Baby Closet Dividers {from 2 Sisters 2 Cities}

  1. Use the scissors to cut two large squares out of the decorative contact paper (make sure the squares are larger than the large circle trace you plan on using.)
  2. Remove the backing from the contact paper and place on both sides of a flat piece of cardboard.  The squares should match up so that when you cut a circle out of the cardboard, the contact paper will fully cover the circle on both sides.
  3. Using a pencil and large circle trace, trace a circle on one side of the square contact paper.  Then, using the small circle trace, trace a small circle in the middle of the large circle that you just traced.
  4. With your scissors, follow the large circle trace and cut the large circle from the piece of cardboard.  Then, cut two small even slits to cut out the small circle trace from the center.  Neaten any edges so that both circles appear even and smooth.
  5. Repeat this process 5-8 times depending on how many baby closet dividers you want to make.  (I made six of them since I will likely be storing away the baby clothes once the baby grows out of them.  I will then change the sticker out on the divider for a larger clothes size.)
  6. Label 6-9 stickers with common baby clothes sizes: newborn, 0-3 months, 3-6 months, 6-12 months, 12-18 months, 18-24 months, 2T, 3T, and 4T.  Apply sticker or label to top of clothes dividers.
  7. Hang in closet and organize baby’s clothes by size!

Baby Closet Dividers {from 2 Sisters 2 Cities}

I love how this project turned out!  Plus, I love being able to look at that first newborn onesie every time I open the closet door- I can never get over how little and cute newborn clothes are.  It barely even fits on the mini hanger!

T never had a closet in our city condo since the closet in his nursery served as my husband’s main closet.  I used a lot of baskets to divide his clothes by size and type and stored them on a bookshelf.  While that system worked well, I really like having everything organized and hanging in a closet this time around.  It’s much easier to visualize what I have by size with everything in sight.  I still need to do a little more organizing once I move the dresser and changing table into this room, but it’s come a long way from the catch-all closet it used to be.

Baby Nursery Closet

Have you ever seen an idea on Etsy or a retail store that you decided to make yourself?

sister m signature


Filed Under: Crafting & DIY, M's post Tagged With: baby, baby #2, baby closet dividers, baby clothes, baby's nursery, closet organization, DIY projects, etsy, getting organized, getting ready for baby, nesting, nursery, nursery storage, preparing for baby

Easy Easter Place Cards

Posted by 2 Sisters 2 Cities on March 29, 2013

Easy Easter Place Cards {from 2 Sisters 2 Cities}

Since we have been on such an Easter recipe kick this week, I also wanted to share a quick little Easter-related DIY project.  I got the idea for these Easter place cards from a book my mom gave to me for my birthday.  I read about Craft-A-Day: 365 Simple Homemade Projects on another blog and added it to my Amazon wish list.  It has so many cute and easy projects in it and I love flipping through it for ideas.

The Craft-A-Day book did not have a specific project for Easter place cards, but I modified a couple of their egg and bunny-themed projects.  This place cards would be a lot of fun to make with kids!  Also, the first person to name the television show that I got all these names from is our official 2 Sisters 2 Cities’ reader of the month :)

The only supplies you need to make these Easter place cards are white and pastel-colored card stock, scissors, double-sided tape or glue, and colorful gel pens.  A circle and oval stencil could come in handy, but it’s not necessarily needed.

To make the egg place cards, you just need to cut out egg shapes from various shades of paper.  It helps to have a template version on the egg so that you can use it to trace all the other eggs so they are a uniform shape and size.  Then, cut one of the eggs in half and cut a strip from the middle of another egg.  Tape or glue these two pieces onto a full egg to create three colorful parts.  Then, tape the egg onto a folded place card and write in the guest name.

paper eggs place cards

Alternatively, you could just wrap one full egg in various colors of washi tape:

washi tape egg place cards

I also couldn’t resist making a couple fun-loving bunnies for my Easter table.  To make these, I just cut small  circles out of white card stock.  I then cut out a pair of ears using the white and the “inner ears” using a shade of pink.  I snipped off a corner of the pink paper for the bunny’s nose.  I used double-sided tape to attach the bunny face, ears, and nose to a pink-colored place card.  Then, use a black gel pen to draw in the bunny’s eyes, mouth, and whiskers.  Finally, use a fun colored pen add the guest name to the place card.

easter bunny place cards

Happy Easter everyone!  I’m off to go stock up on liquor for my guests…

 sister m signature


Filed Under: Crafting & DIY Tagged With: easter crafts, easter DIY projects, easter name cards, easter place cards, easter table, name cards, paper crafts, place cards

DIY Hair Ties and a Giveaway

Posted by 2 Sisters 2 Cities on January 7, 2013

DIY Hair Ties from 2 Sisters 2 Cities

I’ve recently started using hair ties made out of fold over elastic and I wanted to start expanding my color and style selection.  These hair bands are available for sale at a ton of Etsy shops and even some of the larger retailers, such as Anthropologie and Birchbox.  I realized that this would be a relatively simple DIY project to make myself since the fold over elastic used to make the hair ties is also available for sale on-line and costs as little as 50 cents a yard.  I ended up putting in an order at Sunshine Shoppe Supply for a variety of colors and styles of fold over elastic.  I brought the elastics to my parent’s house while we were visiting for Christmas so my sisters and I could all make some DIY hair ties.

old over elastic for DIY hair ties

We grabbed as many pairs of scissors that we could find and started to make a plethora of hair ties.  I found it helpful to have a template elastic for each of the different types of elastics we had- 5/8th” regular fold over elastic, 3/8″ glitter elastic, 5/8th” glitter elastic, and 5/8″ velvet elastic.  The glitter and velvet elastics needed to be slightly longer to comfortably fit around my wrist since they have a little less stretch to them.  Once we got the sizing correct, we were off to the races!

diy hair bands on wrist

To make the DIY hair ties, we just used the template elastic we had measured out to cut a piece of elastic.  Then, we simply knotted the two ends together and pulled the knot tight.  We then finished off the ends by cutting it at a diagonal or with two points (see the photo below for details.)

DIY Hair Ties: straight angle cut vs two points

These hair bands would make such cute gifts wrapped up in little plastic bags or around a piece of thick card stock.

How to wrap up DIY hair ties for gifts

The four of us had a great time making these hair ties and we now each have a huge supply of them to last us each a long time.  We’ve teamed up with Sunshine Shoppe Supply so our 2S2C readers can make their own DIY hair ties as well!  Enter below to win a $20 gift card to Sunshine Shoppe Supply (that will buy you enough elastic to make hair ties for yourself, all your friends, and then some!)  However, even if you don’t win this giveaway, everyone is a winner with this special 2 Sisters 2 Cities promotion code: just use code sisterblog10 by 1/31/13 to get 10% off your order at Sunshine Shoppe Supply!

a Rafflecopter giveaway

The Rules:   No entries will be accepted after January 15th, 2013 at 12:00 am, EST.  Entries that do not follow the entry requirements will not be considered.  One winner will be chosen at random and will be announced on January 16th, 2013.  The chosen winners will then have 30 days to respond by e-mail to claim their prize.  Please note that Sunshine Shoppe Supply is sponsoring this giveaway.  Void where prohibited.

sister m signature


Filed Under: Crafting & DIY, Giveaway Tagged With: DIY, diy hair ties, fold over elastic, giveaway, hair ties

Christmas Mantel Guest Post at My Way Home

Posted by 2 Sisters 2 Cities on December 7, 2012

DIY Christmas mantel

In addition to my blue and silver holiday wreath that I posted about yesterday, I also decided to incorporate this color palette to decorate my mantel for Christmas.  I have a few DIY projects that I made for the mantel being featured today on Wayfair’s blog, My Way Home.

DIY scalloped felt trees

The first thing I made for my Christmas mantel were these felt scalloped trees inspired by ones I saw in the Land of Nod catalog.  They were really fun to make and are easily customizable with any color scheme you want to do with your holiday decor.  This could also be a great project to make with kids!

Banner reads All is Bright

The second project was the holiday banner mantel that read “All is Bright.”  I wanted to use a message that would remind myself to enjoy all the special moments of the holiday season.

I also made the wooden letters that spelled J-O-Y, the wreath, and the felt stockings.  The letters and the wreath all got hit with a couple applications of silver spray-paint.  I used the leftover felt from the scalloped trees to just cut out mini stockings to match the rest of the Christmas mantel.

To access my tutorials and more details on all these projects, check out my guest post at My Way Home.  I also got to pick five items from the Wayfair website to complement my post- I had so much fun picking them out.  I would love it if you could stop by and leave a comment with your thoughts on my post at My Way Home!

K and I will be back very shortly with our nice remaining Christmas cookies for our 12 days of Christmas Cookies series.  We have been busy baking away!  For our first three cookie recipes, see the links below:

Day 12: Twelve Oreo Truffles
Day 11: Eleven Mini Pecan Pie Bites
Day 10: Ten Crisp Toffee Chocolate Bars

sister m signature


Filed Under: Crafting & DIY, Design & Decorating, Guest Bloggers Tagged With: all is bright, blue, christmas, Christmas DIY, Christmas mantel, DIY, diy project, felt scalloped trees, gray, guest post, holiday banner, holiday banner mantel, holiday mantel, Land of Nod, My Way Home, silver, silver wreath, wayfair

Happy Halloween & Mickey Mouse Costume Reveal

Posted by 2 Sisters 2 Cities on October 31, 2012

pumpkin patch

Happy Halloween everyone!  Is anyone else in shock that it is the last day of October?  We ended up pretty much unscathed from Hurricane Sandy.  One of our Japanese maples was uprooted and we lost power for a couple of hours, but pretty minor stuff compared to how others on the East Coast fared.  I hope everyone else out there that was affected by the storm is doing ok!

Since it’s now officially Halloween, I wanted to reveal baby T’s Mickey Mouse costume.  First, here’s a quick round-up of a few Halloween posts that we have done in the past.

Halloween round-up:

  • Scary Black Cat Cookies
  • Eery Half Moon Cookies
  • Boo-tiful Mini Pumpkin Muffins with Cream Cheese Frosting
  • Witch’s Cauldron Crockpot Cider with Mulling Spices
  • Spooky DIY Halloween Pennant Banner

Mickey Mouse Costume:

My son (who turns 2 in a couple of weeks) is pretty much obsessed with the tv show Mickey Mouse Clubhouse.  I decided a couple months ago to dress him up as Mickey Mouse for Halloween.  When I started looking for costumes on-line, I was unimpressed with the results so I decided to make the costume myself.  It was actually very simple to make and ended up costing less than $25.

DIY Mickey Mouse Costume

Materials Needed:

  • black Pants– $5.00
  • long-sleeved black t-shirt– $4.00
  • red shorts– $4.25
  • 2 large white  buttons- less than $2.00 at Michael’s
  • headband- 99 cents  in clearance box at Target
  • thick black pipe cleaner (also called chenille stem)- $2.99 at Michael’s
  • black and yellow felt- 29 cents a piece at Michael’s
  • needle and thread- already had
  • scissor- already had
  • glue gun- already had
  • safety pin- already had
  • black face paint- $4.99 at Michael’s (I know I could have gotten this cheaper somewhere else, but I was running short on time and picked up a set here)
Directions:
Use needle and thread to attach 2 large white buttons to the front of the red shorts.  Cut the chenille stem in half and attach one half to the red shorts with a safety pin.  Use the other half of the chenille stem and cut two small pieces out of (long enough to shape two circle ears out of).  Twist both pieces into circles and attach to headband.  Cut out 4 black circles from the felt and use the glue gun to attach to the circular chenille stems on the headband.  Next, cut a two half-circles and 2 small rectangles from the yellow felt.  Put one half-circle on top of a sneaker and wrap the rectangle piece around the bottom of the sneaker.  Use a glue fun to attach the two pieces so it is a snug fit to the shoe (be careful not to glue the felt directly to the shoe however.)  Repeat for the other shoe.
When it’s costume time, put on black pants and black long-sleeved t-shirt.  Put red shorts on over the pants.  Put on “yellow” shoes and Mickey Mouse ears.  Dab a bit of black face paint on nose and start doing the Hot Dog dance!

Here’s T getting ready to go trick-or-treating!

mickey mouse costume

Hope you have a great Halloween!

sister m signature


Filed Under: Crafting & DIY, Party Ideas Tagged With: diy costume, halloween, halloween diy projects, halloween recipes, mickey mouse clubhouse, mickey mouse costume

DIY Halloween Pennant Banner

Posted by 2 Sisters 2 Cities on October 26, 2012

Halloween Pennant Banner DIY Tutorial

I realized the other day that we have hardly any Halloween decorations in our house besides our cheapo plastic pumpkin that holds candy.  I didn’t want to spend too much money considering Halloween is only five days away so I decided to just focus on sprucing up our fireplace mantle.  The Halloween pennant banner is really easy to make and I’ve got a free printable below so you can use the same spooky letters if you want.

Halloween decorations

I picked up a few other decorations for the mantel earlier today.  The glittery pumpkins were 50 cents a piece at Michael’s.  I found the owl at Marshall’s for less than $10.  My husband and baby T and always complaining that an owl outside keeps them up at night so I thought he would fit in perfectly to our Halloween display.  I bought the baby pumpkin a few weeks ago. All the other pumpkins I bought  at the time have since rotted so we need to pick up a few more this weekend for carving.

Halloween Pennant Banner Tutorial

Materials Needed:

  • Orange, black, and white cardstock
  • A few yards of rickrack or another type of string/ribbon
  • Double-sided tape
  • Masking Tape
  • Large scallop punch (this step is optional if you don’t have one)
  • Ruler
  • Scissors
  • Pencil
  • Halloween candy to munch on

Directions:

Use a ruler to make a template for the pennant flags.  Mine measured out 6 inches on the short side and 9.5 inches on the two long sides.  Sketch out the measurements with a pencil and use scissors to cut out the flag.  Use this flag to trace 13 additional flags alternating the paper color if desired.  Cut out the rest of the flags.

Use a scallop punch to make 14 scalloped circles (Alternative idea: if you don’t have a scallop punch, you could use a can to trace a large circle.)  Print out the font templates below if you want to use the same message and font on my banner.  (For Macs: Save the two jpeg files and open it in Preview to print.)  If you want to create your own message or use a different type of font, I highly recommend checking out picmonkey.com.  They have a lot of different Halloween fonts right now as well.  Trace a small circle (I used a small can) over each letter and cut out the 12 letters.

templates for the letters T-R-I-C-K-O Template for the letters T-R-E-A-T-R

Use double-sided tape to attach the scalloped circle and font circle onto the pennant flag.  Lay out the rickrack and tape the flags to the rickrack using masking tape.  Hang the Halloween pennant banner on your mantel, step back, and admire!

sister m signature


Filed Under: Crafting & DIY, Design & Decorating Tagged With: DIY, diy project, diy tutorial, halloween, halloween pennant, mantel, mantel decorations, pennant, pennant banner

Rolling Storage Crate DIY Tutorial

Posted by 2 Sisters 2 Cities on October 16, 2012

rolling storage cart do-it-yourself tutorial

One of my favorite retailers, Serena & Lily, is selling these adorable vintage-looking rolling storage crates in their baby section.  I fell in love with the little carts.  I realized I already had unfinished crates very similar to the ones featured in the S&L catalog, as well as some ball bearing casters leftover from a previous project.  I decided to turn this into a little DIY project and made one for less than $15 since I had some of the materials on hand.  If you have none of the materials, it will cost you about $30 to make a rolling storage crate.

rolling storage crate

The rolling storage crate is perfect for storing the many books we have in our household.  My son loves pushing it from room to room.

rolling storage cart books

Alternatively, it also makes great toy storage bin as well.  Here is the cart filled with trucks, cars, trains, and plains:

rolling storage cart toys

Here are the materials I used on this project:

rolling storage crates materials

  • Unfinished wooden crate– approximately $9.99 (be sure to use a coupon if you buy it at Michaels)
  • 1/2 pint Old Masters Wiping stain (I used Early American 11716)
  • Four 1″ ball-bearing swivel casters
  • Letter stencils
  • Stencil paint
  • Stencil brush
  • Cloth or rag to apply wood stain
  • 8 small screws
  • Drill
  • Screwdriver

I started off by applying the stencil to the crate.  I chose to write “Books,” but you can be more creative with your wording if you like (the Serena & Lily crates say Soft Drinks, Lemonade, Super Seven or White Star.)  I was going for a retro font from the Mad Men era, but I think the font ended up feeling a bit more old west saloon.  I still like how it turned out, but it wasn’t what I originally had in mind.

Once the stencil was dried, I applied a wood stain.  I used a cloth to apply it.  Since I wanted the rolling storage crate to have a distressed feel to it, I pretty much slapped the stain on and didn’t worry about making the coverage exactly even.

The wood stain took about 24 hours to dry.  I recommend putting it outside if it’s nice out or in a room you are not using- the fumes were a bit strong while it dried.  Once dry, I used a screwdriver to screw the ball-bearing swivel casters on.  Each caster had room for 4 screws, but I only used the two outer wholes (photo below.) If I used all four screws on each caster, the screws on the inside of the crate would poke through the bottom of the crate.  Since the casters are not being used to support a person’s body weight, I think two screws on each caster would be sufficient.  You could use a drill to put eight starter holes (two per each caster) in the crate, but I ended up putting the screws in with just a screwdriver.

wheel

I love how this DIY project turned out!  Have you ever been inspired by something you saw in a catalog and decided to make it yourself?


This post was shared at:

Today's Creative Blog

Related Posts Plugin for WordPress, Blogger...


Filed Under: Crafting & DIY Tagged With: baby storage, book storage, DIY, diy project, diy tutorial, nursery storage, rolling storage crate, serena & lily, storage crate, toy storage, vintage

  • 1
  • 2
  • 3
  • Next Page »

Recent Posts

  • Easy Holiday Office Party Tips
  • 5 Steps to an Easy Football Party
  • Gingerbread Biscotti
  • Holiday Coffee Bar and Thanksgiving Recipes
  • Soft Sugar Pumpkin Cookies
  • Cinnamon Sugar Apple Cake
  • Hello Pumpkin Season!
  • Make Your Own Milkshake Party!
  • Mama’s Pickles
  • S’more Cookies

Categories

  • About 2 Sisters 2 Cities (7)
  • Books (8)
  • Crafting & DIY (22)
  • Design & Decorating (15)
  • Gardening (5)
  • Giveaway (14)
  • Guest Bloggers (8)
  • K's post (46)
  • K's Recipes (191)
    • K's Desserts (75)
    • K's Entrees (23)
    • K's Sides (24)
  • M's post (72)
  • M's recipes (167)
    • M's Entrees (21)
    • M's Sides (14)
    • M's Desserts (30)
  • Organizing (7)
  • Party Ideas (49)
  • Uncategorized (1)
  • Vacation (12)
Stitch Fix

Archives

Blogroll

  • Annie's Eats
  • Bake at 350
  • Baked Bree
  • Boston Harbor Beacon
  • Confections of a Foodie Bride
  • Cook Like a Champion
  • Erin’s Food Files
  • Forever and a Recipe
  • Framed Cooks
  • Oh Happy Day
  • On Common Ground
  • Pennies on a Platter
  • Pink Parsley
  • Recipe Girl
  • Sally's Baking Addiction
  • Simply Scratch
  • The Curvy Carrot
  • The Pioneer Woman
  • Tidy Mom
  • Two Peas & Their Pod
  • What’s Gaby Cooking
  • Young House Love
Increase your website traffic with Attracta.com

grab a 2 sisters button!


Copyright © 2014 ~ 2 Sisters 2 Cities | Blog Design by Minx Design