2 Sisters 2 Cities

Image Map
  • About 2 Sisters 2 Cities
  • Recipe Index
  • Project Index
  • Contact Us
  • Like us on Facebook
  • Follow m on twitter
  • Follow k on twitter
  • Follow 2S2C on Pinterest
  • Follow 2S2C on G+
  • rss
  • e-mail 2S2C

Mama’s Pickles

Posted by Meaghan Barry on July 24, 2014

Mama's Pickles

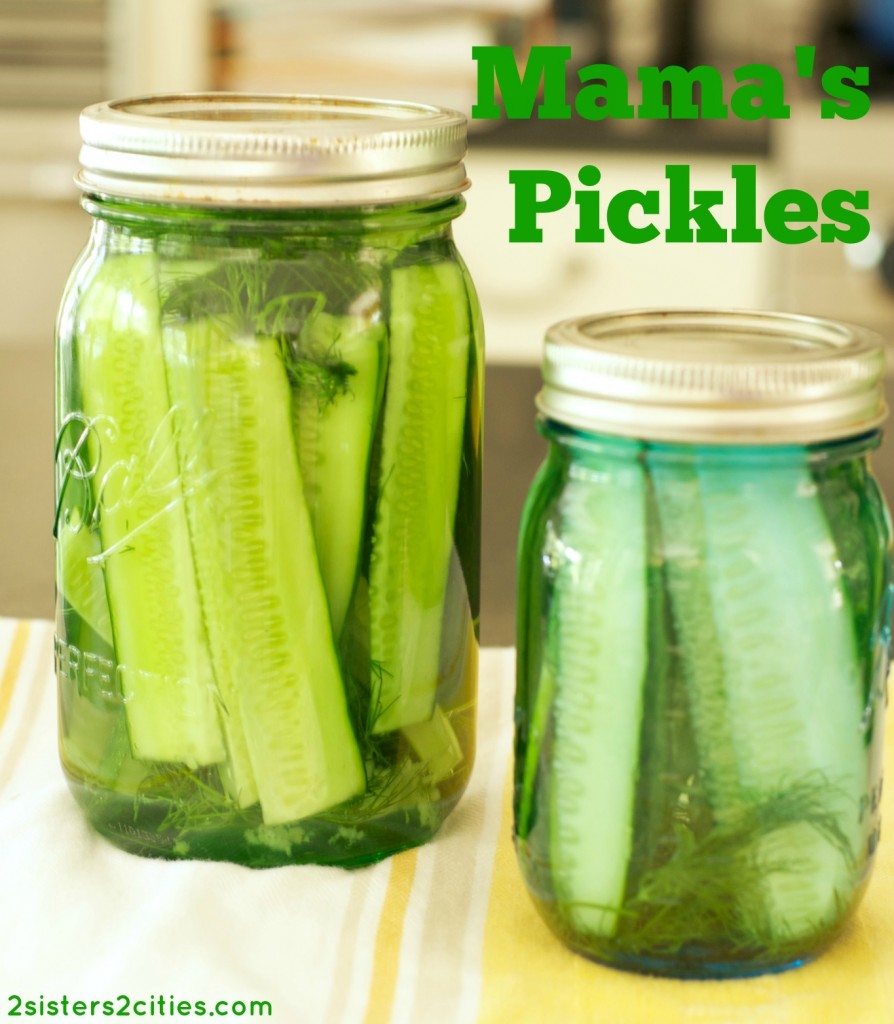
T is the kind of 3-year old who loves pickles.  He’s the kid who requests them for breakfast, lunch, snack, or dinner.  He’s the kid at the summer cookout who will be holding a pickle in one hand and a chocolate chip cookie in the other.  When I made my own pickles for the first time last summer, T was elated and started to refer to them as “Mama’s Pickles.”  The name stuck in our house and homemade dill pickles henceforth were known simply as Mama’s Pickles.

garden

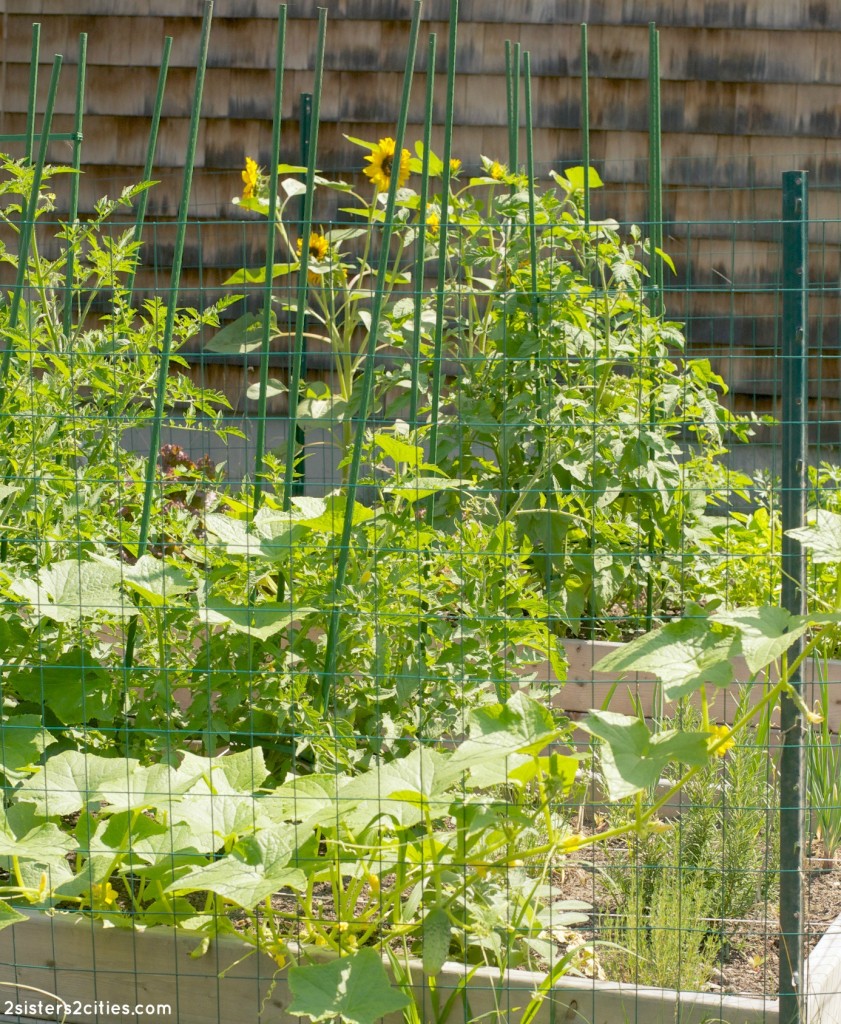
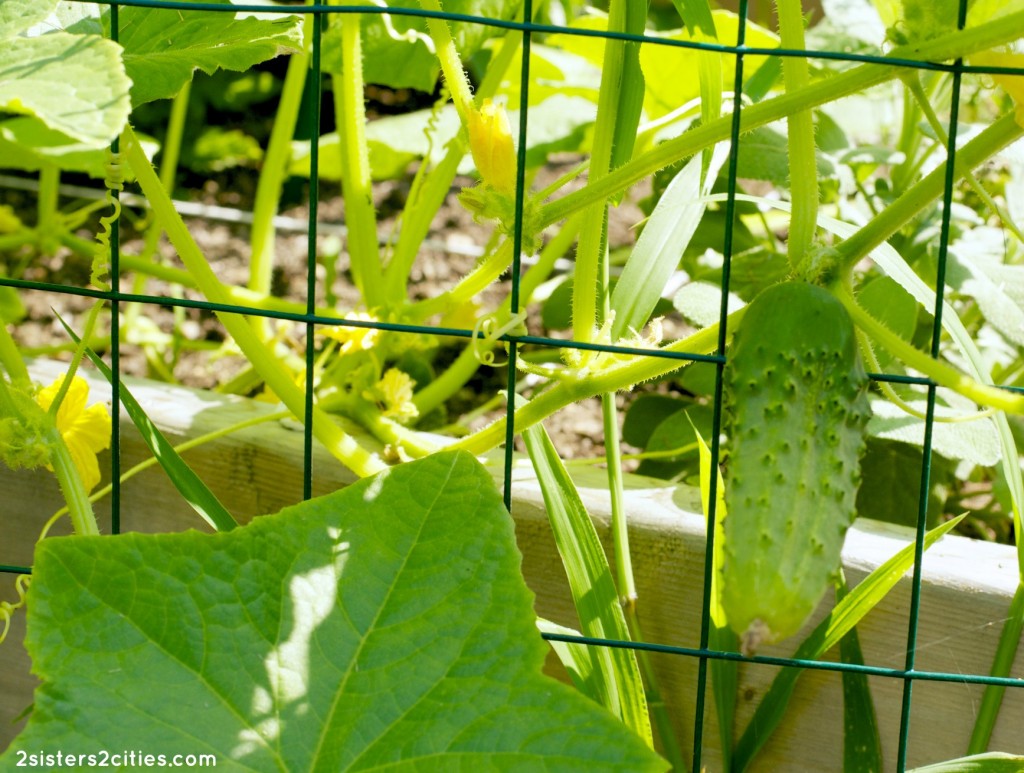
One of the vegetables that I have planted in my garden this summer are pickling cucumbers (in addition to Marketmore cucumbers.)  The cucumbers have really taken off and are climbing all over my garden fence and the other plants.  I’ve already harvested quite a few of them so I knew it was time to make my first batch of Mama’s Pickles for the season, this time with my own homegrown pickling cucumbers!

Cucumber_plant

This recipe is very flexible and you can cut the cucumbers whichever way you see fit (spears, slices, whole, etc.)  T prefers “stick pickles”…his terms for pickle spears, so that is how I cut them for this first batch.  Feel free to halve this recipe or double as you see fit.
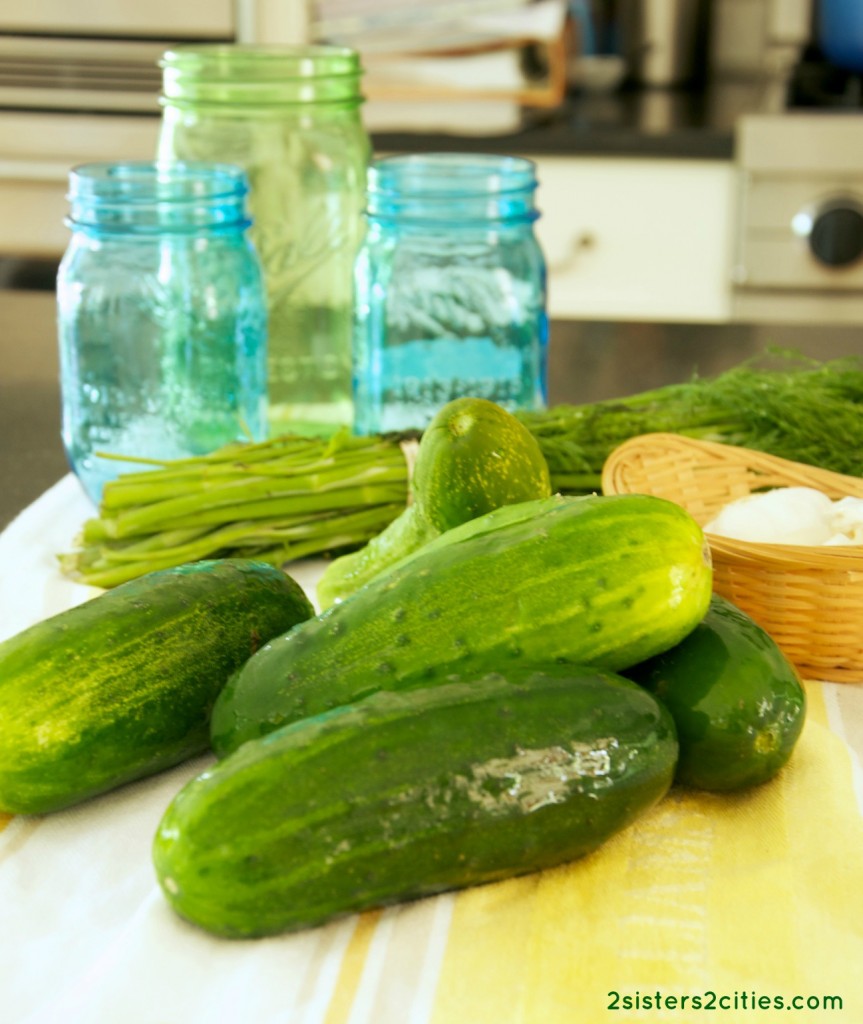
pickle ingredients

prepping pickles

Print
Mama's Pickles
Author: 2 Sisters 2 Cities
Prep time:  48 hours 10 mins
Total time:  48 hours 10 mins
 
Ingredients
  • 1 bunch fresh dill
  • 6 cloves garlic, peeled and pressed
  • 6-8 pickling cucumbers, washed and ends cuts off
  • 6 cups water
  • ¾ cup distilled white vinegar
  • 6 tablespoons kosher salt
Instructions
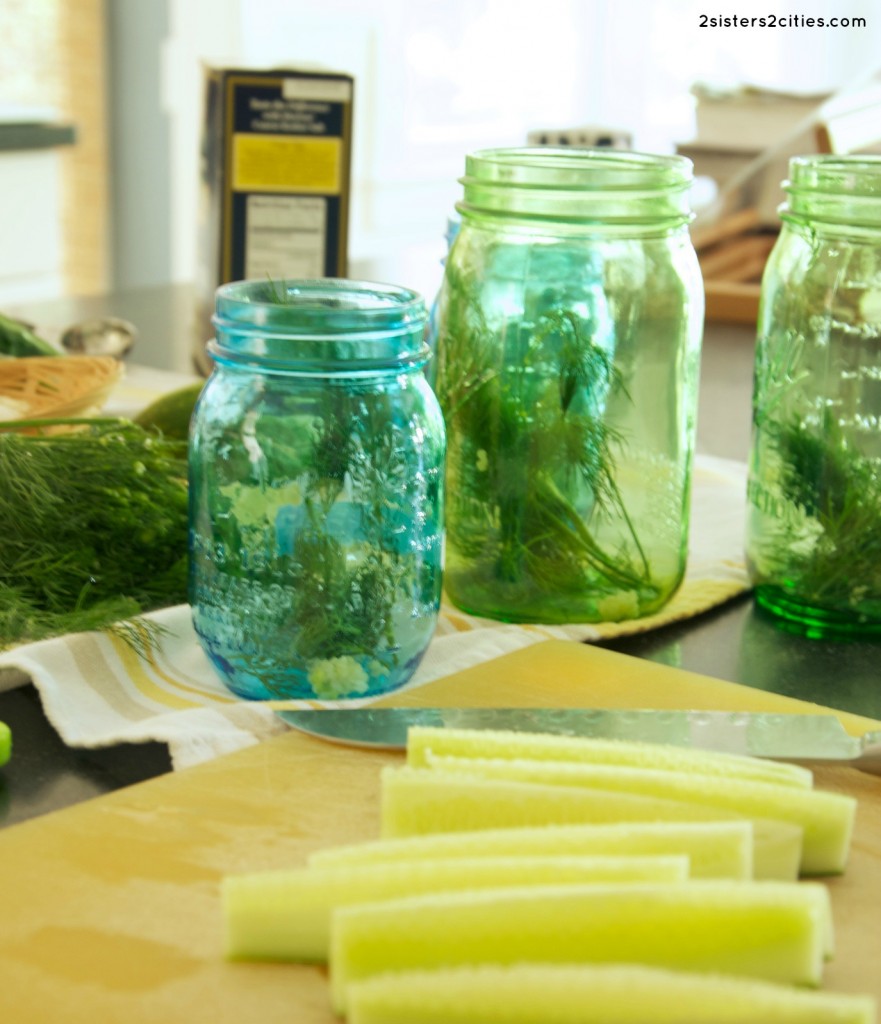
  1. Gather three to four clean mason jars and put a couple sprigs of the dill and some of the pressed garlic on the bottom of each jar. Next, slice the cucumbers up into spears, slices, or keep them whole depending upon your pickling preference. Place the cucumbers into the mason jars.
  2. In a large bowl with a spout or measuring cup, mix together the water, vinegar, and salt. Stir until the salt is fully dissolved. Pour the vinegar mixture into each mason jar until it fully covers the cucumbers. Place a few more sprigs of dill and more of the pressed garlic on top (if desired.) Screw on mason jar covers.
  3. Refrigerate for at least 2 days. Then, enjoy for breakfast, lunch, or dinner if you have the same love of pickles as my little guy!
3.2.2499

Source: Slightly adapted from Annie’s Eats

sister m signature


Filed Under: M's Sides, M's recipes Tagged With: cookout, cookout recipes, cucumbers, gardening, homemade, pickles, pickling cucumbers, summer, summer recipe, vegetable garden

Greek Quinoa Salad

Posted by Meaghan Barry on May 9, 2014

Greek Quinoa Salad

I have to admit that I have had a hard time getting on the quinoa bandwagon.  I think the issue was that I was eating it plain and only seasoned with salt and pepper…boring, bland, blah!  I’ve recently come to the realization that quinoa is much better when you incorporate it with lots of fresh, flavorful ingredients.

With all the recent reports about the high amounts of arsenic in rice, I’ve been attempting to keep our family’s rice intake to a minimum.  Quinoa is certainly a great substitute because it is a great source of protein, iron, and fiber.  Quinoa is also a great sub for pasta as well.

I was originally planning on making a greek orzo salad to go along with Giada’s Tzatziki Salmon recipe last night.  I realized that I had no orzo in the pantry and thought it would the perfect opportunity to sub in some quinoa.  I found a Bobby Flay recipe for Greek Quinoa Salad and adjusted it a bit to my preferences.  I was so pleased with the results!  I think this greek quinoa salad will definitely be making it’s way into our side dish rotation.  I’m so psyched to finally say bring on the quinoa!

Greek Quinoa Salad

Print
Greek Quinoa Salad
Author: 2 Sisters 2 Cities
Recipe type: salad
Cuisine: Greek
Prep time:  75 mins
Cook time:  15 mins
Total time:  1 hour 30 mins
Serves: 4-6
 
Skip the rice or pasta and try quinoa for a healthy, but delicious substitute!
Ingredients
  • 3 tablespoons lemon juice
  • 1 tablespoon red wine vinegar
  • ¼ teaspoon dried oregano
  • 1 clove garlic, pressed
  • Kosher salt and freshly ground black pepper (to taste)
  • ¼ cup extra-virgin olive oil
  • 1 cup quinoa, rinsed and cooked according to the package
  • ½ hothouse cucumber, peeled and diced
  • 1 cup cherry tomatoes, cut in half
  • 1 cup kalamata olives, cut in half or kept whole (whatever is your preference)
  • ½ cup crumbled feta (or use more or less based on your preference)
  • 2 green onions (green parts only), sliced
  • 2 tablespoons chopped parsley
Instructions
  1. Cook the quinoa according to the package's directions. Once cooked, place quinoa in a medium-sized serving bowl and allow to cool.
  2. Meanwhile, start to make the Greek dressing. In a small bowl, whisk together the lemon juice, red wine vinegar, dried oregano, garlic, salt, and pepper. Slowly add in the olive oil and whisk together at the same time so that it emulsifies.
  3. Add the dressing to the cooled quinoa and mix until incorporated. Add in the cucumber, tomatoes, olives, feta, green onions, and parsley and continue to stir until all the ingredients are evenly distributed. Cover with plastic wrap and store in the refrigerator for at least one hour before serving
3.2.2499


Source: Adapated from Bobby Flay

sister m signature


Filed Under: M's Sides, M's recipes Tagged With: greek quinoa salad, greek recipe, quinoa, quinoa salad, salad recipe, side dish

Chorizo Cornbread Stuffing

Posted by Meaghan Barry on November 26, 2013

Chorizo Cornbread Stuffing

I know K has already touched on this, but seriously, how is it already late November already?  I am really trying to enjoy Thanksgiving as it’s own holiday, but with December 1st right around the corner, it’s hard not to start thinking about Christmas. But first, we must keep our focus on a truly great holiday- Thanksgiving.  And I have a truly special dish to commemorate this holiday, Chorizo Cornbread Stuffing.

While I always enjoy a serving of regular stuffing on Thanksgiving, I think I could enjoy this chorizo cornbread version year-round.  A local restaurant has a version of this recipe on it’s menu and my husband and I order it as a side dish every time we go.  I was so pleased that I was able to recreate a very similar version in my own kitchen!

If you are looking to mix it up with some non-traditional Thanksgiving recipes this year, I highly recommend making this version.  Or, if you wanted to go all out for the stuffing lovers out there, you could make traditional stuffing and Chorizo Cornbread Stuffing…just let me know what time to stop by!

Print
Chorizo Cornbread Stuffing
Prep time:  20 mins
Cook time:  35 mins
Total time:  55 mins
 
Ingredients
  • 1 tablespoon olive oil
  • 6 oz. dried Spanish chorizo (I used a smoked version), cut into small cubes
  • 1 medium white onion, chopped
  • 1 medium carrot, peeled and finely chopped
  • 1 celery stalk, finely chopped
  • 3 garlic cloves, pressed or minced
  • 3 cups cornbread, cut into cubes (you can buy it from pre-made or try this recipe for cornbread)
  • ¼ cup parsley, chopped (plus more for garnish if desired)
  • cooking spray
  • ¼ cup parsley, chopped
  • ½ cup low-sodium chicken broth or stock
Instructions
  1. Preheat the oven to 350 degrees F.
  2. Heat a large skillet on medium heat and heat the olive oil. Once hot, sauté the chopped chorizo for a few minutes. Add the onion, carrot, celery, and garlic and cook until the vegetables start to brown (8-10 minutes.) Add the cut-up cornbread pieces and chopped parsley (reserving some for garnish if you like.) Stir well to combine. Stir in ½ cup of chicken broth (add more if the stuffing appears too dry.)
  3. Meanwhile, use the cooking spray to prepare a medium-sized casserole dish. Add the stuffing to the dish and bake for about 20 minutes (look for it to be lightly golden on top.) Garnish with additional parsley before serving.
3.2.2124

Source: Adapted from Aaron Sanchez for Food Network Magazine

 sister m signature


Filed Under: M's Sides, M's recipes Tagged With: chorizo, corn bread, holiday recipes, side dish, stuffing, Thanksgiving, thanksgiving menu, thanksgiving recipe, thanksgiving sides

Caprese Pasta Salad

Posted by Meaghan Barry on July 17, 2013

caprese pasta salad

I’ve been too caught up in newborn/toddlerland to post for the past few weeks, but I’ve finally decided to hop back on the blogging train.  I haven’t been cooking too much lately as we’ve also been fortunate to have had a lot of meals brought to us each evening.  Baby N is pretty relaxed during the day, but things get a bit chaotic around dinnertime each night with him and T.  Yesterday, I had big plans to make this caprese pasta salad right after lunch today while both boys were sleeping.  However, T fought his nap big time, N woke up earlier than expected, and I spent any downtime I had trying to make our house look a little less like a scene from Hoarders.

I finally got a chance to start making this caprese pasta salad around 5 last night, but didn’t get a chance to start taking photos until 7 and I was losing natural light fast.  Baby N was a bit fussy so I had him in the Moby wrap while I was photographing.  Hence, these are not the most stylized or perfectly lit/focused photos.  But, I promise what my photos lack, this recipe makes up for in taste!

caprese pasta salad

This recipe combines two of my favorite types of summer salads: a good pasta salad made with fusilli and a caprese salad.  I love the bright flavor that the white balsamic vinegar brings to this recipe as well.  While I was making it, I was a bit concerned about using a half a cup of vinegar, but I think this is the ingredient that really makes this recipe shine.  This caprese pasta salad would be a delicious summer dish on its own or served on a side with a piece of grilled chicken or steak.

Print
Caprese Pasta Salad
Prep time:  15 mins
Cook time:  10 mins
Total time:  25 mins
 
Ingredients
  • 4 cups fresh basil leaves
  • 1 pound fusilli pasta
  • ½ cup white balsamic vinegar
  • 1 teaspoon sea salt
  • ¼ teaspoon red pepper flakes
  • ¼ teaspoon freshly ground black pepper
  • ½ cup good quality extra virgin olive oil
  • 8 ounces fresh mozzarella, chopped into bite size pieces (you could also use small mozzarella balls)
  • 1 pint cherry tomatoes, halved or 2 medium heirloom tomatoes, chopped (I used a combination of the two)
  • 2 tablespoons capers, drained
Instructions
  1. Bring a large pot of salted water to a boil and prepare an ice bath in a separate bowl Once water is boiling, blanche basil leaves for 30 seconds. Once they turn bright green, use a slotted spoon to add them to the ice bath. Drain well, squeezing out any excess liquid. Add basil to the bowl of a food processor.
  2. Using the same pot of boiling water, cook pasta according to package directions until al dente. Drain pasta and rinse with cold water until cool. Add drained pasta to a large bowl.
  3. Meanwhile, in the food processor, add the vinegar, salt, red pepper flakes, and pepper to the basil. Process for a few seconds. Continue to process and drizzle in the olive oil slowly through the top of the food processor until fully combined.
  4. Pour dressing over the top of the pasta. Add mozzarella, tomatoes, and capers. Stir together all ingredients until fully combines. Can be served immediately or refrigerated for up to 3 days.
3.2.1753

 Source: Slightly adapted from Love and Olive Oil

sister m signature


P.S. Happy, happy birthday to my favorite co‐blogger of all time!  That glass of rosé is for you!


Filed Under: M's Sides, M's recipes Tagged With: caprese pasta salad, caprese salad, cookout, cookout recipes, heirloom tomato recipes, heirloom tomatoes, mozzarella, pasta salad, summer recipes, tomato recipes, tomatos

Herbed Potato Salad

Posted by Meaghan Barry on June 19, 2013

 Herbed Potato Salad (from 2 Sisters 2 Cities)

I recently came across this recipe for Herbed Potato Salad in a recent copy of Better Homes & Gardens.  While I am not one to be craving potato salad on a daily basis, I certainly appreciate it’s place as a summer side whenever we make grilled chicken, hot dogs, or hamburgers.  I tend to associate potato salad with tons of creamy mayonnaise.  I was very surprised how much delicious flavor this recipe had considering the relatively small amount of mayonnaise and sour cream it used.  I have definitely been eating it by the spoonful before the serving bowl even hits the dinner table.

Another thing I really like about this recipe is that the method for steaming the potatoes is pretty much foolproof.  I am a chronic potato under‐cookerer (yes spellcheck, I realize cookerer is not a word, but it should be.)  Nothing is worse than biting into a rock hard potato center…yuck!  However, they have come out perfectly done every time using this steaming method.

Bowl of Herbed Potato Salad

I have already made this Herbed Potato Salad several times this spring and I’m sure it will be making it’s way to our dinner table many more times this summer.  It’s tastes even better the next day (that is, if there is any leftover!)  I also love that it uses a relatively small amount of fresh herbs so that I can use my container garden supply.  I’m certainly not yielding any pesto‐sized crops yet so it’s nice to be able to use my my own herbs in recipes that call for a scant amount.

Print
Herbed Potato Salad
Prep time:  10 mins
Cook time:  20 mins
Total time:  30 mins
 
Ingredients
  • 3 pounds small red potatoes, washed, unpeeled, and cut into 1‐inch pieces
  • 3 tablespoons extra‐virgin olive oil
  • 2 tablespoons cider vinegar
  • 1‐2 tablespoon(s) fresh herbs (I have been using a combination of chives, thyme, and oregano)
  • 2 tablespoons sour cream
  • 2 tablespoons mayonnaise (regular or light)
  • 2 teaspoons Dijon mustard
  • 1 teaspoon kosher salt
  • ½ teaspoon freshly ground black pepper
  • ¼ teaspoon celery seed
Instructions
  1. To prepare potatoes, boil a large pot of water and place a steamer basket just above the water line. Once the water is simmering, add the potatoes to basket. Reduce the heat to medium and cover the pot. Allow potatoes to steam for 18‐20 minutes or until cooked thoroughly. Remove the pot from the heat and allow to cool down a bit.
  2. In a large bowl, whisk together remaining ingredients. Add the cooled potatoes and stir to combine. You can serve immediately or place in the fridge to be served at a later time.
3.2.1753

Source: Adapted from Better Homes and Gardens, June 2013


Filed Under: M's Sides, M's recipes Tagged With: bbq, bbq sides, cookout recipes, fourth of july recipes, memorial day recipes, potato salad, potatoes, summer, summer recipes

Perfect Corn Muffins

Posted by 2 Sisters 2 Cities on January 8, 2013

Perfect Corn Muffins from 2 Sisters 2 Cities

My sisters will probably laugh at this post about corn muffins given my record with making them.  Back about five years ago,  my sisters were visiting me in Boston and I made a batch of cornbread to go with whatever dinner we were having.  I decided to make a batch from scratch and apparently used corn starch instead of corn meal.  Let’s just say the consistency was really, really bad.  They have not let me live down the cornbread debacle, but I think the joke is sorta on them considering they actually ate the corn starch corn bread!

Making Corn Muffins

I’ve now found a sure fire recipe for corn muffins and I even use the right ingredients now!  I have another recipe that I am planning on sharing tomorrow that goes perfectly with these muffins.

Corn Muffins from 2 Sisters 2 Cities

Print
Perfect Corn Muffins
Author: 2 Sisters 2 Cities
Prep time:  10 mins
Cook time:  18 mins
Total time:  28 mins
 
Ingredients
  • 1 and ¼ cups yellow cornmeal
  • 1 and ¼ cups all-purpose flour
  • ⅓ cup sugar
  • 1 tablespoon baking powder
  • 1 teaspoon salt
  • 2 large eggs, lightly beaten
  • 1 and ½ cups milk
  • ¾ cup unsalted butter (1 and ½ sticks), melted and allowed to slightly cool
Instructions
  1. Preheat the oven to 350 degrees F.
  2. Prep muffin pan with 12 baking cups.
  3. In a large bowl, mix together the cornmeal, flour, sugar, baking powder, and salt. In a separate bowl, combine the eggs, milk, and butter. Make a well in the center of the dry ingredients and stir in the liquid. Stir until combined, but try not to overmix the batter (it may still be slightly lumpy.)
  4. Fill the 12 muffins cups about ¾th full. Bake for 18-20 minutes until lightly golden and a toothpicks comes out clean when inserted into the center of a muffin.
3.2.1336

Source: Recipe from The Magnolia Bakery Cookbook

Have you ever made a cooking blunder that your family won’t let you live down?  I would love to hear your story!

sister m signature


Filed Under: M's Sides, M's recipes Tagged With: cooking disasters, corn bread, corn muffins, muffin recipe, muffins

Garlic Rice Pilaf

Posted by 2 Sisters 2 Cities on October 12, 2012

I wanted to share with you the best recipe for rice ever.  Not that I have too many recipes for rice…  I usually just cook plain white, basmati, or jasmine rice and throw in some fresh herbs or scallions.  When I make rice pilaf, I always made the box mix.  However, after making this garlic rice pilaf recipe, it will be very hard to return to the pilaf box mix.

Even the cow likes this recipe!

It’s kind of a lot of steps, considering that’s it rice.  It takes a long time to make as well.  I would not go starting this recipe at 7pm and hope to eat at a reasonable hour.  If I have the time to make it, I make a double-batch of the garlic rice pilaf so we can reheat it as a side dish throughout the week.  It especially makes a great side dish for chicken recipes.  Anyway, if you are a pilaf lover, I really think you should consider making this recipe.  You won’t be sorry!

Print
Garlic Rice Pilaf
Author: 2 Sisters 2 Cities
Recipe type: Side Dish
Prep time:  5 mins
Cook time:  75 mins
Total time:  1 hour 20 mins
Serves: 4
 
Ingredients
  • 2 tbsp. butter
  • 3 cloves garlic, pressed
  • 1 cup long-grain white rice
  • 2½ cups chicken broth, divided
  • ½ tsp. salt
  • ½ tsp. pepper
Instructions
  1. Preheat the oven to 375° F. In a small saucepan, melt the butter over medium-high heat. Add the garlic and rice to the pan and cook until both are golden brown, usually about 3-4 minutes. Stir in 1 cup of the chicken broth, salt, and pepper and bring to a boil. Pour the rice mixture into the casserole dish, cover, and bake for 25 minutes. Stir in the remaining 1½ cups chicken broth and bake, covered, for another 45 minutes.
3.2.1336

Source: Slightly adapted from Annie’s Eats

Do you eat rice as a side dish with dinner?  What is your usual way to prepare it?


Filed Under: M's Sides, M's recipes Tagged With: garlic, garlic recipe, garlic rice pilaf, Rice, rice pilaf, rice recipe, side dish

Caprese Salad- The Taste of Summer

Posted by 2 Sisters 2 Cities on August 20, 2012

For the past couple of weeks, I have had a huge overflowing vase of fresh basil and a large basket of heirloom tomatoes on my kitchen counter.  This point of summer is culinary heaven!  One of my favorite ways to use up all those tomatoes and basil is to make a caprese salad.  It’s very simple to pull together and in my opinion, it is the perfect taste of summer.  My favorite way to prepare it is to get as many different color heirloom tomatoes as possible on the plate.

One of the things besides beautiful tomatoes that really makes caprese salad work is good-quality balsamic vinegar and extra-virgin olive oil.  Two brands that I have really liked is the Kirkland Signature Balsamic Vinegar of Modena (available at Costco) and the Paesano Extra-Virgin Olive Oil (available at Whole Foods.) While there are certainly higher quality balsamic vinegars and olive oils out there, I think both types I listed are a very good value for their quality.

One day, I would  love to make homemade fresh mozzarella as well, but I may have to move that one to next summer’s bucket list.  Here’s to the last few weeks of summer!

Print
Caprese Salad
Author: m
Recipe type: Appetizer or Side Dish
Prep time:  5 mins
Total time:  5 mins
Serves: 4
 
The quintessential dish of summer!
Ingredients
  • 4-8 heirloom tomatoes (depending on size)
  • 1 fresh mozzarella ball, brought to room temperature
  • Balsamic vinegar (good-quality)
  • Extra-virgin olive oil (good-quality)
  • 4-6 basil leaves, cut chiffonade-style
  • Kosher salt
  • Freshly ground pepper
Instructions
  1. Wash and cut the tomatoes into thin slices. Arrange the tomatoes on a decorative serving platter. Slice the mozzarella ball into 6-8 large slices or into many small pieces depending on your preference. Drizzle on the balsamic vinegar and extra-virgin olive oil (I generally prefer a 1:2 ratio of vinegar to olive oil.) Sprinkle cut basil leaves on top and season with salt and pepper.
2.2.8


Filed Under: M's Sides, M's recipes Tagged With: basil, caprese salad, heirloom tomato recipe, heirloom tomatoes, mozzarella, summer appetizer, summer dish, summer produce, summer salad

Greek Pasta Salad

Posted by 2 Sisters 2 Cities on June 21, 2012

Greek Pasta Salad from 2 Sisters 2 Cities

It’s now officially summer! And it has come in with a bang in the Boston area- 98 degrees yesterday and it may hit 100 later today.  With such heat, we usually opt to grill outside as much as possible.  For Father’s Day on Sunday, I pulled together this simple Greek Pasta Salad with some ingredients I already had on hand.  I loved how it came together and it was the perfect accompaniment to our grilled steak tips, sausages, and zucchini.

I recommend making this Greek Pasta Salad early in the day while it’s cooler out and the flavors get a chance to meld together.  I also don’t add the tomatoes until I’m ready to serve the pasta salad as tomatoes lose a lot of their flavor if they are refrigerated.  If you don’t feel like dicing up olives or roasting a red pepper, be sure to check your supermarket antipasto bar- an olive tapenade or pre-made roasted red peppers will work in a pinch!

Print
Greek Pasta Salad
Author: m
Recipe type: Side dish
Prep time:  15 mins
Cook time:  15 mins
Total time:  30 mins
Serves: 12
 
The perfect pasta salad for a hot day
Ingredients
  • 16 oz box fusilli pasta
  • 1 red pepper, washed, trimmed, and cut in half
  • ½ cup olive oil (or more to taste)
  • ⅓ cup lemon juice
  • 2 tablespoons snipped fresh basil or 2 tsp. dried basil, crushed
  • 2 tablespoons snipped fresh oregano or 2 tsp. dried oregano, crushed
  • 1 tablespoon anchovy paste
  • 2 cloves garlic, crushed or minced
  • ¼ teaspoon salt
  • ¼ teaspoon ground black pepper
  • ½ cup kalamata olives, diced
  • ½ small red onion, diced
  • 1 cup feta cheese
  • 2 plum tomatoes, chopped
Instructions
  1. Cook pasta according to package directions. Drain in a colander and rinse with cold water until cool.
  2. Preheat oven to 400 degrees. Place red pepper halves on a baking sheet covered with foil. Bake for about 15 minutes until peel starts to blacken. Take baking sheet out of the oven and wrap pepper tightly with the aluminum foil it was baking on. Once it has cooled, remove peel and dice red pepper into small pieces.
  3. In a small bowl, whisk together the olive oil, lemon juice, basil, oregano, anchovy paste, garlic, salt, and pepper.
  4. In a large bowl toss together the cooked pasta, red pepper, olives, red onion, feta, and dressing. Cover and chill in refrigerator for as least 2 hours or up to 24 hours. To serve, add diced tomatoes; toss. Makes 12 to 16 side-dish servings.
2.2.7

What is your favorite dish to prepare when the temperatures are soaring?


Filed Under: M's Sides, M's recipes Tagged With: easy side dish, greek pasta salad, greek pasta salad recipe, grilling, pasta salad, side dish, summer meal, summer recipe

Domino Weeknight Dinner Party

Posted by 2 Sisters 2 Cities on April 29, 2012

Years ago, I had clipped an article from the now defunct Domino magazine detailing how to throw a weeknight dinner party.  Last night, I finally decided to use the menu from the article for a small dinner party we were having.  Granted, it was a weekend night, but it worked out for the best as I was a little short on time yesterday with a few other commitments we had during the day.  The article has a full timeline of how Nathan Turner goes from work at 5:00 pm to dinner on the table by 8:00 pm.  I find some of the details a little far-fetched considering he does not have any groceries, wine,  or flowers when he gets out of work, and still finds time to buy all this, re-arrange the flowers into a more aesthetically pleasing look, set the table, and oh yeah, prep and cook all the food.  However, it is a fairly simple menu to pull together for guests and I was pleased with the results.

The Menu:

Appetizers: Mixed olives, a cheese plate featuring 1 hard, 1 soft, and 1 semisoft cheese (I went with a brie, a Danish blue cheese, and an Irish cheddar), roasted red peppers, crackers, and  5-minute artisan bread

Dinner: Pesto-Crusted Rack of Lamb (recipe below), Potato and Leek Mini Gratins, and Roasted Tomato & Mixed Greens Salad

Dessert: Strawberry Rhubarb Slab  Pie – This was not on the original menu from the article, but I saw it in a recent cooking magazine and thought it looked really good (and it was!)  Stop back later this week on Fresh Produce Tuesday for the recipe…we are featuring Rhubarb recipes this week.

Print
Pesto-Crusted Rack of Lamb
Recipe type: Entree
Prep time:  5 mins
Cook time:  8 mins
Total time:  13 mins
Serves: 4
 
Ingredients
  • 2 racks of lamb, frenched and cut into individual chops
  • ½ cup pesto (you can buy store-bought or make your own)
  • 1 cup bread crumbs
  • cooking spray
Instructions
  1. Before the dinner party, spray a cookie sheet with cooking spray. Brush a small amount of pesto on each individual lamb chop. Pour the bread crumbs in a bowl and roll each chop in the bread crumbs. Cover with aluminum foil and put in the fridge.
  2. About 10 minutes before dinner, turn the broiler on high. Cook the chops under the broiler until a nice crust forms (about 4 minutes a side).
2.2.6

For the potato and leek mini gratins, just cut the white part of 2 leeks and 4-5 small, peeled potatoes into thin slices.  Pour a small amount of olive oil in each cup of a muffin tray and add a small amount of shredded gruyere cheese.  Add a layer of potato, then a layer of leeks, and more gruyere cheese.  Repeat these 3 ingredients until the cups are full.  Pour 2-3 tablespoons milk over each mini gratin.  Cover with foil and place in fridge until ready to make.  Bake at 375 degrees for 45 minutes, removing the foil halfway through.

To make the roasted tomato and mixed green salad, start by putting 1 pound of cherry tomatoes on a baking sheet and drizzle with extra virgin olive oil and season with salt and pepper.  Roast for 25 minutes at 375 degrees.  On a separate baking sheet, roast 1/4 cup of pine nuts for a few minutes until lightly toasted.  Once tomatoes are done, take the juices from the tomatoes and pour into a small bowl to make the dressing.  Put the tomatoes aside to cool.  Add 1 tablespoon white balsamic vinegar, 3 tablespoons good quality extra virgin olive oil, and a pinch of sugar and salt to the tomato juices in the bowl.  Whisk together.  Place mixed greens in a large salad bowl.  Right before dinner is served, add the roasted tomatoes, pine nuts, feta cheese, and dressing and mix the salad together.

Source: Adapted from Domino magazine, October 2008

What do you like to serve for an easy dinner party?


Related Posts Plugin for WordPress, Blogger...


Filed Under: M's Entrees, M's Sides, M's recipes Tagged With: dinner party in 3 hours, dinner party recipe ideas, domino magazine, nathan turner dinner party, pesto-crusted rack of lamb, potato and leek mini gratins, recipes from domino magazine, roasted tomato and mixed greens salad, weekend dinner party, weeknight dinner party

  • 1
  • 2
  • Next Page »

Recent Posts

  • Easy Holiday Office Party Tips
  • 5 Steps to an Easy Football Party
  • Gingerbread Biscotti
  • Holiday Coffee Bar and Thanksgiving Recipes
  • Soft Sugar Pumpkin Cookies
  • Cinnamon Sugar Apple Cake
  • Hello Pumpkin Season!
  • Make Your Own Milkshake Party!
  • Mama’s Pickles
  • S’more Cookies

Categories

  • About 2 Sisters 2 Cities (7)
  • Books (8)
  • Crafting & DIY (22)
  • Design & Decorating (15)
  • Gardening (5)
  • Giveaway (14)
  • Guest Bloggers (8)
  • K's post (46)
  • K's Recipes (191)
    • K's Desserts (75)
    • K's Entrees (23)
    • K's Sides (24)
  • M's post (72)
  • M's recipes (167)
    • M's Entrees (21)
    • M's Sides (14)
    • M's Desserts (30)
  • Organizing (7)
  • Party Ideas (49)
  • Uncategorized (1)
  • Vacation (12)
Stitch Fix

Archives

Blogroll

  • Annie's Eats
  • Bake at 350
  • Baked Bree
  • Boston Harbor Beacon
  • Confections of a Foodie Bride
  • Cook Like a Champion
  • Erin’s Food Files
  • Forever and a Recipe
  • Framed Cooks
  • Oh Happy Day
  • On Common Ground
  • Pennies on a Platter
  • Pink Parsley
  • Recipe Girl
  • Sally's Baking Addiction
  • Simply Scratch
  • The Curvy Carrot
  • The Pioneer Woman
  • Tidy Mom
  • Two Peas & Their Pod
  • What’s Gaby Cooking
  • Young House Love
Increase your website traffic with Attracta.com

grab a 2 sisters button!


Copyright © 2014 ~ 2 Sisters 2 Cities | Blog Design by Minx Design