2 Sisters 2 Cities

Image Map
  • About 2 Sisters 2 Cities
  • Recipe Index
  • Project Index
  • Contact Us
  • Like us on Facebook
  • Follow m on twitter
  • Follow k on twitter
  • Follow 2S2C on Pinterest
  • Follow 2S2C on G+
  • rss
  • e-mail 2S2C

Stovetop Oatmeal

Posted by Keelin Hollenbeck on January 6, 2014

Stovetop Oatmeal

Before Thanksgiving, my mom visited me for a few days while Matt was on a business trip.  I picked my mom up from the airport and surprised her by taking her to a cookbook signing for Giada’s new book Giada’s Feel Good Food.  The signing was at the Stanford Shopping Center in Palo Alto, which is beautiful, so that was a plus.  We waited in line for 2 hours and finally we got to meet Giada.

I have never been to something like this and of course, I was so starstruck I couldn’t think of anything to say when it was our turn. While I was smiling awkwardly, my mom kept talking to Giada about how much she loves her shows and books while Giada signed our books.  When we walked away, we had a really good laugh about how we reacted to seeing Giada!  We went to the restaurant next door and sat outside for a great dinner.  We even got to see Giada again when she left the book signing from our table at the restaurant.

Giada

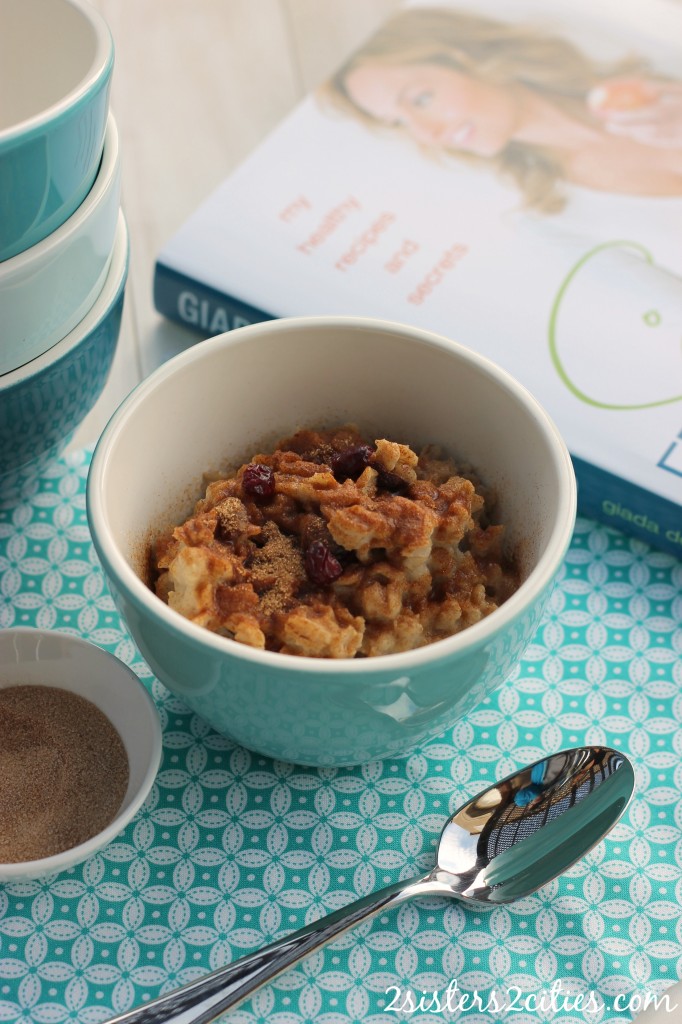
When we got home that night, we decided to make one of the oatmeal recipes in her book that I happened to have all the ingredients for.  We reheated the oatmeal for the next two mornings for breakfast and it was so delicious and filling.   During the whole month of December I made this oatmeal on Sunday night to have for breakfast for the whole week .  I put each serving of oatmeal in a lidded container and stored then in the refrigerator.  When I got to work, I would reheat it for 1 -1 1/2 minutes in the microwave.   I really enjoyed the oatmeal and found myself look forward to it.   This breakfast gave me the energy during the holiday season and stopped me from feeling sluggish.

Now that it is January and things are back to normal around here, this oatmeal is definitely going to be a breakfast staple.   I am back to Weight Watchers after last month’s cookies so this breakfast fits perfectly into my plan.

Print
Stovetop Oatmeal
 
Ingredients
  • 3½ cup almond milk
  • ⅛ tsp. kosher salt
  • 1 tsp. vanilla extract
  • 2 cups old fashioned oats
  • 2 tbsp. dried cranberries
  • 1 tbsp. brown sugar
  • ¼ tsp ground cinnamon
  • 2 tsp. granulated sugar
Instructions
  1. Add almond milk, kosher salt, and vanilla extract to a sauce pan and bring to a boil over medium heat. Once the milk begins to boil, add in oats and cook for 6-7 minutes. Cook an additional 1-2 minutes if you prefer a thicker oatmeal.
  2. Stir in dried cranberries and brown sugar. In a small bowl combine the ground cinnamon and sugar. Separate the oatmeal into four bowls and sprinkle each bowl with ¼th the cinnamon sugar mix.
  3. To make ahead- Separate cooked oatmeal into 4 lidded containers and sprinkle with cinnamon sugar. Store in the refrigerator until needed. To reheat oatmeal remove lid and microwave for about 1-1½ minutes. Stir and enjoy!
3.2.2199

Source- Adapted from Giada’s Feel Good Food (disclosure: this is an Amazon affiliate link)

sisterk (2)


Filed Under: K's Recipes Tagged With: breakfast, breakfast recipe, Feel Good Food, Giada, Healthy Living, oatmeal

Easy Pecan Sticky Buns

Posted by Keelin Hollenbeck on December 20, 2013

Easy Pecan Sticky Buns

Disclosure: This post is sponsored by the the National Frozen & Refrigerated Foods Association and The Mom It Forward Blogger Network.  All opinions are our own.

One of our favorite holiday traditions is enjoying warm sticky buns after opening presents on Christmas morning.  We are usually ravenous by the time we get to breakfast on that special day and these easy pecan sticky buns hit the spot every time.  This recipe is great because you can prepare it ahead of time and bake it right before serving.  This recipe calls for puff pastry (found in the freezer aisle) and unsalted butter (from the dairy aisle).  These easy pecan sticky buns just might become a Christmas tradition for your family too!

Quick Sticky Buns

While you are planning your holiday menu over the next week, don’t forget to shop the freezer and dairy aisle.  Both aisles offer such a great variety of foods that can be used for special holiday meals and treats. For more holiday recipe ideas, check out the Easy Home Meals Pinterest boards or the Easy Home Meals website, sponsored by the National Frozen & Refrigerated Foods Association.

Sticky Buns from Frozen Puff Pastry Dough

Save Print
Easy Pecan Sticky Buns
Prep time:  30 mins
Cook time:  30 mins
Total time:  1 hour
 
Ingredients
Sticky Buns
  • 12 tablespoons (1 and ½ sticks) unsalted butter, at room temperature
  • ⅓ cup light brown sugar, lightly packed
  • ¾ cup pecans
  • 1 package (17.3-ounces/ 2-sheets) frozen puff pastry, defrosted
Filling:
  • 2 tablespoons unsalted butter, melted and cooled
  • ⅔ cup light brown sugar, lightly packed
  • 3 teaspoons ground cinnamon
  • ½ cup raisins
Instructions
  1. Using the bowl of an electric mixer, cream together the 12 tablespoons butter and ⅓ cup brown sugar with the paddle attachment. Use a small ice cream scoop to place the mixture in each of the 12 muffin cups. Add the pecans evenly among the 12 muffin cups.
  2. Meanwhile, flour a surface and unfold 1 sheet of the puff pastry with the folds going left to right. Brush the entire sheet with the melted butter. Leaving a 1-inch border on the puff pastry, sprinkle each sheet with ⅓ cup of the brown sugar, 1 and ½ teaspoons of the cinnamon, and ¼ cup of the raisins. Starting with the end closest to you, roll the pastry up tightly around the filling, finishing the roll with the seam side down.
  3. Cut off ½-inch off the ends of the roll and discard. Slice the roll in 6 equal pieces. Place each cut bun (spiral side up) into a cup of a standard-sized muffin pan.
  4. Repeat with the second sheet of puff pastry to make 12 pecan sticky buns in total.
  5. Cover muffin pan with plastic wrap and refrigerate until serving day.
  6. On serving day: Preheat the oven to 400 degrees F. Place the muffin pan on a foil-lined baking sheet. Bake for 30 minutes, until the sticky buns are golden to dark brown on top and firm to the touch. Allow to cool for 5 minutes only and flip the buns onto the parchment paper (use a spoon to scoop out any remaining filling and pecans and pour onto the buns). Enjoy!
3.2.2199

Source: Adapted from The Barefoot Contessa

Holiday cheers!

k & m


Filed Under: K's Recipes, M's recipes Tagged With: breakfast recipe, christmas, christmas morning, holiday baking, holiday helper, pecan sticky buns, puff pastry, sponsored post

Baked Doughnuts

Posted by Keelin Hollenbeck on June 6, 2013

Homemade Baked Doughnuts (from 2 Sisters 2 Cities)

Let’s talk about doughnuts.  Do you love them or hate them?  I (like most foods out there) love them!  Certain foods in my life have memories associated with them.   When I was little, I remember going to church and there would sometimes be doughnuts and juice in the church basement after the mass.   This probably only happened a few times in reality, but I would always sit through the whole mass hoping they would have doughnuts at the end.   On days I didn’t want to go to mass, I would try to use doughnuts as a plea bargain with my parents.  “I’ll go, but can we go out for doughnuts after?”  This is probably the reason why we started going to 4 PM mass so I would shut up about doughnuts.  I can’t say that I have grown out of this now.  I still correlate Sunday mornings to doughnuts every week.  (However, I usually think about them in passing…I don’t actually have a doughnut every Sunday.)

For the majority of my life I thought the right way to spell doughnuts was “donuts”  because of the beloved Dunkin’ Donuts.  I love Dunkin’ Donuts, but the funny thing is that I rarely get donuts there.  I do love their coffee and I also buy their coffee grounds to make coffee at home.  There are no Dunkin Donuts where I live in California!  I have to smuggle Dunkin’ Donut’s ground coffee in every time I travel someplace that has one.   My friend from New York visited last week and asked me if there was anything I wanted her to bring.   I was like “YES!  Bring me Dunkin’ Donut’s Coffee!”

Powdered Sugar Doughnuts (from 2 Sisters 2 Cities)

The problem with doughnuts is that they have an “unhealthy” connotation to them because they are fried and filled with sugar.    Well, I have some good news on one of those problems‐ this recipe for doughnuts calls for them to be baked!  This morning I had my homemade baked donuts with a big mug of DD coffee.  Thanks B!

Cinnamon Baked Doughnuts (from 2 Sisters 2 Cities)

These doughnuts are from Ina Garten’s newest cookbook Barefoot Contessa Foolproof.   My boyfriend and I have sort of been on a Ina kick lately.  All the dinners and desserts and now breakfast we have made this weekend have been from Ina.  I recently bought two more of her cookbooks at Costco and have been obsessively looking through them for what I will make next.   I assure you that I will eventually be sharing with you what  I have made.

Baked Doughnuts with Powdered Sugar(from 2 Sisters 2 Cities)

I have made fried doughnuts at home before and they were really good.  I do however try to avoid frying things at home for several reasons: it seems like a waste of oil to me,  it creates a huge mess with splashed oil, and it makes my apartment stink like a fast food place for days.   I am also an extremely clumsy person so being near splashing hot oil is just not a good idea for me.  When I originally saw this recipe for baked doughnuts in Ina’s cookbook, I was so excited to try it.   The only caveat was that I needed to buy a donut pan.   I have this thing about buying pans that only serve one purpose.   Anyone that lives in an apartment understands this because space is limited.  I have the same conundrum with Madeleine pans too!   I want to make them but I don’t want to own the pan.    I finally saw a doughnut pan at Marshall’s the other week and it was priced pretty well so I decided to finally buy one.    The cool thing about this pan is basically you can take any muffin recipe and make baked doughnuts with it.  These doughnuts are easy to make and we even tried dipping half in cinnamon sugar and half in powdered sugar.  I love that these are even better the next day after the butter soaks in and the toppings dry, making them the perfect make‐the‐night ahead breakfast.

Print
Baked Doughnuts
 
Ingredients
  • 2 cups AP flour
  • 1½ cup sugar
  • 2 tsp. baking powder
  • 1 tsp. ground cinnamon
  • ½ tsp. ground nutmeg
  • ½ tsp. kosher salt
  • 1 large egg
  • 1¼ cup milk
  • 2 tbsp. unsalted butter, melted
  • 2 tsp. vanilla extract
For toppings
  • ½ cup butter (1 stick), melted
  • ½ cup granulated sugar mixed with ½ tsp. ground cinnamon
  • OR
  • 1 cup sifted confectioners’ sugar (powdered sugar)
Instructions
  1. Preheat oven to 350 degrees. Spray doughnut pan with non-stick cooking spray (I only have one 6-doughnut pan so I just had to make the doughnuts in batches)
  2. In a large bowl whisk together flour, sugar, baking powder, cinnamon, nutmeg, and salt. Then in a small bowl whisk together the egg, milk, melted butter and vanilla extract. Take the wet ingredients and add them to the dry ingredient bowl. Mix together until just combined.
  3. Spoon the batter into prepared donut pans filling about ¾ths the way.
  4. Bake for 15-17 minutes until doughnuts spring back when poked.
  5. Let doughnuts cool for 5 minutes.
  6. Prepare the cinnamon and sugar mixture or the confectioners’ sugar for the topping in a medium sized bowl. If you want both cinnamon sugar and powdered doughnuts half the ingredients and put in two different bowls
  7. Dip both sides of doughnuts in melted butter and then sugar (either cinnamon sugar and confectioners.)
3.2.1753

Source- Adapted from Ina Garten’s Barefoot Contessa Foolproof

Doughnut Breakfast (from 2 Sisters 2 Cities)
sisterk (2)


Filed Under: K's Recipes Tagged With: baked doughnuts, baked goods, breakfast, breakfast recipe, coffee, donuts, doughnut

Chocolate Peanut Butter Banana Muffins

Posted by Meaghan Barry on April 4, 2013

chocolate peanut butter banana muffins

Ready for some non-Easter recipes yet?  We’ve taken a brief hiatus this week after Easter to recuperate and to start getting into spring-mode!  We have been brainstorming a lot of new recipes ideas and can’t wait to share them.  In the meanwhile, I wanted to share the recipe for these chocolate peanut butter banana muffins that I made for the first time about six months ago and have made several times since.  T loves them and I really don’t mind eating them myself ;)

chocolate peanut butter muffins

The original recipe is from Jessica Seinfeld’s cookbook Deceptively Delicious.  In her cookbook, she incorporates a lot of pureed fruits and vegetables into recipes so that kids (especially picky eaters) get more nutrients into their diet.  The original recipe calls for a 1/2 cup of pureed carrots or cauliflower, but I haven’t yet tried making them with this.  The recipe I have tried does incorporate a bananas, peanut butter, and applesauce- they are amazingly moist considering they only have one egg white and no oil or butter in them.

Print
Chocolate Peanut Butter Banana Muffins
Prep time:  10 mins
Cook time:  20 mins
Total time:  30 mins
 
Ingredients
  • 1 cup firmly packed brown sugar, divided
  • ½ cup creamy peanut butter
  • ½ cup unsweetened applesauce
  • 1 banana, mashed
  • 1 egg white
  • 1 cup all purpose flour (alternatively, you could use ½ cup whole wheat flour and ½ cup all purpose flour)
  • 1 teaspoon baking powder
  • 1 teaspoon baking soda
  • ½ teaspoon salt
  • ⅓ cup cocoa powder
  • ¼ cup chocolate chips
Instructions
  1. Preheat oven to 350 degrees Fahrenheit. Meanwhile, line a muffin tin with paper baking cups.
  2. In a large mixing bowl, mix ½ cup of the brown sugar with the peanut butter, applesauce, mashed banana and egg white. In a separate mixing bowl, combine the flour(s), baking powder, baking soda, salt, and cocoa powder. Add the mixed dry ingredients with the peanut butter mixture and stir to combine. Add the chocolate chips until fully mixed. Add the remaining ½ of brown sugar and stir once or twice.
  3. Use a spoon to pour the batter in 12 muffin cups (the batter may be a bit thicker than a regular muffin recipe.) Bake for 18-20 minutes or until tops of the muffins are set and a toothpick comes out clean.
  4. Remove from oven and allow the muffins to cool in the muffin tin for a few minutes. Remove muffins from tin and cool on a wire rack.
3.2.1682

Source: Adapted from Deceptively Delicious and Once a Month Mom

sister m signature


Filed Under: M's recipes Tagged With: applesauce, bananas, breakfast, breakfast recipe, chocolate, kid-friendly recipes, muffin recipe, muffins, peanut butter, snack recipes, toddler-friendly recipes

Diet Cran-Strawberry Spinach Smoothie

Posted by Meaghan Barry on March 4, 2013

Diet Cran-Strawberry Spinach Smoothie

I was recently asked by Ocean Spray to try their Diet Cranberry Juice Drink in a smoothie recipe.  I had been wanting to try a smoothie that involved spinach for the past few months and I thought cranberries and spinach sounded like the perfect combination.  I came up with a diet cran-strawberry spinach smoothie recipe as a result.  By swapping out a full calorie juice for a diet juice, such as Diet Ocean Spray Cranberry Juice, you can cut calories and still enjoy a delicious, nutrient-packed smoothie.  This smoothie would definitely be a great way to kick-start your day, especially if you are calorie conscious.

Ocean Spray Diet Cranberry Juice

Since Diet Ocean Spray Cranberry Juice only has 5 calories per serving, you can focus your calories in this smoothie on really nutritious ingredients.  I love to use Greek yogurt in smoothie recipes as it packs in so much protein.  I also used strawberries and half of a banana to add more nutrients and flavor.  I used about 1/4 of a cup of spinach leaves in this particular smoothie, but I’ve heard that you can add up to 1 cup for a smoothie.  Since it was my first time trying it, I started off with a small amount of spinach and I hope to build up to more as I get used to the taste.  You could also try adding a little bit of flax seed or chia seeds to add in some omega-3 fatty acids.

Ocean Spray Diet Cranberry Juice Ingredients

While I thought the Diet Ocean Spray Cranberry Juice was great in a smoothie, I also enjoyed it mixed with a glass of sparkling water.  Ocean Spray also sent me a recipe card for an awesome sounding 50-calorie Cosmo which I definitely look forward to trying this summer post-pregnancy.  For other Diet Cranberry Juice recipes, check out the Ocean spray website.

Diet Cran-Strawberry Spinach Smoothie

Print
Diet Cran-Strawberry Spinach Smoothie
Prep time:  5 mins
Total time:  5 mins
 
Ingredients
  • ¾ cup Diet Ocean Spray Cranberry Juice Drink
  • ¾ cup fresh or frozen strawberries (if you use fresh strawberries, be sure to add about ¼ cup of ice as well)
  • ¾ cup low-fat, plain Greek yogurt
  • ½ banana
  • ¼ cup baby spinach or regular spinach leaves (you can add up to 1 cup of spinach, but I recommend starting off with a small amount and working up to more if this is your first green smoothie)
  • 1 teaspoon vanilla extract
Instructions
  1. Combine all ingredients in a blender. Blend for a few seconds on high speed (you may need to stop the blender and scrape down the sides so that all ingredients get incorporated.) Continue to blend until everything is thoroughly combined. Serve in a large glass ( and preferably with a fun straw!)
3.2.1682

 Source: Adapted from Ocean Spray


Please note: I have partnered with Ocean Spray through DailyBuzz to help promote their new Ocean Spray Diet product. I have been compensated for my time commitment to work with this product, however my opinions are entirely my own and I have not been paid to publish positive comments.

sister m signature


Filed Under: M's recipes Tagged With: bananas, breakfast recipe, cranberry juice, diet recipe, diet smoothie, ocean spray, smoothie, smoothie recipe, sponsored post, strawberries

Hawaiian Papaya Smoothie

Posted by 2 Sisters 2 Cities on January 6, 2013

papaya smoothie

While we were celebrating Christmas and New Year’s, we couldn’t help but reflect back on our trip to Hawaii a year ago.  I made a papaya smoothies almost everyday while we were there and I wanted to make this a new holiday tradition to remember our trip by.  I didn’t get a chance to make the papaya smoothie during our busy holiday break, but I was finally able to procure a Hawaiian papaya from a specialty food store to make a papaya smoothie again this weekend.

While we were in Hawaii, we were encouraged to try papayas cut in half, seeded, and doused with plenty of local lime juice.  The local produce was more than plentiful out there- I love this picture of all the produce that we had picked up at local markets or were picked from the fruit trees on the property.

hawaiian produce and flowers

If you decide to try this papaya smoothie, feel free to adjust or substitute the ingredients out.  While we were in Hawaii, I had guava and pineapple juice on hand so I added a splash of each to the smoothie mixture.

papaya smoothie recipe

Print
Hawaiian Papaya Smoothie
Author: 2 Sisters 2 Cities
Recipe type: smoothie
Cuisine: Hawaiian
Prep time:  5 mins
Total time:  5 mins
Serves: 2
 
Ingredients
  • 1 papaya (peeled, seeded, and roughly chopped)
  • 1 lime (juiced)
  • 1 cup low-fat, plain Greek yogurt
  • 1 tablespoon blue agave or honey
  • ½ cup skim milk
  • ½ banana
  • ¼ cup orange, pineapple, or guava jioce
  • handful of ice
Instructions
  1. Place all ingredients in blender and blend until smooth. Taste and adjust ingredients as needed (ex: add more ice, juice, milk, etc.) Serve right away.
3.1.09

It was nice to have a taste of Hawaii on a cold January morning and reminisce about our trip from the prior year.  What are some of your favorite foods to eats this January now that the holidays are over and we settle into winter-mode?

sister m signature


Filed Under: M's recipes Tagged With: breakfast, breakfast recipe, Greek yogurt, hawaii, hawaiian papaya, papaya, papaya smoothie, smoothie, smoothie recipe

Veggie Cream Cheese

Posted by 2 Sisters 2 Cities on November 29, 2012

Veggie Cream Cheese

When I first thought of this post for veggie cream cheese, I didn’t realize K was going to be writing about making homemade bagels this week.  Sometimes things just work out like that!  I got this recipe for veggie cream cheese from my husband’s Aunt N.  It’s very easy to whip up a batch and serve it to company as an easy, but tasty breakfast.  I served it to my family for the breakfast on the Friday after Thanksgiving.

You don’t need to follow this recipe exactly- just add more or less of the ingredients you enjoy.  I usually make it with carrots, celery, and green onions, but radishes, peppers, or fresh herbs would all work nicely.  I also tend to make it with a mix of regular cream cheese and light cream cheese or Neufchatel cheese.  This cuts some of the fat and calories without a huge reduction to flavor.

Print
Veggie Cream Cheese
Author: 2 Sisters 2 Cities
Recipe type: Breakfast
Prep time:  10 mins
Total time:  10 mins
Serves: 12
 
Ingredients
  • 8 oz. regular cream cheese, at room temperature
  • 8 oz. light or Neufchatel cream cheese, at room temperature
  • 3 tablespoons green onions, finely chopped
  • 3 tablespoons carrots, finely chopped (rainbow carrots add some fun color, but regular carrots work as well)
  • 3 tablespoons celery, finely chopped
  • kosher salt, to taste
  • ground black pepper, to taste
Instructions
  1. Place all ingredients in the bowl of an electric mixer. Mix on low speed with a paddle attachment until blended. Serve with toasted bagels.
3.1.09

Source: Adapted from Barefoot Contessa

What’s your favorite way to enjoy a bagel?

sister m signature


Filed Under: M's recipes Tagged With: bagels, breakfast, breakfast recipe, cream cheese, homemade cream cheese, veggie cream cheese

Nutella Banana Pizzas & the Nutella Breakfast Tour

Posted by 2 Sisters 2 Cities on September 14, 2012

I tried Nutella for the first time earlier this year (when my mom made these awesome Nutella cookies) and I have been stocking our cupboards with it ever since. My husband lived in Europe when he was a small child and remembered having Nutella all the time. His mother must have told him it at some point that it was a special delicacy because until just recently, he thought Nutella cost over $50 a jar. Fortunately for us, it’s much more affordable than this and is something we can enjoy everyday.

We have started incorporating Nutella into our breakfast routine recently as well. My husband loves to have it spread on graham crackers with some fruit on top and I like to make it into a smoothie. I’ve been experimenting with different ingredients and ratios, and I think I have finally found the best combination. I’ve also tried making these mini Nutella Banana Pizzas for breakfast.

Print
Nutella Banana Pizzas
Author: m
Recipe type: Breakfast
Serves: 2
 
Ingredients
  • 2 6-inch corn or flour tortillas
  • 1 banana, sliced vertically
  • 4 tablespoons Nutella
Instructions
  1. Spread 2 tablespoons of Nutella onto each tortilla. Place sliced bananas on top and cut each tortilla into mini pizza slices using a pizza slicer.
#version#

Bostonians- be sure to visit the Nutella Breakfast Tour from September 21st through 27th. While visiting the Nutella® Breakfast Tour, join the City Challenge for a chance to have Boston win a visit from the Nutella Truck filled with 5,000 jars of free Nutella®. RSVP to the event through the widget in the upper right-hand column or follow Nutella on Facebook for more information:

Or tweet your favorite way to enjoy Nutella in the morning using the hashtag #nutellaboston. For official rules, visit nutellusa.com/officialrules.

If you don’t live in the Boston area, check out below when the Nutella Breakfast Tour will be in your city!

Boston 9/21-9/27
New York 9/29-10/5
Philladelphia 10/8-10/13
Washington DC 10/16-10/20
Atlanta 10/24-10/27
Orlando 10/30-11/3
New Orleans 11/7-11/11
Dallas 11/15-11/19
Phoenix 11/24-11/27
San Diego 11/30-12/2
Los Angeles 12/5-12/8
San Francisco 12/11-12/15

This blog post is part of a paid SocialMoms and Nutella blogging program. The opinions and ideas expressed here are my own. To read more posts on this topic, click here.


Filed Under: M's recipes Tagged With: breakfast, breakfast ideas, breakfast recipe, nutella, nutella banana pizzas, nutella breakfast tour, nutella for breakfast, sponsored post

Freezer Sausage, Egg, & Cheese Breakfast Sandwiches

Posted by 2 Sisters 2 Cities on May 18, 2012

A few weeks ago when I was visiting my parents, I tried some egg and sausage sandwiches that my mom had prepared ahead of time and froze.  They are just glorified Egg McMuffins, but I was very surprised at how great they tasted after being frozen and then reheated in the microwave.  I made a batch a few weeks ago and we went through them so quickly that we are already on our second batch.  They are a great grab-n-go breakfast when you are short on time.

This recipe would also be such an easy way to serve a crowd, especially if you wanted something ready completely ahead of time.  I’m definitely bookmarking this recipe to make ahead and pack in a cooler for future trips – all you need is a small freezer and microwave to prepare these egg sandwiches once you get to your ski condo, beach house, summer-getaway cabin, etc.

Freezer Sausage, Egg, & Cheese Breakfast Sandwiches Recipe:

5.0 from 2 reviews
Print
Freezer Sausage, Egg, & Cheese Breakfast Sandwiches
Author: m
Recipe type: Breakfast
Prep time:  10 mins
Cook time:  15 mins
Total time:  25 mins
Serves: 12
 
Ingredients
  • 12 eggs
  • 12 English muffins (I used whole-wheat)
  • 12 breakfast sausage patties
  • 3 cups shredded cheddar cheese
  • salt and pepper to taste
  • cooking spray
Instructions
  1. Preheat broiler on oven. Split the English muffins and place on a large baking sheet. Toast both sides under broiler (1-2 minutes). Set English muffins aside. Turn off broiler and preheat oven to 400 degrees.
  2. Cook sausage patties in a frying pan until completely cooked and nicely browned. Set sausage patties aside.
  3. Crack all the eggs into a large measuring cup, add salt and pepper (to taste), and whisk thoroughly. Spray a 12-cup muffin tin with cooking spray and pour the egg mixture evenly into the 12 cups. Bake for 10-12 minutes, or until the eggs are set.
  4. Remove eggs from oven and top each cup evenly with the shredded cheese. Return to oven until cheese is just melted. Remove from oven.
  5. Assemble the sandwiches in the following order: 1 English muffin half, one egg and cheese round, one sausage patty, 1 English muffin half.
  6. Once the sandwiches are cool, wrap each one individually in plastic wrap and place each wrapped sandwich into a resealable freezer bag.
  7. To reheat- Remove plastic wrap and wrap egg sandwich in a paper towel. Microwave for 1 and ½ to 2 minutes (depending on the strength of your microwave.)
2.2.6

Source: Adapted from Foodie with Family


Filed Under: M's recipes Tagged With: beach house breakfast, breakfast recipe, cabin breakfast, easy to prepare meals, egg sandwiches, freezer breakfast meals, freezer egg sandwiches, freezer meals, grab-n-go breakfast, group vacation breakfast, kitchenette breakfast, sausage egg and cheese sandwiches, ski condo breakfast, vacation breakfast

Blueberry Muffins

Posted by 2 Sisters 2 Cities on May 8, 2012

As you can tell from my last two posts,  I love muffins.  They are one of those things that are so easy to put together and so good right out of the oven.  Whenever I see blueberries for less than 3 dollars, I have the urge to make either blueberry muffins or blueberry pancakes.  It was a close call this time but I ended up making buttermilk pancakes and then blueberry muffins the next day.  I happily sat in my new chaise lounge I bought on impulse at IKEA and drank my morning coffee with a fresh hot blueberry muffin, while reading through the blogs I follow.  Now that is what I call my kind of morning.

Blueberry Muffins

Print
Blueberry Muffins
Author: K
Recipe type: Breakfast
Prep time:  10 mins
Cook time:  20 mins
Total time:  30 mins
Serves: 12
 
Ingredients
  • 1½ cup flour
  • ½ cup white sugar
  • ¼ cup brown sugar
  • 2 teaspoons baking powder
  • ⅓ cup vegetable oil
  • 1 egg
  • ⅓ cup of milk
  • 1 6 oz package of fresh blueberries
  • ¼ cup white sugar
  • ¼ cup brown sugar
  • ⅓ cup AP flour
  • ¼ cup(1/2 stick) of butter, cold and cut into small pieces
  • 1½ teaspoons ground cinnamon
Instructions
  1. Preheat oven to 350 degrees.
  2. Whisk together flour, sugars, salt and baking powder in a large bowl.
  3. In a separate medium bowl mix oil, egg, and milk.
  4. Rinse blueberries and make sure there are no stems. Dry berries on a paper towel and place into dry mixture. Stir gently to not crush the blueberries.
  5. Next gently combine the wet ingredients into the dry until just incorporated. Folding the batter helps to make sure that you are not crushing the berries.
  6. To make topping-  Combine the last 5 ingredients from ¼ cup sugar to the cinnamon in a small bowl. Mix together with hands until all the mixture clumps together is pea size pieces.
  7. Line a muffin tin with paper liners.
  8. With a ¼ cup spoon batter into tin until about ¾th filled. Top with crumble topping, pressing slightly into batter. Use up all the topping on the muffins.
  9. Place in the oven and cook for 18-20 minutes until golden brown.
2.2.6

Source– Adapted from Not without Salt

Blueberry Muffins2

Related Posts Plugin for WordPress, Blogger...


Filed Under: K's Recipes Tagged With: blueberries, blueberry muffin recipe, blueberry muffins, blueberry recipe, breakfast, breakfast recipe

  • 1
  • 2
  • Next Page »

Recent Posts

  • Easy Holiday Office Party Tips
  • 5 Steps to an Easy Football Party
  • Gingerbread Biscotti
  • Holiday Coffee Bar and Thanksgiving Recipes
  • Soft Sugar Pumpkin Cookies
  • Cinnamon Sugar Apple Cake
  • Hello Pumpkin Season!
  • Make Your Own Milkshake Party!
  • Mama’s Pickles
  • S’more Cookies

Categories

  • About 2 Sisters 2 Cities (7)
  • Books (8)
  • Crafting & DIY (22)
  • Design & Decorating (15)
  • Gardening (5)
  • Giveaway (14)
  • Guest Bloggers (8)
  • K's post (46)
  • K's Recipes (191)
    • K's Desserts (75)
    • K's Entrees (23)
    • K's Sides (24)
  • M's post (72)
  • M's recipes (167)
    • M's Entrees (21)
    • M's Sides (14)
    • M's Desserts (30)
  • Organizing (7)
  • Party Ideas (49)
  • Uncategorized (1)
  • Vacation (12)
Stitch Fix

Archives

Blogroll

  • Annie's Eats
  • Bake at 350
  • Baked Bree
  • Boston Harbor Beacon
  • Confections of a Foodie Bride
  • Cook Like a Champion
  • Erin’s Food Files
  • Forever and a Recipe
  • Framed Cooks
  • Oh Happy Day
  • On Common Ground
  • Pennies on a Platter
  • Pink Parsley
  • Recipe Girl
  • Sally's Baking Addiction
  • Simply Scratch
  • The Curvy Carrot
  • The Pioneer Woman
  • Tidy Mom
  • Two Peas & Their Pod
  • What’s Gaby Cooking
  • Young House Love
Increase your website traffic with Attracta.com

grab a 2 sisters button!


Copyright © 2014 ~ 2 Sisters 2 Cities | Blog Design by Minx Design